 |
| ||||||||||||||||||||||||||||||||||||||||||||||||||||||||||||||||||||||||||||||||||||||||||||||||||||||||||||||||||||||||||||||||||||||||||||||||||||||||||||||||||||||||||||||||||||||||||||||
|
| ||||||||||||||||||||||||||||||||||||||||||||||||||||||||||||||||||||||||||||||||||||||||||||||||||||||||||||||||||||||||
Message
Agroforestry, the land management system of incorporating crop production with tree and/or livestock production, evolved to become one of the most widely promoted tools for sustaining development in the uplands To supplement the materials used by upland development extension workers in promoting agroforestry, a group of specialists, technicians and farmers from 11 government and nongovemment organizations met at the invitation of the International Institute of Rural Reconstruction in Silang, Cavite in November 1989 to develop the Agroforestry Technology Information Kit (ATIK). In November 1992, some of the specialists, together with some farmers and an additional number of specialists and technicians, met again at IIRR to revise the ATIK.
The updated kit is handy, easy-to-understand and full of illustrations. It widely uses indigenous technologies. With this kit, it is hoped that extension workers and upland dwellers develop a better understanding and appreciation of agroforestry. The success of agroforestry as a tool for sustaining upland development, however, will depend on how this tool is introduced and implemented. Sustainable agroforestry systems can only be attained if upland dwellers are involved in the planning and establishment of such systems.
I commend all those involved in the production of this useful kit.
Angel C. Alcala Secretary Department of Environment and Natural Resources
|
| ||||||||||||||||||||||||||||||||||||||||||||||||||||||||||||||||||||||||||||||||||||||||||||||||||||||||||||||||||||||||
Workshop to revise
The agroforestry technology
Information kit (ATIK)
The first workshop to develop the Agroforestry Technology Information Kit-- now more popularly known as ATIK -- was conducted by the International Institute of Rural Reconstruction (IIRR) in its Silang Campus, Cavite, Philippines, on November 413, 1989. There were 39 participants to this workshop who came from 11 government and nongovernment organizations (GOs and NGOs).
ATIK was produced primarily for use by DENR technicians who have been implementing the Social Forestry Program nationwide. DENR conducted a nationwide survey among its staff who were involved in the implementation of its Integrated Social Forestry Program and also primary users of ATIK. A questionnaire was formulated, focused on the actual experiences of these technicians in using the ATIK and on specific revisions they proposed to rrake on the kit. A Planning Committee was created to study the technicians' proposed modifications to the ATIK, as well as to plan for the workshop to revise it. The committee was composed of For. Domingo Bacalla of DENR, For. Moises Butic of DENR, Ms. Rowena Cabahug of UPLB College of Forestry, Dr. Romulo del Castillo of UPLB College of Forestry, Ms. Remedios Evangelista of DENR, Dr. Julian Gonsalves of IIRR, Mr. Scott Killough of IIRR and Mr. Jaime Ronquillo of IIRR.
The workshop to revise the ATIK took place also in IlRR's Campus in Silang, Cavite, on November 16-21, 1992, with 45 participants representing 13 agencies. These agencies included: the Department of Environment and Natural Resources; Farm and Resource Management Institute; Southern Mindanao Agricultural Programmer Mag-uugmad Foundation, Inc.; University of the Philippines at Los Banos; Upland Development Program/Sungay Upland Farmers' Golden Harvest Association; Soil and Water Conservation Foundation; Quirino Livelihood Concept and Development Resource Center, Inc.; Winrock International; Mindanao Baptist Rural Life Center; Visayas State College of Agriculture; International Rice Research Institute; and, IIRR.
In the workshop, the same process for materials production was followed. Old sheets and first drafts of new topics were presented by the authors in plenary sessions. These materials then underwent continuous improvements through the critiquing of the other workshop participants. Communication experts (writers, editors, layout and design artists) were on hand to assist the authors in revising/preparing the texts, illustrations and designs of their papers. Before the materials were prepared in a camera-ready format, they were submitted to their authors for final review and revision to ensure that the additional corrections were incorporated.
The major revisions of ATIK are the following:
A. Format
1. From a set of loose-leaf single sheets in folder/binder to six, pocket-size (4" × ?") booklets, individually classified and bound according to major topics2. Using simple, white, ordinary bookpaper, rather than the thicker, colored and more expensive bristol board
3. Using a thick binder to hold the six booklets, instead of an individual folder for each kit.
B. Content
1. Some old topics which were found not relevant/useful from the survey were dropped from the kit.2. Other topics were revised, focusing on the specific needs of the DENR technicians.
3. Additional, new topics were included, again to respond to the expressed needs of the technicians.
4. Many old topics - which were adapted by farmers - remained as they were.
The revised ATIK -- with its new format and content is expected to further facilitate the work of DENR's1,200 technicians in its Integrated Social Forestry (ISF) Program nationwide. Ultimately, the kit will help enable DENR's ISF's program to give the Filipino uplanders access to forest lands for a tenure of 25 years or more.
WORKSHOP TO REVISE THE AGROFORESTRY TECHNOLOGY INFORMATION KlT
(ATlK)
November 16-21, 1992
IIRR, Silang,
Cavite
|
| ||||||||||||||||||||||||||||||||||||||||||||||||||||||||||||||||||||||||||||||||||||||||||||||||||||||||||||||||||||||||
List of participants
Authors/Resource Persons
1. Ms. Nita Abena
Veterinarian, Appropriate Technology
Unit
Intemational Institute of Rural
Reconstruction (IIRR)
Silang 4118,
Cavite
2. Ms. Emma Aguilar
Community Development
Officer
DENR-CENRO, Barotac Nuevo, lloilo
3. Mr. Pio B. Apostol
CDA/Project Leader Patlabawon
ISF
Upland Farmers Association, Inc.
Patlabawon, Patnongon, Antique
c/o DENR
Region 6, lloilo City
4. Mr. Laurito Arizala Crops Specialist IIRR
Silang 4118,
Cavite
5. Dr. Edwin Balbarino Field Coordinator,
Matalom Upland
Dev't.
Project Farm and Resource Management Institute
(FARMI) VISCA,
Baybay, Leyte
6. Mr. Carlos S. Basilio
Agricultural Administration
Specialist IIRR,
Silang 4118, Cavite
7. Mr. Cristituto G. Bual
Assistant Section
Chief,
Extension Services Division Southern Mindanao
Agricultural
Programme (SMAP) Bago Oshiro, Davao City
8. Mr. Agustin Calanao
Farmer, NISFFAI
Nazuni Dingle,
lloilo
9. Mr. Jose D. Cansancio
CDA llfiorest Community
Organizer
DENR-Upland Development Program Region Xl-4A,
Digos, Davao del
Sur
10. Mr. LapuAapu Cema President,
Mag-uugmad Foundation, Inc.
(MFI)
3-2 Rodriguez Apartment, Pelaez St.,
Cebu City Tel. No. 220197
11. Dr. Roberto E. Coronel
Associate Professor,
Institute
of Plant Breeding University of the Philippines
at Los Ba�os College, Laguna
12. Mr. Ricardo El. S. Dayrit
Specialist, Livestock
Production IIRR,
Silang 4118, Cavite
13. Ms. Maxima Dandasan
Farmer UDP/Sungay Upland Farmers
Golden Harvest Assn.
Sungay, Alubijid, Misamis Oriental
14. Mr. Terrence E. Davis
Extension and Training Specialist
Southern
Mindanao Agricultural Program (SMAP) Department of
Agriculture
Daveo City
Tel. No. 82-79767; Fax No. 82-2766
15. Dr. Reynaldo dela Cruz
Professor, Department of Forest
Biological Sciences
College of Forestry, UPLB, College, Laguna
Tel. No.
94-2725J94 2773; Fax No. 94-2721
16. Dr. Zosimo dela Rosa
Associate Professor,
FARMI-VISCA
Farmers' Village, VISCA, Baybay, Leyte
Tel. No. 521-2027
17. Ms. Ines Fehman
Volunteer, Appropriate Technology
Unit
International Institute of Rural Reconstnuction (IIRR)
Silang 4118,
Csvite
18. Dr. Pam Femandez
Agronomy Department
University of the
Philippines at Los Batlos
College, Laguna
19. Mr. Rutino C. Garcia
Research Associate
Departnent of
Forest Biological Science
UPLB, College, Laguna
20. Mr. Bill Granert
Managing Director
Sell and Water
Conservation Foundation
P.O. Box 309, Cebu City
Tel. No. 92312/5528; Fax
No. 922312
21. For. Nick Iscala
Social Forestry Department
Department
of Environment and Natural Resources (DENR)
Vsayas Awl, Dilirnan, Quezon City
22. Ms. Aida B. Lapis
Supervising Science Research
Specialist
Ecosystem Research and Development
Bureau (ERDB)
College,
Laguna
Tel. No. 2269 loc. 267; Fax No. 6394-3628
23. Dr. Rodel Lasco
Assistant Professor UPLB Agroforestry
Program College of Forestry UPLB
College, Laguna Tel. No. 2599/3657/2657 Fax
No. (94) 32-06
24. Dr. Ulysses Lustria
Director of Extension and Assistant
Professor
University of the Philippines at Los Bahos College,
Laguna Tel.
No. 3358
25. Mr. Roger Magbanua Intennational
Rice Research Institute
(IRRI) P.O. Box 933, Manila
26. Mr. Dominador A. Martinez
Project Director Quirino
Livelihood
Concept and Development Resource Center,
Inc. Aglipay, Quirino
3403 Tel. No. 076-692-5058
27. Ms. Ophelia Q. Nate
Community Development Officer
11
DENR-PENRO
Suqui, Caiapan, Oriental Mindoro
28. Mr. Armando M. Palijon
Assistant Professor
UPLB
College of Forestry
College, Laguna
Tel. No. 2599
29. Dr. Ben Parker
Institute of Animal Science
University
of the Philippines at Los Ba�os College, Laguna
30. Mr. Raquelito M. Pastores
Assistant
Director/Agroforestry
Specialist IIRR, Silang 4118, Cavite
31. Dr. Agustin Pihol
Supervising Science Research Specialist
ERDB,
College, Laguna Tel. No. 2229
32. Mr. Glorioso Quihones
Farmer Liquida, Caba, La Union
33. Ms. Rosalinda S. Reaviles
Science Research Specialist II
ERDB,
College, Laguna Tel. No. 2229/2269/2481
34. Mr. Gregorio D. Reyes
Chief, Science Research Specialist
and Division Chief
Upland Farms Ecosystem Research Division ERDB,
College,
Laguna Tel. No. 3481/2269/2229 loc. 230
35. Mr. NestorRodemo
Appropriate Technology Unit IIRR, Silang
4118, Cavite
36. Mr. Romeo San Buenaventura
Agroforestry
Technician
IIRR, Silang 4118, Cavite
37. Seed Science and Technology
Division Staff Department of
Agronomy
University of the Philippines at Los Ba�os College, Laguna
38. Ms. Carol Stoney
Agroforester, Winrock
International
c/o ARMP, P.O. Box 290, Bogor 16001, Indonesia
Tel. No. 62
(251) 323-325
Fax No. 62 (251) 328489/325-251
39. Mr. Henrylito D. Tacio
Staff Writer Mindanao Baptist
Rural Life Center (MBRLC)
Kinuskusan, Bansalan, Davao del Sur
40. Dr. Frederico Villamayor
Professor PRCRTC, VISCA
Baybay,
Leyte Tel. No. 521-2027 (Pasay Office)
Steering Committee
41. For. Domingo Bacalla
Chief, Social Forestry Division
DENR,
Visayas Ave., Diliman, a c.
42. For. Moises Butic
Social Forestry Division
DENR,
Visayas Ave., Diliman, Q.C.
43. Ms. Rowena Cabahug
Research Associate
UPLB
Agroforestry Program College of Forestry,
UPLB, College, Laguna Te.
No. 2657/3657
44. Dr. Romulo del Castilo
Director, UPLB
Agroforestry
Program College of Forestry UPLB, College, Laguna
45. Ms. Remedios S. Evangelista Sodal
Forestry Division DENR,
Visayas Ave., Diliman, Q.C.
46. Dr. Julian Gonsalves
Director Appropriate
Technology
Unit/Communication Department IIRR,
Silang 4118, Cavite
47. Mr. Scott Killough Deputy Director Appropriate Technology Unit IIRR, Silang 4118, Cavite
48. Prof. Nestor Lawas Agronomy Department UPLB, College, Laguna
49. Mr. Jaime P. Ronquillo
Assistant
Director
Communication Department
IIRR, Silang 4118, Cavite
Artists
50. Mr. Albert Ba�ez
UGSAD Editorial and Visual Arts
Association, Inc.
Lincoln Bend, Parkwood Greens, Pasig, M.M.
51. Mr. Boy Belardo
IIRR, Silang 4118, Cavite
52. Mr. Ric Cantada ilRR, Silang 4118, Cavite
53. Mr. Henry Cruz
54. Mr. Mitchell Doren
UGSAD Editorial and Visual Arts
Association, Inc.
Lincoln Bend, Parkwood Greens
Maybunga, Pasig, Metro
Manila
55. Mr. Bemabe Remoquillo
Institute of Development
Communication
UPLB, College, Laguna
Editors
56. Mrs. Lyn C. Doren
IIRR, Silang, Cavite
57. Ms. Carmenia May Magno
IIRR, Silang,
Cavite
Administrative Support Staff
58. Lhai Kasala
59. Jel Montoya
60. Gigi Naval
61. Angie Poblete
62. Ariel Madlangsakay
63. Secretarial Support Services
Design and layout by Carmenia May Magno
|
| ||||||||||||||||||||||||||||||||||||||||||||||||||||||||||||||||||||||||||||||||||||||||||||||||||||||||||||||||||||||||
Current program thrusts in Upland development
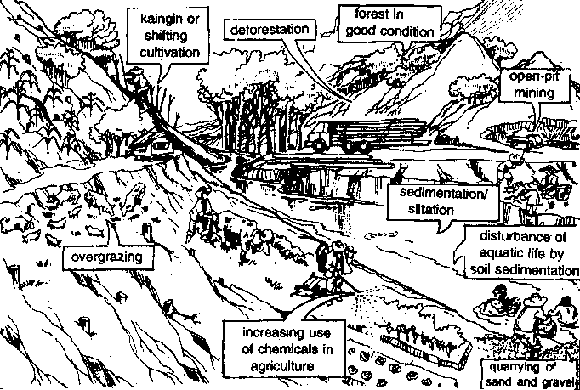
Human greed, abuse and misuse of the country's forest resources have resulted in the sad state of our uplands today. Resource depletion, environmental degradation, inequitable access to resources, tenurial issues, upland poverty and the continuous influx of lowland migrants into the uplands are among the current issues in natural resources management.
In recent decades, the Philippines witnessed an unprecedented commercial exploitation of the timber resources leading to an annual rate of deforestation reported to have reached an average of 119,000 hectares during the declining years of the timber boom between 1969 to 1987. From a leading exporter of precious "Philippine Mahogany", the Philippines has become a timber deficit country where the cost of a board foot of lumber is beyond the means of an average wage earner. The disappearance of forests has resulted in the loss of jobs and livelihood in neighboring communities; destructive floods and drought during wet and dry seasons, respectively; and, landslide and siltation of rivers and dams. Other consequences of deforestation have become common occurrences in many parts of the country.
Through the years, landlessness and unemployment have driven hundreds of thousands of poor families in the lowlands to migrate and eke out a living in upland areas where they have become squatters by operation of law. In many cases, these have resulted in the total destruction of remaining forest vegetation in the area. The land has become marginally productive as the top soil continues to be lost through erosion brought about by improper agricultural practices. The result is poverty and a degraded upland environment affecting not only the people who subsist in these areas, but even the poor farmenrs in the lowlands who likewise suffer from the inevitable consequences of forest destruction. Latest estimates show that as much as 8.25 million hectares are now severely eroded.
In view of these problems, the government has in recent years formulated programs directed at arresting resource depletion and environmental degradation while searching for solutions to the issues of secured access to land, poverty alleviation and increased sustainable productivity. Among the major programs being implemented by the Department of Environment and Natural Resources are the Integrated Social Forestry Program (ISFP) in noncritical areas of the public domain that are under various forms of cultivation; the National Forestation Program (NFP) in degraded areas and in residual stands that are inadequately stocked; the Forest Land Management Agreement (FLMA) in newly reforested areas under the NFP that need to be maintained and cared for; and, the Community Forestry Program (CFP) in residual forest lands occupied by farming families.
1. INTEGRATED SOCIAL FORESTRY PROGRAM (ISFP)
Initiated about a decade ago, the ISFP draws strength from the DENR Upland Development Program (UDP) started by the Bureau of Forest Development in 1980 which was aimed at distilling lessons and developing methodologies for participatory management of the uplands. The ISFP incorporates the best features of three people-oriented forestry programs implemented in the 1970's, i.e., Forest Occupancy Management, Communal Tree Farming and Family Approach to Reforestation. The major features include granting longterm tenurial arrangements to qualified applicants, technical and modest material assistance and institution building.aimed at developing capability for communitybased resource management.
ISFP addresses the twin problems of Rural poverty and ecological stability in occupied forest lands. Through ISFP, forest land occupants are provided secure access to land as well as technical and material aid to make the land productive without depleting R. Secure land tenure comes through either the Certificate of Stewardship Contracts (CSCs) for individuals, or the Community Forest Stewardship Agreements (CFSAs) for community organizations. In both cases, farm families are granted renewable 25-year leases on the public land which they occupy and cultivate. In the first years of the lease, the farmer receives technical assistance for developing self sufficiency and sustainable farming practices.
The program provides assistance in the areas of agroforestry, land tenure and community organizing. Community organizing is applied to mobilize groups to obtain stewardship contracts, promote agroforestry and soil/water conservation and build local institutions. ISFP emphasizes improvement of existing farmer practices, not introduction of new ones except in situations where such may be necessary. Participatory strategies are used to gather data, diagnose field situations and monitor technical problems. Farm visits and training courses develop farmers' skills in agroforestry and organization. In the process, community leaders are prepared to take responsibilities for continued development after the end of the project, tentatively set at five years.
Recently, the implementation of the Local Govemment Code obligated the DENR to devolve to the Local Govemment Units (LGUs) the management of all ISF project sites except some of the "model sites" (one model site per province) and the UDP sites. These projects will remain under the care of the DENR for use as learning sites where new technologies and approaches are expected to be generated. These sites will also be used as training areas for LGU technicians and other development workers as part of the outreach program of the DENR.
2. NATIONAL FORESTATION PROGRAM (NFP)
In 1988, the DENR implemented the NFP which consists of three major components, namely: reforestation, watershed rehabilitation and timber stand improvement. The reforestation component is concerned with the replanting of denuded forest lands with indigenous and exotic forest species, including fruit trees, bamboos and minor forest species. One of the reforestation strategies used is assisted natural regeneration (ANR) where augmentation planting of climax species is done to improve future yield at minimum cost. The timber stand improvement (TSI) involves the removal of over-mature and inferior trees to improve growth in logged-over areas. Reforestation, ANR and TSI are approaches used in rehabilitation of identified critical watersheds and catchment areas.
DENR enters into contract with upland settler families, community and civic religious organizations, entrepreneurs, local and other government offices and other NGOs for any of the above NFP activities in areas identified by DENR. The contract may be for survey, mapping, planning, community organizing training, monitoring and evaluation or actual comprehensive site development of a given area.
3. FOREST LAND MANAGEMENT AGREEMENT (FLEA)
FLMA provides a long-term tenure to the people who plant and care for trees in newly reforested areas by granting farmers access to these areas for purposes consistent with sound ecological principles. When the reforestation contract terminates after three years, the contractor may apply for an FLMA if at least 80 percent of the trees planted are surviving and properly maintained. Family contractors must organize into associations or cooperatives covering a total of at least 100 hectares. DENR employs local NGOs to help organize communities and train them in forest management.
Like stewardship contracts under ISFP, FLMAs are for 25 years, renewable for another 25 years. The contractor may use the area to grow and harvest minor forest products or interplant cash crops, fruit trees and other agricultural crops using sound agroforestry practices. The contractor may also harvest, process and sell timber when the trees mature, following the principles of sustained yield forest management. in return, the contractor provides DENR 30 percent of the total proceeds until the whole cost of reforesting the area has been recovered. The proceeds will be deposited into a "trust fund" for expanding reforestation activities.
4. COMMUNITY FORESTRY PROGRAM (CFP)
The need to democratize access in the use of the forests and allow organized upland communities to benefit from the resource compelled the government to adopt policies that would enable communities to protect, manage and rehabilitate fragmented residual and old growth forests. CFP is emerging as a community-based approach in managing certain portions of abandoned, canceled and expired areas of Timber License Agreements (TLAs).
CFP makes upland dwellers stewards of residual forest areas. Communities are awarded 25-year Community Forestry Management Agreement (CFMA). Again, these agreements are renewable for another 25 years if mutually agreeable to DENR and the community. The community organization can harvest process and sell forest products from the area according to a management plan submitted to DENR beforehand. The plan must comply with prescribed rules and follow principles of sustained yield management.
Under the CFP, DENR assists the holder organization to set up and strengthen the community organization This includes on-the-job training in resource inventory, preparation of forest management and conservation plans and developing livelihood opportunities. For this assistance, DENR employs qualified NGOs.
ROLE OF NGOS
Through the years, the NGOs have been doing a proactive role in upland development through advocacy, training and technical assistance. However, the latter part of the 1980s offered greater opportunities for their direct involvement in the implementation of government programs such as reforestation, social forestry and community forestry. In addition to their traditional roles, the NGOs are now involved in technical work such as survey and mapping; resource appraisal and planning; community organizing; reforestation; resource management; and, harvesting, processing and sale of forest products.
A TOOL IN UPLAND DEVELOPMENT
Agroforestry is an important tool in the development of the uplands. If practiced properly, it helps promote soil and water conservation while increasing productivity and sustainability of upland farms to the benef t of the people.
There are traditional astute agroforestry practices being employed mostly by indigenous people in the uplands. The great majority of the population, however, remains in need of improving their system of farming the uplands to increase income and protect the environment.
Meanwhile, the number of people being engaged in promoting appropriate agroforestry technologies has dramatically increased in recent years. They come from national government agencies, various nongovernment organizations and, more recently, technicians of local government units to whom the upland development functions have been devolved.
This Agroforestry Technology Information Kit (ATIK) has been developed for use by these types of development workers as a quick reference. It consists of simple. illustrated technologies being used in various parts of the country. It is a product of a week-long materials production workshop among agroforestry practitioners in the government and nongovernment organizations, farmer groups and the academe.
TABLE 1. SUMMARY PROFILE OF DENR'SPEOPLE-ORIENTED UPLAND DEVELOPMENT PROGRAMS.
|
PARTICULARS |
ISFP |
NFP |
FLMA |
CFP |
|
Target areas |
Occupied forest lands |
Denuded and |
NFP contracted areas |
Fragmented residual |
| |
except national parks |
understocked |
|
and old growth forest |
| |
and critical watersheds |
areas | |
areas |
| | | | | |
|
Target |
Upland farmers and |
POs, NGOs, |
Community contractors |
Upland resident POs |
|
participants |
communities |
LGUs and |
with at least 80% |
|
|
| |
families |
survival after 3 years | |
| | | | | |
|
Stewardship |
25 years |
3 years |
25 years |
25 years |
|
contract | |
| | |
| | |
| | |
|
Funding source |
DENR and CARP |
ADB |
ADB |
ADB and |
| | | | |
USAID-NRMP |
| | | | | |
|
DENR office |
National ISF |
NPCO |
NPCO |
CFP Secretariat |
|
concerned |
Secretariat/Social |
| | |
| |
Forestry Division |
| | |
| |
| | |
|
|
Project |
DENR,NGOs and LGUs |
Contractors |
FLMA awardees |
Communities |
|
implementor |
| | |
|
|
| | |
| |
|
Implementing |
CO-driven agroforestry |
Reforestation |
Management contract |
Management |
|
strategies |
intervention |
contract |
contract/agreement |
|
|
| ||||||||||||||||||||||||||||||||||||||||||||||||||||||||||||||||||||||||||||||||||||||||||||||||||||||||||||||||||||||||
Degradation of the uplands
DEFINITION
In the Philippines, the definition of upland areas varies across sectors depending on the government agency or the kind of project involved. The Department of Environment and Natural Resources (DENR) which has jurisdiction over most upland areas in the country uses the following definition:
Uplands are hilly to mountainous landscapes with 18 percent slope or greater, including the table land and plateaus lying at higher elevations which are not normally suited to wet rice unless some from the terracing and ground water exist. These are mainly classified as public lands.
ECOLOGICAL SIGNIFICANCE OF UPLAND AREAS
The upland areas play a significant role in the dynamic and highly interactive landscape components of a rural system. They serve as the life support system of the lowland and aquatic areas. Upland areas are of considerable importance because they contain the tropical rainforest ecosystems which are the oldest, the most productive and the most protective ecosystems on earth. An increasing population of the "poorest of the poor" lives in the upland areas. These areas are expected to absorb even more of the expanding population from the lowlands.
In the past, upland areas were covered with tropical rainforest vegetation and human population was sparely distributed Few problems existed in these upland areas
Upland areas yielded varied products which satisfied the basic needs of these human settlements. However, given an increasing human population, together with indiscriminate exploitation of the forest, the uplands have become marginal and less capable of sustaining productivity and supporting the basic needs of human society (Sajise, 1986).
As forest resources have been depleted and agricultural activities have been undertaken in upland areas, the fragile soil resources have been exploited and severe degradation of upland agricultural land has occurred.
Today, areas affected by agricultural degradation are characterized by barren denuded hills and mountains with very few remaining trees and mainly vegetated with cogon and brush. the soil is not fertile with outcropping of rocks and the presence of eroded gullies. Wild animals practically do not exist; instead, ruminant animals graze these lands.
If environmental and socioeconomic conditions in the uplands are not improved, the peace and order situation could worsen. But, properly developed upland areas can be Keys to a sustainable, socioeconomic progress for the country.
DEGRADATION OF THE UPLANDS
UPLAND POPULATION
Estimated to be 17.8 million Filipinos
- 8.5 million live in the forest
- 5.95 million tribal Filipinos
- 3.35 million lowland migrants
The marginal upland areas compose the following classes of areas:
|
Cultivated/Open areas/Forest |
- 0.3040 m. ha. |
|
Grassland |
- 1.8129 m. ha. |
|
Cultivated Mixed Grassland |
- 10.1143 m. ha. |
|
Eroded Areas |
- 0.0007 m. ha. |
|
Other Barren Areas |
- 0.0130 m. ha. |
|
TOTAL |
12.2422 m. ha. |
FACTORS AFFECTING DEGRADATION OF UPLAND AREAS
Land tenure arrangements
Uncontrolled exploitation of forest,
e.g over-logging, charcoal-making
Shifting cultivation
or"kaingin"
Speculation/Conversion of agricultural lands
Population
pressure
Overgrazing
Improper agricultural practices, e.g., (plowing) down
the slope, lack of crop rotations
Inefficient use of forest
products
Construction of road networks
Mining/gold panning
Land
clearing for national infrastructures (dams, geothemmal plants)
Large
forest/grass fires, indiscriminate burning
Natural
calamity/phenomenon
Land conversion in the upland li.e., for residential
lands)
EFFECTS OF DEGRADATION OF UPLAND AREA
Loss of forest cover
Soil erosion
Loss of nutrients
(shortened fallow period of land resources)
Decreased agricultural
yields
Flood intensification
Reduced efficiency of hydroelectric
projects
Drought intensification
Decline in genetic diversity
Shift in
climatic patterns
Lowered water table
Increased
sedimentabon/siltation
Salt water intrusion to wafer table in coastal
areas
Loss of wildlife habitat
Increased carbon dioxide level in the
atmosphere (global wamming)
Increased poverty of famm families
Urban
migration of salty water into terrestial
bodies
|
| ||||||||||||||||||||||||||||||||||||||||||||||||||||||||||||||||||||||||||||||||||||||||||||||||||||||||||||||||||||||||
Nutrient cycles in upland farms
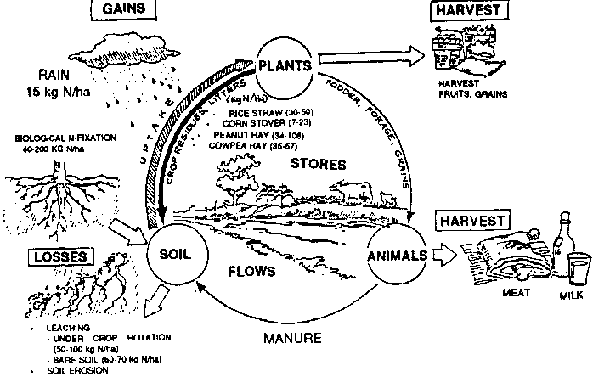
Agroforestry aims to develop upland farms into self sustaining yet productive ecosystems. The key to this goal is an efficient cycling of nutrients within the system.
The nutrients required for plant growth consist of: Carbon (C), Hydrogen (H), Oxygen (O), which are all derived from air and water; the major nutrients: Nitrogen (N), Phosphonus (P) and Potassium (K), the secondary nutrients: Calcium (Ca), Magnesium (Mg) and Sulfur (S); and, the trace elements or micronutrients (around seven), which are all soilderives.
The soil-nutrient cycle operating in an upland farm can be viewed as a system consisting of stores, flows, gain, and losses.
Nutrient store:
- roots and shoots of all crops and trees
- plant residues
- soil organisms
- soil organic matter
- clay minerals (through fixation)
- soil solution Nutrient flows:
- plant uptake (via roots)
- mineralization (from plants to residues, via organisms to soil humus)
Nutrient gains:
- symbiotic, non-symbiotic fixation (for N only)
- rock weathering
- rain and dust
- organic materials from outside
- fertilizers
Nutrient losses:
- burning (for N and S)
- denitrification and volatilization (for N)
- leaching
- erosion
- harvest
Understanding these nutrient cycles is important for a farmer to be able to effectively manage them. This should also be the basis for determining what soil and water conservation measures are needed. Likewise, this should guide the farmer in a more rational use of fertilizers.
Nutrient
cycle
|
| ||||||||||||||||||||||||||||||||||||||||||||||||||||||||||||||||||||||||||||||||||||||||||||||||||||||||||||||||||||||||
Establishing an swcsystem
Soil erosion, which leads to low crop yield, is caused by the washing down of the soil from the slope. Erosion can be checked by putting up physical structures and live barriers across the farm conserving both the soil and the water.
1. Mark contour lines using an
A-frame beginning from

2. Make the contour canals and place
the dug-out soil above the canal.

3. Plant soil stabilizers (grass
species) and N-fixing trees at the upper side of the canal.
4. Make a drainage canal that would
run across the contour canals.

5. Build check dams along the
drainage canal.

6. Dig soil traps soil within the
contour or drainage canals
PHYSICAL STRUCTURES IN A SOIL AND WATER CONSERVATION SYSTEM
1. Contour canal. Contour canals are constructed on farmlands where the soil is deep. They hold water longer and allow it to seep slowly into the ground, thus increasing soil moisture and draining excess water away from the field.

Contour cycle
2. Contour bunds
In the process of digging a contour canal, place the soil on the upper edge of the canal until a mound or bund is formed. (Note The soil dug out from the cane/may also be placed on the lower edge of the canal).
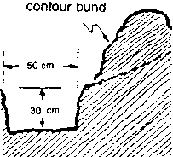
Contoue bund
Tamp the soil until the mound becomes firm.
The contour bund checks the rapid downward flow of water during heavy rains and the topsoil that goes with it.
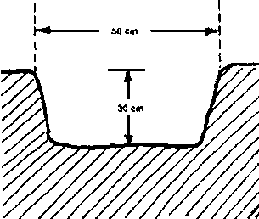
3. Bench terrace. Bench terraces can be dug at the hillside. The steeper the hillside' the smaller the terraces. It is recommended that the topsoil be removed first, the terraces constructed and then the topsoil placed evenly on the terrace. The riser should slope gently to reduce erosion. A contour canal is dug at the base of the riser and a small mound of soil is constructed at the edge of the terrace to prevent soil loss.

Midport
Locate midpoints between two contour lines
Along the lower contour line, cut from the hillside a 50cm bench.
Excavate the soil above the midpoint, first in big chunks then, in finer particles.
Pile the big chunks of soil on the 50-cm bench to form a mound, the height of which should be level with the midpoint. This will become the riser, which should be sloping, not vertical.
Construct a contour canal below the riser.
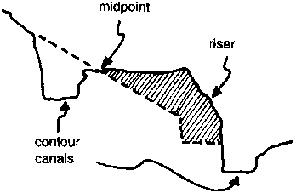
Midport
4. Contour hedgerow. The simplest soil erosion control structure for a hillside is a contour hedgerow.
Plant the contour bunds with multipurpose shrubs/trees in a triangular form Planting napier grass on the hedgerow is not recommended because they compete with other crops for soil nutrients.
Plant napier grass or creepers on the riser to stabilize it

Grass
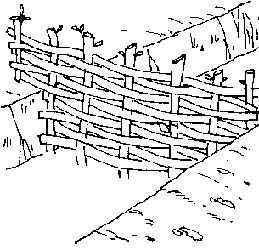
5. Check dam. This is a simple structure that can stop gully erosion by slowing down water flow.
In the drainage system, drive stakes into the ground, perpendicular to the water flow. Gliricidia makes an ideal "live" peg if it is available. The cuttings will grow and form a permanent living barrier.
Weave split bamboo strips between the pegs and place bush or stones against the dam's upper side. Periodically, clean the area above the dam.
Begin constructing dams from the top portion of the drainage canal. The steeper the slope, the closer together the dams should be.
Fence
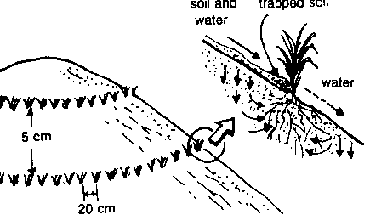
6. Soil trap. The purpose of this structure is to catch soil carried by water in a canal or gully. The pit should at least be 0.8 m deep × 1.0 m long × 0.5 m wide in a drainage canal. Clean the pit periodically and spread the soil on the farm Soil traps should be placed about 1 m above the dam.
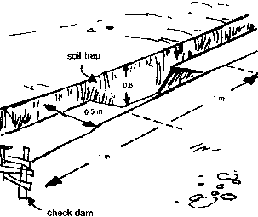
Soil trap
In fames where zero or minimum tillage is practiced (rocky or heavy limestone areas, steep slopes or where there are plenty of tree roots as a result of bush farming), digging of contour canals may prove to be difficult. Other alternative structures can be built.
1. Drainage/diversion canal. This canal will catch water coming from above the farm and throw it off to a nearby gully. The size of the canal should be enough to accomodate the volume of the water.
Dig from the uppemmost portion of the farm, sloping gradually across the farm at about one percent grade.
Place the excavated soil on the lower portion of the canal to form a mound or bund.
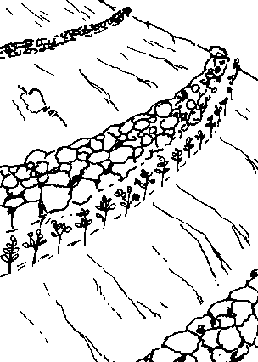
Rockwalls
2. Rockwalls. in areas where rocks are abundant, rockwalls are appropriate.
Along the contour line and above the contour stakes, cut the hillside. This is the base to hold the stones.
Pile the stones, putting the bigger ones on the base.
If enough stones are available on the farm make the height of the rockwall level with the midpoint (of the contour lines).
Plant hedgerows of multipurpose trees at the base of the rocks. These will stabilize the rockwall and will also serve as a forage source.
Rocks
|
| ||||||||||||||||||||||||||||||||||||||||||||||||||||||||||||||||||||||||||||||||||||||||||||||||||||||||||||||||||||||||
Farm management practices that reinforce SWC

1. Crop rotation

2. Relay planting

3. Contour cultivating and planting

4. Use of organic matter

5. Laying crop residues along the
contour
6. Diversification of farm
enterprises, including tree crops

7. Maintenance or establishment of
forest at the upper end of the slope
8. Protection of the land with cover
crops during fallow periods

9. Animal confinement
FARM MANAGEMENT PRACTICES WHICH REINFORCE SOIL AND WATER CONSERVATION
1. Use good crop rotation practices. Alternate grain crops with legumes whenever possible.
2. Practice relay planting of the second season crop. Sowing the second crop while the first is still growing helps reduce demand for soil cultivation. Relay planting also serves as an effective soil cover following the first harvest.
3. Always cultivate and plant crops along the contour. This impedes water flow between more solid structures, like rockwells or living hedgerow barriers.
4. Incorporate all available organic matters (crop residues, animal manure, etc.) into the soil. This helps improve soil structure, fertility and moisture holding capacity. Do not bum crop residues.
5. Lay additional crop residues, twigs and other materials in contour lines or spread or mulch across the slope, to further impede water flow. These lines can be placed at the base of contour hedgerows or rockwalls.
6. Diversify farm enterprises to include more tree crops. Fruit or estate crops can be planted in small orchards or interspersed with food crops. Tree crops are particularly suitable on severely sloping land.
7. Maintain forested areas at the upper end of sloping farmlands. These forested plots or woodlots should serve both a protective or conservation function as well as provide a steady source of fuelwood, food, income and other useful products.
8. Protect the land during fallow periods. Use effective mulches on cover crops to protect the soil surface from intense sunlight, wind erosion and the occasional unseasonal rains.
9. Stall-feed or tether all animals. Free-grazing animals which roam farmland during off seasons can be one of the major causes of erosion in hilly areas. Stall-feeding also enables collection of manure for soil fertility management.
|
| ||||||||||||||||||||||||||||||||||||||||||||||||||||||||||||||||||||||||||||||||||||||||||||||||||||||||||||||||||||||||
Traditional soil and water conservation (SWC) technologies
Traditional soil and water conservation (SWC) measures were pioneered by the natives and/or ethnic groups found mostly in remote areas of the uplands. These upland areas have long established settlements and have been practicing these technologies for centuries, even before the advent and popularization of modem technologies. These technologies, rooted on sociocultural and religious beliefs, had been developed over many generations and had passed the test of time.
GEN-GEN -- CONTOUR COMPOSTING
Gen-gen refers to a bank or barriers of turf trashes and or earth constructed to control or confine water or prevent passage especially of something undesirable. It is an age-old practice among mountain cultivators in the Cordillera (Ikalahans) as well as the Caraballo and Sierra Madre mountains. This hillside structure is one way of controlling sheet erosion and in sustaining valuable soil nutrients. it combines terracing and composting, thus effectively breaking-up runoff flow and traps eroding soil.
Procedure
1. The land is first cleared. of scrub vegetation and grasses (construction of gaik or fireline).
2. Trashes are collected and piled at intervals in shallow trench (gen-gen) dug along the contour lines to serve as check for surface runoff and soil erosion.
3. Dirts and weeds taken out during weeding operations and crop refuse after harvests such as vines of sweet potato and ubi tops not required for replanting are piled from time to time on strips.

Gen-Gen - contour composting
4. The land between the gengen(an alleyway) is cultivated and flattened over a period of time and the gen-gen develops into contour paddies.
Usually, sweet potato is planted in a quincunx manner so as to minimize soil erosion and to prevent the fommation of small gullies between the hills of the crop; other crops like pigeon pea are also planted along the trench (gen-gen) itself.
On the average, the swidden/farm is used for four years before it is abandoned. The mean fallow period totals six years, completing a swiddencycle of about 10 years.
In very steep slopes, stakes are driven into the soil to support and hold the piled trash in place.
TUDLING
This is a vegetative soil and water conservation practice of the Batangueffos which aims not only to control soil erosion but also to encourage bench terracing in the field. Essentially, the fammer's choice of the practice in the area is primarily governed by the needs or demand of feeds for cattle.

Land - contour
Procedure
1. Ipil-ipil (Leucaena leucocephala) seeds are sown, then slightly covered with soil on furrows moving in straight lines across the field without regard for the contour of the land.
2. The seeds are allowed to grow with minimal management except for thinning out in areas too densely planted.
3. It may be a series of one-row strips or a band of ipiPipil in two closely spaced rows.
4. The ipil-ipil trees are cut at a certain height, usually a little shorter than a man's height and the leaves and sprouts are continually pruned for forage. Sometimes, bananas are used instead of ipil-ipil and there are cases also where the combination of the two is being practiced.
There is a practical advantage of aligning the tudling crossway rather than down the slopes because of the farmer's belief that when the forage tree species are to be poured, it is more comfortable and convenient to cut leaves walking across rather than up or down the hillside, espedally if somebody is already carrying the forage.
One limitation is the competition of the tudling species with those of the main crops, making the cultivable area or the effective area smaller.
BALABAG/BABAG OR ITSAKA
In the local dialect, the term means an obstruction (of any kind) usually oriented perpendicular to a known and recuning path so as to stop or control entry, passage, movement or, in this case, water flow.
This practice of the Naaladnons in Naalad, Cebu, primarily aims to arrest the downward movement of soil, especially after heavy rains, thus extending the productivity of the marginal slopes. In addition, the practice also improves and maintains soil fertility (considering the fertilizer trapping of the babag) particularly the organs matter contribution of the decayed wood to the soil. Balabag structures, which literally means "fence", are replaced every four to five years when the wooden stakes and poles decompose and are no longer effective in conserving the soil.

Figure
Procedure
1. Stakes of ipil-ipil are drawn to the ground until about only 0.45 meter high is left above the soil surface.
2. These stakes are established some 0.5 meters apart following the contour of the farm
3. At the base of the pegs, Leucaena poles, leaves, twigs and other debris are horizontally stacked on top of one another across the stakes uphill side to act as barriers to the downward movement of the soil.
4. As dumped branches and leaves decompose, spaces between strips flatten, which makes the entire area appear like- real terraces from a distance.
5. Upon decomposition, the branches and leaves of ipil-ipil are incorporated into the soil to serve as fertilizer.
6. Crops such as tobacco, corn or sweet potato are grown on the farm spaces or alleys between the balabag structures
CANOPY STRUCTURE AND MAINTENANCE
This involves the presence of multilayered arrangement of crops in a single area which minimizes the energy of falling raindrops or conserving water down the slope. Soil and water conservation is achieved by harvesting the crops in blocks. In addition to the yield benefits for several varieties managed separately, the harvesting of small areas leaves little bare soil exposed. If the blocks are allowed to propagate by pakad (or set down adventitious roots), the plants do not need yearly replacement and, hence, maintain a continued canopy for the duration of a cropping cycle. This is also practiced by the upland farmers in the Cordillera region.
Peasant
DAY-OG OR MULCH COMPOSTING
This is another age-old soil conservation technology by the Cordillera forest dwellers, including the Ikalahans. It involves gathering of grasses and other plant debris to be
spread over the area intended to be planted, primarily to conserve soil moisture and to protect the soil from the impact of raindrops, particularly during heavy rains. Finally, these trashes will undergo decomposition and will serve as organic fertilizer to the crop plants.
It is also practiced in connection with tree planting wherein plant debris are placed at the bottom of the holes and covered with soil before the seedling is planted.
PLANTING OF TALA GADA W (TIGER GRASS)
Some farmers in the Benguet area plant tiger grass as hedgerow species instead of leguminous species. They practice this not only to enhance soil conservation but also to generate additional income when these are made and sold as soft brooms.
Nob: Aside from these six traditional soil and water conservation technologies being described, there are still many other technologies which the upland farmers may have been practicing for quite a long time and may, in fact, have been proven sustainable. The listing and descriptions herein presented are far from complete. Inclusion of the other traditional practices/technologies in this paper was not made possible primarily because of the limitation of available literature and/or documentation on these particular technologies.
References:
Agroforestry Technology Inforrnation Kit, 1989. Agroforestry and Mangroves Project Manual RRDP.
Baconguis Jr., R. 1992. Paper presented during the Soil and water Conservation and Management Short Training Course held on May 24-June 6, 1992, UPUN, UAP, College, Laguna.
Barker, Thomas C. Shifting Cultivation Among the Ikalahans. Working Paper Series I, February 1984.
Cagampang, F.V. et. al. 1986. A Case Study of Upland Soll
ConaorvaUon Strategies In Selected Areas of the Phillipines. Temminal Report. Los Ba�os/Philippines. UPLB.
Celestino A.F. and F.P. Elliot. 1986. Hillyland Farming Systems In U. Phillppines: An Assessment, FSSRI, UPLBCA.
Lasco, R.D. and H.D. Lasco. 1992. Paper presented during the Soil and Water Conservation and Management short Training Course heid on May 24-June 6, 1992, UPUN, UAP, College, Laguna.
Paningbatan, E.P. 1992. Paper presented during the Soil and Water Conservation and Management short Training Course held on May 24-June 6, 1992, UPUN, UAP, College, Laguna.
Raminez, D.M. 1988. Indigenoua Soil Conservation Strabgl" In Phillppina Upland Farms. EAPI Working Paper. East-West Center Honolulu, Hawaii.
Rico, D. and F. Dulnuan. 1980. Indigenous Forest Dwellers in Forest Development Planning. In Proceedings of the Workshop In Agroforesty In the Phillppines. Los Ba�os/Philippines. UPLB.
Race, D. 1984. Ikabhan Penance: A Forest Dwelling Peoph's Joamey on the Ragged Terrain of Development Tropical Forests 1(1): 18-29.
Sajise P.O. 1983. Upland Fanning Systems. Paper presented at the National Conference on Research in the Uplands, Quezon City.
The Philippine Recommands for Soil Conservation, 1977.
|
| ||||||||||||||||||||||||||||||||||||||||||||||||||
Soil and Water Conservation (SWC) Technologies and Agroforestry Systems (IIRR, 1992, 171 p.)
Options for contour farming:
1. Establishing Contour Lines
Contour line
INTRODUCTION
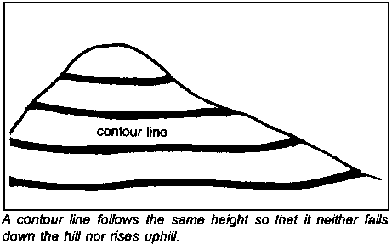
A central element of soil conservation on sloping land is thecorrect establishment of contour lines. If contour lines are incorrectly established, then they can actually increase the risk of erosion. Therefore, it is very important that farmers understand the concept of contour lines and are initially assisted to correctly establish these.
PRINCIPLE
Contour lines are lines that nun across a (hill) slope such that the line stays at the same height and does not run uphill or downhill. Contour lines are used in the establishment of hedgerows, pasture strips, canals, etc.
DISTANCE APART
Generally, contour lines are established so that the vertical distance between the lines does not vary. For erosion control, the rule of thumb is: vertical fall between contour lines is about 1 meter on steep slopes (above 15 percent), reducing to 0.75 meter on greater slopes (below 15 percent).
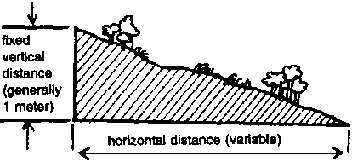
The horizontal distance between two
contour lines will vary as the steepness of the slope changes.
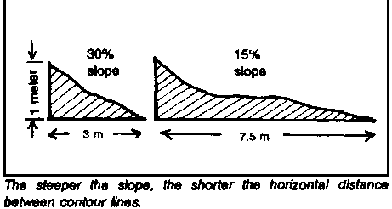
The steeper
As contour lines travel across a hillside, they will be close together on the steeper parts of the hill and further apart on the gentle parts of the slope.
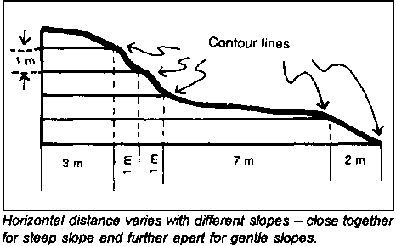
Contour lines
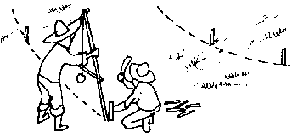
HOW TO ESTABLISH CONTOUR LINES
1. Use an A-frame, O-ring or water level to determine the contour lines. (See pages 37-38).
2. Start in the middle of the slope, work down to the bottom of the area, then work upwards to the top. By starting in the middle, you minimize cumulative errors. Some people prefer to start work in the steep section, some at the top.
3. Make sure that the base of the instrument stands as a representative site (not in a hole or on a hill).
4. Ignore small disruptions to the general slope.
5. Place stakes at least every 3-6 meters along the contour line or closer if desired (every first pivot of the A-frame). Make sure that stakes are driven well into the ground. Place the stakes closely (3 meters) if the ground cover is tall or dense and/or if the slope is steep with rapid changes.
6. The vertical spacing (1 meter) between contour lines can be measured by sighting over a "T-stick" of appropriate height (1 meter) back to the previous contour line (working downhill: or from the previous contour line uphill (working uphill).

Working downhill
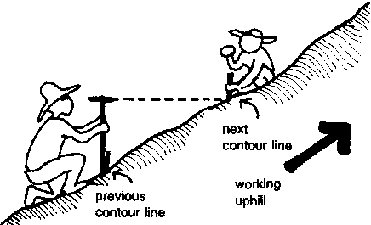
Working uphill
INSTRUMENTS
1. A-frame (See Making an A-frame on pages 1001 03.)
with carpenter's level
with string plumb bob
2. O-ring
To make:
· Fill one-meter length of clear plastic tube (15 mm diameter) half full with colored water using the extracts from achuete or duhat.· Form the tube into a circle by bending it into a circle and inserting one end into the other end. Heat or hot water may be used to soften the outer end to make it easier to insert the other end into it.
· Attach the ring to the top of a stick. String, tape or nails can be used to attach the ring to the stick. The stick should be about as tall as the person using it. The level of the water in the Oring will then be at eyeheight.
· Make another stick (staff) the height of the water level in the tube. A small bar painted a bright color for visibility can be attached to the top of the stick.
To Use:
One person holds the stick with the ring while another holds the stick with the bright-colored bar. The person with the ring directs the person with the bar who stands 36 meters away to move up or down the hill, using the water levels in the ring and the top of the bar as guides. The site is correctly located when the water in the ring is level with the top of the bar. A stake is placed at the foot of the stick with the bright-colored bar.

O-ring
3. Water Level
To make:
· Purchase eight meters of dear plastic tube (510 mm diameter).· Attach the ends to two sticks of equal height (two meters) with a mark at the eye-level leaving about 50 cm. of tube above the eye level mark.
· Fill the tube with colored water to the level of the top of the two eye-level marks. Then, seal the ends of the tube.
To Use:
· One person holds one stick, another person takes the other stick out along the contour and locates the site where the water level is steady at the eye-level marks. A stake is driven at this spot.· The two people then move so that the first person walks to the site of the second and the second moves to a new site along the contour.
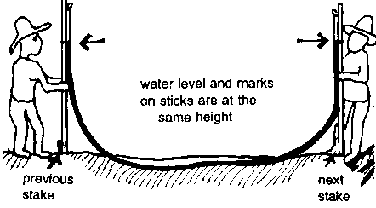
Water level
Helpful hints:
1. Study the land first and visualize where the contour lines will run.
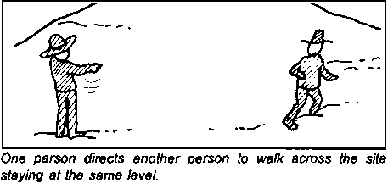
Same level
This may be done best by having one person direct another person in walking to the other side of the area to be contoured such that he/she stays at the same height as the first person.

People
Also try to visualize what the area will look like when terraced -- particularly the height and width of the terraces. This can be assisted by using a "T-stick" and string.

Using a “T-stick”
2. Always look behind at the line of stakes and assess whether you are running level.
3. Get a feel for the main direction of the slope. The contour line will run perpendicular to this direction.
4. Establish your contour lines at a time when labor requirement for other farm operations is low.
However, do not leave the stakes for a long time before cultivating or sowing because the stakes may be displaced by livestock or children.
5. Land that has been cleared but not cultivated best to work on. If the land has been cultivated, the site for placing the staff or leg of the A- frame should be roughly levelled with the foot.
6. Cultivation of the whole area creates problems in establishing seeds or seedlings because heavy rain will wash away seeds and seedlings.
7. Encourage neighboring farmers to work together to plan the contouring and layout of hillsides. In this way, contour lines can be connected and drainage systems protected.
8. If stakes are close together when plowing or seeding, do not follow the exact contour line from peg to peg (Doing so will create a zigzag line), but look ahead and smooth out the line by taking a line of "best fit" between the stakes.
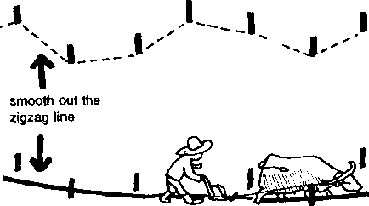
Smooth out the zig-zag
line
2. Sloping Agricultural Land Technology (SALT-1)
Land lines
SALT-1 is a one-hectare model of agroforestry technology with agricultural and forestry crops at a percentage of 75:25. Based on the experience of the Mindanao Baptist Rural Life Center (MBRLC) in Bansalan, Davao del Sur, this technology decreases erosion by 50 percent, as compared to the traditional upland farming system. In addition, it increases com yield by about five times and income by six times.
This information material will guide you on how to establish SALT-1.
SALT is a simple, applicable, low-cost and timely method of farming the uplands. This technology was developed for farmers with few tools, small capital and little knowledge in agriculture. A farmer can continue his traditional farming practices in the SALT system.
If farmers leave the SALT farm, like some tribals in Mindanao do, the nitrogen-fixing trees and shrubs (NFT/S) will continue to grow and overshadow the crop area. By the time the land is again cultivated, the soil has already been enriched by the large amount of leaves from the NFT/S, which also prevents erosion. In addition, the NFT/S, particularly the woody species, may be harvested for firewood or charcoal as additional source of income. Findings of MBRLC show that a hectare of SALT farm can provide an income of P1,3001ha/mo as against the P200/ha/mo in upland farms of corn cultivated the traditional way. Another benefit of SALT-1 is that it is less laborious than the traditional method of upland farming.
Here's how to put SALT-1 in your hillyland:
Step 1: Make an A-Frame. The A-frame is a simple device for laying out contour lines across the slope. It is made of a carpenter's level and three wooden poles nailed together in the shape of a capital letter A with a base of about 90 cm. The carpenter's level is mounted on the crossbar. (Other methods of making an A-frame are discussed in Making an Aframe, pages 100-103.)

A-stick
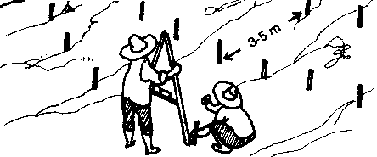
Step 2: Locate the contour lines using the A-Frame. One leg of the A-frame is planted on the ground; then, the other leg is swung until the carpenter's level shows that both legs are touching the ground on the same level. A helper drives a stake beside the A-frame's rear (first) leg. The same level-finding process is repeated with stakes every five-meter distance until one complete line is laid out. The distance of contour lines is three to five meters apart.
Locating
Step 3: Prepare the contour lines. After finding and marking the contour lines, prepare them until ready for planting. The width of each area to be prepared should be one meter. The stakes will serve as guide during plowing

Preparing
Step 4: Plant seeds of nitrogen-fixing trees and shrubs (NFTS/S). On each prepared contour line, two furrows are laid out. Plant two to three seeds per hill at a distance of one-fourth inch between hills. Cover the seeds firmly with soil. When fully grown the hedgerows bank the soil and serve as source of fertilizer. Examples of hedgerow species are Flemingia macrophylla (syn. congests), Desmodium renzonli, Calliandra calothyrsus, Gliricidia septum, Leucaena diversifolia and L. Ieucocephala.
Planting seeds
Step 5: Cultivate alternate strips. The space of land between the thick rows of nitrogen-fixing trees and shrubs where the crops are to be planted is called a strip or alley. Cultivation is best done on alternate strips. Altemate cultivation will prevent erosion because the unplowed strips will hold the soil in place.

Strips
Step 6: Plant crops. The permanent crops like coffee, cacao, banana, citrus and others of the same height may be planted at the same time the nitrogenfixing species are sown., In areas which are not cultivated, only the spots for planting are cleared and dug and, later, only ring weeding is employed until the hedgerows are large enough to hold the soil in place. Plant permanent crops in every third strip. Tall crops should be planted at the bottom of the farm to avoid shading.

Citrus + Banana
Step 7: Plant short-term crops. Plant short and mediumterm income-producing crops (pineapple, ginger, taro, potato, peanut, mung bean, melon, sorghum, corn upland rice, etc.) between the strips of permanent crops as a source of food and regular income while waiting for the permanent crops to bear fruits. To avoid shading short plants are planted swan from tall ones
Short term planting
Step 8: Trim the contour hedgerows regularly. One year after planting the hedgerows, cut the hedgerows at a height of 40 centimeters from the ground every 30 to 45 days. Always pile the cut leaves and twigs at the base of the crops. These cuttings serve as an excellent organic fertilizer for the crops.

Trim the contour
Step 9: Rotate your food and cash crops. A good way of rotating is to plant cereals corn, upland rice, sorghum, etc.), tubers (sweet potato, cassava, gabi, etc.) and other crops (pineapple, castor bean, etc.) on strips where legumes (mung bean, bush sitao, peanut, etc.) were planted previously and vice versa. This practice will help maintain the fertility and good condition of the soil. Other management practices in crop growing like weeding and pest management should be done regularly.

Rotating
Step 10: Maintain your SALT-1 farm. Apart from providing you with adequate food and sufficient income, an even more important benefit of using SALT-1 is the control of soil erosion. This is done by the double thick rows of NFT/S and the natural terraces being formed along the contour lines of the hill. To enrich the soil and effectively control erosion, always pile straws, stalks, twigs, branches, leaves, rocks and stones at the base of the thick rows of nitrogen-fixing species. As the years go by, strong, permanent and naturally green terraces will be formed which reliably anchor the precious soil.

Maintaining
SALT-1 can be adapted throughout the country, particularly in the uplands. SALT-1 is now being adopted in several Asian countries, among them Indonesia, India, Thailand, Sri Lanka, Nepal, Cambodia, Vietnam, Nigeria and Congo. But even then, MBRLC believes SALT-1 is not a perfect farming system despite its popularity. No system can bring depleted, eroded soil back into production in a short span of time. But land can be restored, upgraded and sustained to a reasonable level of productivity by using SAL Tel.
Table 1. ADVANTAGES OF SALT-1 OVER THE TRADITIONAL UPLAND FARMING SYSTEM.
| |
TRADITIONAL FARMING |
SALT-1 |
|
Soil erosion |
194.3 m.tJyr |
3 4. m.t./yr |
|
Crop productivity |
less productive |
more productive |
|
Net income |
P300.00 |
P1,300.00 |
|
Labor |
High Labor |
Low labor |
|
Hedgerows |
None |
Two strips |
|
Organic fertilization |
None |
Free 3,000 kls. biomass/ha/yr |
During its establishment, SALT-1 is more laborious (planing of hedgerows and permanent crops) than the traditional farming In the subsequent years, SALT-1 decreases its labor requirements (cultivation and weeding is lessened; only pruning is practiced); whereas, in traditional farming, constant cultivation, regular planing of crops and regular weeding are still required.
Source: MBRLC Editorial Staff (1990). How to Farm your Hilly Land Without Losing Your Soil. MBRLC, Kinuskusan, Bansalan Davao del Sur. 24 pp. How to Serbs No.1
Nob: The crops mentioned earlier are just suggestions. Farmers can use other crops suitable to their areas.
3. Rockwalls
Contour rock walls are soil conservation structures which are generally constructed where there is an abundance of rocks. The technology is very labor intensive and is generally accomplished through labor exchange groups (i.e., bayanihan, alayon) rather than individually. The structure is more permanent than other soil erosion barriers. Several steps are involved in rockwall construction.

Steps
1. Starting from the upper side of the farm lot, excavate a drainage canal which gently slopes (1121%) towards a nearby gully. The canal will prevent water from flowing onto the farm from the land above.
2. Use an A-frame to mark a contour line on the hillside and below the drainage canal. Smooth the curve of the contour line.
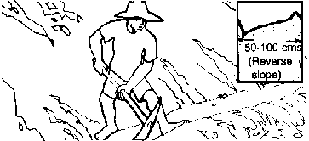
Excavate
3. Excavate a base for the rockwall between 50-100 cm wide, 10-25 cm deep, and with a reverse slope to the base (i.e., slopes downward from the edge of the slope onto the hill.)
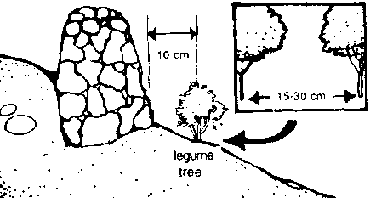
4. Begin construction by using large rocks for the base. The flatter, heavier sides should be placed outward. Smaller stones are used to fill in spaces between larger stones. Do not use small rocks for the base and place large rocks on top. This is unstable. Build one layer at a time. Tamp the stones to make the layer firm before starting another layer.

Constructing
5. The height of the rockwall will vary but, if possible, should reach the vertical height of the mid-line between the contour lines. If a shorter wall is initially constructed, it should be raised if the soil caught behind it reaches the top.
6. The sides of the rockwall should be gently angled for stability. The top should have a smaller width than the bottom. Generally, the top width of 50-70 cm is used for a onemeter-wide base. Walls shorter than one meter have narrower tops.
7. Rock walls should be constructed 3-5 meters apart for steep slopes, 5-10 meters apart for medium slopes and up to 20 meters apart for very gentle slopes.
8. During heavy rains, soil will erode from the base of the downhill side. The depression created will eventually enlarge, creating an unstable situation. The wall may eventually fall. Regular maintenance and suggestions listed below will help solve this problem.

Scouring
9. To further stabilize the rock wall and reduce the chance of a washout, Glincidia or other fast-growing legume trees can be planted 10 cm from the wall and 15 to 30 cm apart within the row on the downhill side. The legume trees below the wall will help hold it in place. It can provide firewood, forage fertilizer and windbreakers.
Wall
10. Napier or other forage grasses can be planted on the upper side of the wall. Newly eroded soil will wash down the hill and be caught behind the wall. This will help fertilize the grasses. The grasses can, be used as forage or fertilizer (i.e., green manure, mulch).

Wall
CONSIDERATIONS
1. In many places, rockwall construction is a continuous process. Because of the labor input, only a portion of the wall may be constructed at any one time. The wall gradually increases in height as rocks are cleared from the field and as more time is devoted to the activity.
2. There are examples of rockwalls combined with other soil conservation technologies. One example is the combination of a canal, hedgerow and rockwall. The hedgerow is planted directly above the canal while the rockwall is built along the upperside of the hedgerow. Bench terraces are often combined with rockwalls. In this case, the rockwall stabilizes the terrace riser. (See Terraced Agricultural Land Technology, page 81.)
3. Sometimes, grasses are placed below the wall. If this is done, Vetiver grass (Vebvera zizanioides) is recommended. The planting distance is 10-15 cm from the wall and 30 cm between clumps.
4. If napier grass is planted on the upper side of the wall, care must be taken to manage the grass. Napier tends to spread out and will invade the cropping area if not regularly cut. This is not so much a problem if a clump grass, such as Guinea grass, is used. Napier or other grasses can serve as homes to rats and other pests if not regularly inspected and harvested.
5. Rockwall systems should be tied up to the overall soil conservation system in the farm. This is critical if there is excess water accumulating behind the rockwall and must be safely removed from the area.
6. Rockwalls have many empty spaces in between rocks which can become the home of agricultural pests such as rats and snails. Successful local methods to solve these pest problems are: (a) regular inspection while using a dog to locate and chase the rats and (b) regular hand-picking of larger snails while employing one or more ducks to eat the baby snails.
7. Farmers have used legume trees planted below the rockwalls in different ways. Among these are: (a) allowing one tree to grow taller at 5 m spacing and cutting it as firewood when thick enough; (b) cutting the hedgerow at 1 meter height for forage and/or green manure fertilizer; and, (c) allowing the tree to grow two meters and keeping it pruned at that height so it acts as a windbreak for the area behind the rockwall.
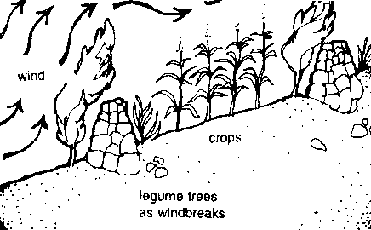
Legumes trees as windbreakers
One practice made by IIRR to prevent leguminous trees (i.e., ipil-ipil) from jumping lice (psyllid) attack is to pollard them higher than normal (above 2 meters). In this manner, the birds could easily pick on the psyllids, thus, putting them under control and lessening the threat of damage or of drying up during drought periods.
4. Vetiver for SWC
Vetiveria zizanioides L. Nash, also known as Vetiver grass, Khus, Moras or Mura is densely tufted, perennial clump grass, with stiff leaf blades. The foliage is mostly basal with the leaf sheaths closely overlapping, strongly compressed and keeled which creates a physical barrier of great density at the ground surface.

Vetiver grass
VETIVER GRASS:
THE RECOMMENDED PLANT
Vetiver grass has the following characteristics that make it ideal for permanent, effective and simple to establish and maintain soil and water conservation measures:
1. It is easy to propagate and establish as a hedge.2. It is adapted to a wide range of soil and climatic condition.
3. When planted correctly, vetiver grass will form a dense permanent hedge in less than one year.
4. It has a strong root system that penetrates and binds the soil.
5. It is perennial and requires minimal maintenance.
6. It will not spread to the alleys since it does not spread by rhizomes nor from seeds.
7. Its crown is below the ground surface which helps protect the plant againts fire and overgrazing.
8. Its sharp leaves and aromatic roots are reported to repel rats, snakes and other pests. However, if leaves are not pruned, maya birds (Lonchura ma/acca) have been found to build nest among its dense leaves attracting snakes and rats.
9. Its leaves and roots have demonstrated a resistance to most insects and diseases.
10. It is generally unpalatable to livestock. The young leaves, however, can be used as fodder, especially during drought.
11. It can withstand drought, flood and long periods of waterlogging.
12. Vetiver hedgerows have minimal space requirements.
13. It does not compete as much with the crop plants it is protecting compared with other grasses.
14. It is compatible with any crop (e.g.' com, sweet potato, vegetables) or other hedgerow grass and legume species (e.g., rapier, ipil-ipil, madre do cacao, etc.).
15. It is abundant in many places in the country.
STEPS IN ESTABLISHING VETIVER HEDGES
1. Locate the contour lines using an A-frame and make the furrows.
2. Prepare the planting materials:
· Dig the vetiver clumps with a digging flat bar.
· Tear a handful of the vetiver grass from the clump and further sever the root divisions or slips.
· Cut the leaves 15-20 cm from the base.
· Trim the roots 8-10 cm below the base.

Trim the roots
3. Just like planting rice seedlings, plant one or more slips in single rows along the contour furrows 10-15 cm apart at the start of the the rainy season

Planting the roots
4. Replant dead vetiver slips for gap filling.
5. Trim the vetiver hedges 40-50 cm from the ground after they have properly established to encourage tillerino and avoid shading of adjacent cross.

Trim the vetiver
6. Plant fast-growing leguminous trees/shrubs every 2 m just above the vetiver furrow lines and prune no less then 1.5 m 1 m high

Pruning
7. Vetiver can be planted below contour bunds It can also be paired with leguminous tree and shrub species planted on the upper side of the bund.
Vetiver grass is used extensively in India for control of sheet erosion on vertical soils or flat lands. It also serves the purpose of a fire break.
Figure
The leaves are sometimes used for mulching and rooking.
References:
Vetiver Grass (Vetiveria zizanioldes): A Method of Vegetative Soil and Moisture Conservation. 2nd Edition. J.C. Greenfield, Works Bank. New Delhi. April 1 988.
MURA Ang Tanom nga Mopugong sa Pagkeanas sa Yuta. Basahon I, FARMI, ViSCA, Baybay, Leyte. 1991. OnFamn Research Notes. Issue No. 5, FARMI, VISCA, Baybay, Leyte, Febnuary 1991.
5. Uses of Grasses in SWC
Grasses play an important role in stabilizing sloping areas. Species like rapier/elephant grass (Pennisetum pupereum), Guinea grass (Panicum maximum) and NB21 (rapier crossed with pear' millet) grow vigorously and are ideal for their soil-binding properties. They are also good sources of fodder for livestock. However, if the farmer is more interested in essential oils rather than livestock, he can plant citronella (Cymbopogon nardus Jowitt) and lemon grass (Cymbopogon citratus Stapt). Grasses have the advantage of establishing easily although they could compete for moisture in waterlimited situations.
GRASSES AS SOIL BARRIERS
Plant the grasses along the contour lines to minimize surface runoff/erosion in cultivated sloping farms Soil will begin to collect behind the grass barrier even within the first year of establishment.
Soil barriers
Where feasible, contour earth bunds may be constructed and then planted with grass to stabilize the structure against breakages or breaches. Grasses must be regularly trimmed and used as feed for livestock or as mulch for the crops. Trimming of stems and clumps reduces shading and controls growth. Otherwise, the untrimmed grass may become a problem (i.e., it may later be considered a weed).
Soil barriers
GRASSES AS SOIL BINDERS
Stabilizing grass species have also been proven effective in firming up the riser of terrace structures. They prevent soil erosion and the collapse of the terraces.
The space between the drop structures, the bed and the sides of the waterways should be well-sodded with guinea grass to protect it from erosive water. In addition, rows of napier grass 40 cm apart can be planted along the lip/edge of the terrace. This will increase the protection of the risers, discourage farmers from cultivating the edge and provide an additional source of forage.
Note: The limitation of this grass-based technology is the lack of nitrogen-rich green leaf manure that fast-growing leguminous trees could provide.

Napier grass and guinea
grass
6. Simple/Double Selection of Hedgerow Species
The adoption of alley cropping or contour farming using living hedgerow barriers continues to gain popularity with farmers in the Philippines. The initial success.with ipil-ipil (Leucaena leucocephala) was followed by a devastating infestation of the jumping plant lice (Heteropsylla cabana). This pest eliminated much of the ipil-ipil in the country and caused farmers, technicians and scientists to reconsider the use of a single species in alley cropping hedgerows. This experience has stimulated trials with a wide range of plant species and had reinforced the need for diversification in hedgerow planting.
It is important to select carefully the hedgerow species which are suitable to local conditions and the needs of individual farmers in discrete locations. The range of useful species offers many options for farmers; however, they must consider carefully the objectives and constraints they are working under. Selection of species for hedgerows should include the following consideration:
1. Main objectives
- erosion control
- legume or fixes nitrogen from the
air
- fuelwood
- green manure
- livestock fodder
- herbage
production
2. Rainfall
- amount and distribution (number of dry months)
- drought
tolerance
3. Type of soil
- textural characteristics
- depth
- pH; acidJalkaline -
fertility 4. Elevation 5. Others
- pruning tolerance
- deep-rooted or
tap-rooted propagation
- germination ability/livability of planting materials
nitrogen-protein content
- availability of planting materials/seeds -
origin
- pest resistance
The main hedgerow species are perennial members of the legume family. In addition, several types of grasses have been used. The list of the key plant species which are currently being utilized as hedgerow species in the Philippines, with information on their suitability under the various conditions described earlier is shown in Table 2.

Peasant
TABLE 2. HEDGEROW SPECIES
|
SCIENTIFIC NAME |
COMMON NAME |
USES' |
ELEVATION (meters) |
DROUGHT TOLERANCE |
pH TOLERANCE |
|
A. LEGUME SPECIES | |||||
|
Acacia confuse |
|
GM/FW | | | |
|
Acacia villosa |
Villosa |
GM/FW | | | |
|
Calliandra calothyrsus |
Red Calliandra |
EC/GM/FW/AF |
0-2000 |
Mode rate |
AcT |
|
Calliandra tetragona |
White Calliandra |
EC/GM/FW/AF |
0-2000 |
Moderate |
AcT |
|
Calliandra |
Fireball |
EC | | | |
|
haematocephala |
| | |
| |
|
Cassia siamea |
Thailand shower |
EC/GM/FW |
0-t500 |
Excellent |
WT |
|
Cassia spectabilis |
Antsoan dilao |
EC/GM/FW |
0-1500 |
Moderate |
AcT |
|
De/onix regia |
Fire tree |
EC/GM/FW |
0-2000 |
Very good | |
|
Desmodium rensonii |
Rensonii |
EC/GM/AF |
0-1000 |
Moderate | |
TABLE 2. HEDGEROW SPECIES
|
SCIENTIFIC NAME |
COMMON NAME |
USES' |
ELEVATION (meters) |
DROUGHT TOLERANCE |
pH TOLERANCE |
|
Erythrina posppioiana |
Dapdap |
EC/FW/GM |
0-1900 |
Good | |
|
Flemingia macrophylla |
Flemingia |
ECIGM/AF |
0-2000 |
Moderate |
WT |
|
Gliricidia sepium |
Kakawate |
EC/GM/FW/AF |
0-1500 |
Good |
WT |
|
Leucaena diversifolia |
Acid ipil-ipil |
EC/GM/FW |
0-2000 |
Moderate |
AcT |
|
Leucaena bucocephala |
Ipil-ipil |
EC/GM/FW/AF |
0-2000 |
Very good |
NAc |
|
Parkia noxburghn |
Kupang |
EC/FW |
0-2000 |
Good |
WT |
|
Piliosbqma ma/abancum |
Butterny |
EC/AF/FW/GM |
0-1500 |
Good |
WT |
B. GRASSES
|
Pannicum maximum |
Guinea grass |
EC/AF |
0-2000 |
Good |
WT |
|
Pennisetum purpureum |
L Napier grass |
EC/AF |
0-2000 |
Moderate |
WT |
|
P. purpureum (hybrid) |
NB-21 grass |
EC/AF |
0-2000 |
Moderate |
WT |
TABLE 2. HEDGEROW SPECIES
|
SCIENTIFIC NAME |
COMMON NAME |
USES |
ELEVATION (meters) |
DROUGHT TOLERANCE |
pH TOLERANCE |
| | | | |
2 |
3 |
|
Setaria so. |
Setaria |
EC/AF |
0-2000 |
Good |
WT |
|
Vetiveria zizanoides |
Vetiver grass |
EC |
0-2000 |
Excellent |
wT |
C. OTHER PLANTS
|
Ananas comosus Pineapple |
AcT |
EC/F |
0-1500 |
Moderate |
|
Hibiscus rosa-sinensis Gumamela |
EC/GM/AF |
0-1500 |
Moderate |
WT |
'Uses: Erosion control (EC), green manure (GM), fuelwood (FW), animal fodder (AF), source of food (F)
'Drought tolerance: Excellent (withstands long drought periods), moderate (moderately tolerant of extended dry periods, poor (requires high, evenly distributed rainfall
'Son conditions: AcT (tolerance to acidic conditions), WT (wide tolerance to soil conditions), NAc (not tolerant of acid soils)
Nob: A variety of additional plants is currently being tested for suitability as hedgerow species. These are not listed until they have been proven appropriate
7. Contour Canals
Contour Canals
In sloping farmlands where soil is relatively deep, a system of canals and other physical structures built can effectively minimize soil erosion and conserve water. These structures are the drainage/diversion canal, contour canal, contour-drainagecanal, contour bund, check dam and soil trap
FUNCTION OF THE STRUCTURE AND ITS CONSTRUCTION
1. Drainage/Diversion Canal This is the first structure to be built on the farm. The purpose of a drainage or diversion canal is to catch the water coming from above the farm or from other canals and divert its flow towards a nearby gully, thus, preventing damage to the farm
· It is recommended to build the drainage/diversion canal first before the other structures.
· Start digging from the uppermost portion of the farm. The canal should be sloping gradually across the farm at about one percent drop towards a gully. Size of drainage canal depends upon volume of water and slope

1% drop
· Place the excavated soil on the lower portion of the canal to form a bund or mound.
· Tamp to make bund farm.
· Stabilize bund by planting grasses and leguminous hedgerow.
· Plant creeping grasses along the sides of the canal to help slow down water current and to prevent sides from scouring.
· It is suggested that farmers agree on a Common drainage outlet, if necessary.
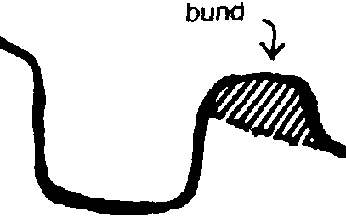
Bund
2. Contour Canal. This canal is built on a contour to hold the water and allow it to seep into the ground, thus increasing soil moisture and replenishing the aquifer. This structure is suitable on porous soils.

Drainage canal
· Using an A-frame, determine a contour line 3m-5m below the drainage canal and at every 3m-5m interval down the slope until the whole canal system is finished. Smoothe curves of the contour line.
· Dig a canal at least 50cm wide × 30cm deep following the contour.
· Place the excavated soil from the canal on either side of the canal.

Figure
· Tamp the soil to make a firm mound.
· Plant grasses and leguminous spp. on the mound.
3. Contour-Drainage Canal. This is a contour canal built with a gradual slope towards a drainage canal. At the point where this canal is about to join the drainage canal, it is blocked by a mound of soil 112 the height of the canal. This will prevent water from flowing out. Only during excessive rain is the block removed to allow water to flow into the drainage canal. The contour-drainage canal serves two purposes: a) to hold water when rainfall is minimal and b) to remove excess water to prevent flooding and waterlogging. This structure is recommended in heavy soils.
· Contour-drainage canal is constructed similar to a contour canal except that it gradually slopes at one percent droo into the drainage canal.
· Place excavated soil on the lower side of the canal.
· Place a mound of soil at the lower end of the canal.
· Tamp the soil to make firm mound.
· Plant grasses and leguminous spp.

Contour drainage canal
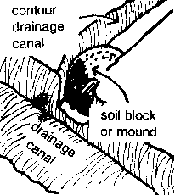
Soil block
4. Contour bund is the firm mound of soil formed during the construction of the canals. During rain, water and the soil carried by it are initially collected at the depression at the. base of the mound and the strip. The excess water and the soil canted by it collect at the canal before the mound or bund, in case canal is below the bund or by the canal in case the bund is below the canal.

Before and after
5. Check Dams Moving water dislodges soil particles and carry these particles away, thus causing erosion. A check dam slows down water flow and allows heavier soil particles to settle down.

Check dams
· In a drainage system, drive
stakes into the ground, perpendicular to the water flow.
Gliricildia makes an
ideal "live" peg if it is available. The cuttings will grow and form a permanent
living barrier. Arrow root and vetiver grass planted across the canal will serve
as good check dam.
· Weave split bamboo strips between the pegs but not very closely. The aim is not to stop the water but to slow down its flow. Periodically clean the area above the dam.
· Begin constructing dams from the top portion of the drainage canal or gully. The steeper the slope, the closer together the dam should be.
6. Soil traps. The purpose of this structure is to catch soil carried by water in a drainage system and to slow water flow. It is placed about 1/2 m above a check dam.

Soil trap
· In a drainage system (drainage diversion canal, contour-drainage canal or gully), dig a pit at least 0.8 m. deep × 1.00 m long and 0.5 m wide.
· Clean the pit periodically and spread the soil on the farm.
8. Bench Terraces
The process of levelling the land for agricultural or other purposes is called bench terracing. It is generally done where there is deep heavy clay soil rather than in very sandy soil. The most direct method is called the cut and fill procedure and requires several steps These are:

Area
1. Using an A-frame, mark at least two contour lines on a hillside. The vertical distance should not be more than 1.5 meters. Generally, the vertical distance will be about 1.0 meter. The distance along the slope will vary. The more gentle the slope. the further apart the contour lines.

Find the midline
2. Find the midline between the two contour lines.
3. Using draft animals or hand tools such as shovels, begin removing the soil from the upper half of the strip, i.e., midline to upper contour line (the cut) and place it on the lower half (the fill).
4. Continue the process until the area above the midline and the soil piled below the midline are levelled.
5. The front of the level area called the riser should be constructed so it slants back toward the hillside. The angle of the riser should be between 15° and 45° depending upon the type of soil and the riser height. The angling of the riser will give it more stability. Further riser stabilization is done by planting the riser with grasses.
6. A small canal is excavated at the base of the terrace. This canal is used to carry off excess rain water during heavy rains and saves the terrace below from being washed away. Care must be taken to integrate the drainage of the bench terrace into the overall drainage system of the farm
7. Slope the new front area of the terrace slightly upwards. At the front of the terrace and on the top of the riser, construct a small mound or lip. This will prevent water from washing over the front and eroding the riser

Cross section showing riser lip
CONSIDERATIONS:
1. Bench terracing is the most labor intensive and the most expensive of the land-levelling processes and often requires draft animal power.
2. A scraper/scoop can be used to help in moving soil. The scraper consists of blade made of a solid plank of wood or metal with a handle attached and a strong rope (4 m. length) attached to the top of the blade (base of the handle). The scraper is operated by two men. One places the blade into cultivated soil. The other, guided by the man with the handle, pulls the scraper towards the fill area. If draft animals are available, the area can be plowed first to facilitate soil movement. The blade can be attached to and pulled by draft animals.

Two-man scraper
3. Frequently, top soil from the proposed terracing areas is removed and stock piled on the side. The base of the bench terrace is constructed using subsoil from the cut area and then the top soil is placed back on the surface. The process is time consuming but ensures good will remains on the surface.
4. Several different materials may be used to stabilize the riser. These include Bermuda grass Cynodon sp.,Napier grass Pennisetum purpureum, "Hetero", Desmodium heterophyla.
5. In some areas of the country, legume hedgerows are placed at the top of the riser and constantly pruned to generate green manure or animal feeds. vetiYer grass may also be planted on the lip.
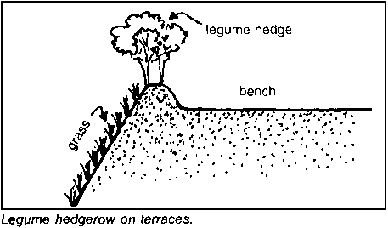
Legume hedgerow on terraces
6. Rockwalls are frequently used to create a more permanent riser. (See Terraced Land Agncultural Technology, page 81.)
7. To protect the above newly terraced area, a drainage canal can be constructed across the top of the farm and excess water from land above the farm can be diverted around the farm. Care must be taken to stabilize the canal and the gully into which the water flows. This is especially true on steep slopes.
8. Care should be taken that a finished riser height is not too tall. When one terrace is linked to the one below it, the riser height is the same as the vertical distance between contours. Riser heights of over one meter are difficult to climb. For example, if the vertical distance between contour lines is 20 meters, the riser height of one terrace is 10 meter.
This is fine until another bench terrace is built above or below. If the new riser also has a 2.0 m vertical height between contours, the common riser between the two benches will be 2.0 m. A farmer would need a ladder to climb over the riser. It would ' he more unstable because of its height.
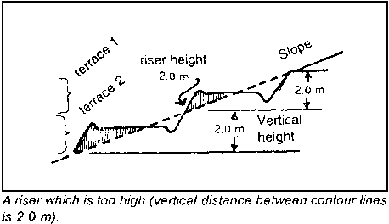
A riser is too high
9. The bench terrace requires maintenance. The canal at the back should be constantly cleaned, the riser checked and its cover maintained, If hedgerows are present, they should be regularly pruned.
10. Comparison of bench terracing with other soil conservation structures:
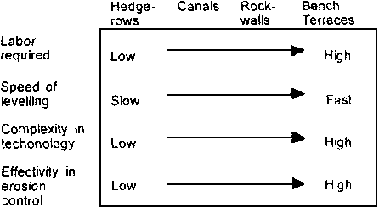
Figure
11. Rockwalls are sometimes used to stabilize the riser and the terrace used for both wet land and dry land crops. (See Terraced Agricultural Land Technology)
TERRACED AGRICULTURAL LAND TECHNOLOGY (TALT)
This farm technology was observed in Patlabawon. Patnongon, Antique, and dates back to the early 1900s. In some parts of Cebu, this practice has likewise been observed. A more extensive proof of this technology is the irrigated rice paddies of the Cordillera, particularly the Banaue rice terraces.
Materials include stones or rocks, A-frame, carabao or cow, plow, flat bar, pick mattock, hoe, spade or shovel, wooden plank.
Procedure:
1. Locate a site with good soil and where stones/boulders are abundant

Plow line on hillside at soil height
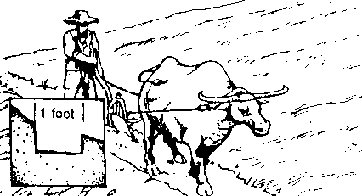
2. Establish the contour using an
A-frame

3. Collect stones/rocks and prepare
them below the identified contour line
4. Plow and dig the identified contour deep enough to accomodate the initial foundation of big stones. Set the initial stones on angle towards the slope.
5. Pile rocks stones gradually in a manner that they fit and lock each other. Fill in the gaps with smaller stones and clayey soil to minimize leakage. The heavier end of the rock or boulder must be piled facing the hill for greater stability. The base of the rockwall must be always wider than the top. The inclination of the rockwall should be between 5-10 degrees from the vertical axis.
6. Plow to loosen the upper portion of the slope and move the soil using a harrow mounted with a wooden plank towards the rockwalls if soils are deep.
7. After attaining the desired level of the soil, construct a dike on the soil surface adjacent to the top of the rockwall. This will create a holding area for water.
8. Terrace building starts from the bottom and proceeds uphill. In severely eroded areas like Cebu, the farmers start building from the upper slope.
9. Prepare the field for planting of rice during rainy months and corn/tobacco/vegetables during summer.
10. Plant forest and fruit trees on the upper portion of the hill and some leguminous species around the terraced area to minimize soil erosion and enhance water accumulation.
CONSIDERATIONS:
1. The distance between contour lines depends on the farm plan and the farm situation.2. The height of the rockwalls depend on the availability of stones/rocks in the area, farm situation and farm plan.
3. This labor intensive technology is best done through alayon or dagyaw (bayanihan) or mutual labor sharing (man and animal).
4. To break big stones, heat and pour tap water over the rock before breaking with pick mattock.
ESTIMATED COST OF CONSTRUCTION OF TERRACED RICE PADDY
1. Construction of Rock walls (Gathering and Piling of Rocks) Rockwall Dimension:
1.0 meter base
1.0 meter high
0.5 meter top
Rate: 2 linear meters per person day2. Diversion of Soil a. Average of 2 cubic meters per person day b. Average of 8 cubic per person/animal day at P15 00/cubic meter
3. Leveling the Rice Paddy 112 Hectare per person/animal day
4. Construction of Paddy Dikes (Dimension 30 × 60 cu m)
Average of 9 linear meters per person day
|
| ||||||||||||||||||||||||||||||||||||||||||||||||||||||||||||||||||||||||||||||||||||||||||||||||||||||||||||||||||||||||
Land management practices for improved water conservation
Water conservation is important, especially in areas where water is limited or not enough for crop production.
Land management practices that aim to conserve water in upland farms are based on the understanding of water cycle and its component processes.
THE WATER CYCLE
· Upland farms receive water mainly from rainfall.
· Some of these water enter the soil (infiltration).
· Some run over the land surface and flow out to the streams, rivers and seas (runoff).
· Water in the soil is used by crops.
· Some water in the soil move downward (percolation) and sideward (seepage) into the ground water and then also to the streams, rivers and seas.
· Water is resumed to the air directly from water surfaces, ground surfaces, etc., (evaporation) and thru plants (transpiration).
· Water vapors in the air join together to form clouds and condense to form rain.

Water cycle
TABLE 3. CYCLE SUMMARY.
|
GAINS |
PATHS |
STORES |
|
Rain |
Infiltration |
Soil (temporary) |
| |
Uptake |
Plants (temporary) |
| |
Percolation/ |
Groundwater |
| |
seepage | |
| |
Runoff/percolation/ |
Rivers, seas, etc. |
| |
seepage | |
| |
Evaporation/transpiration |
Air clouds |
The goals of water conservation strategies are to store more rain water, increase infiltration, decrease runoff, percolation and seepage and minimize evaporation. Early land preparation, cultivation along the contours, deep cultivation and addition of organic matter increase the capacity of the soil to hold water by improving the soil structure. They are best done before the onset of the rainy season. Other practices like mulching, terracing, maintenance of vegetative groundcover minimize runoff by giving more time for the rainwater to infiltrate the soil. Minimum tillage and zero tillage decreases evaporation and are more effective in storing residual soil moisture for dry-season cropping.
Organic matter sources include compost, animal manure, green manure and other organic fertilizers. Leaf litters and crop residues such as rice straws, corn stovers, rice hulls, etc., are some examples of good mulching materials.
In some areas, networks of small water holes, small farm ponds or water-impounding structures are established to conserve more water.
TABLE 4. WATER CONSERVING LAND MANAGEMENT PRACTICES.
EFFECTS ON PROCESSES
|
PRACTICES |
Rain Water Storage |
Infiltration |
Runoff |
Percolation Seepage |
Evaporation/Transpiration |
|
Addition of organic matter |
+ |
+ |
- |
+ |
o |
|
Contour cultivation |
o |
+ |
-* |
o |
o |
|
Deep cultivation |
+* |
+*. |
- |
+ |
o |
|
Terracing |
o |
+ |
- |
o |
o |
|
Maintenance of vegetative groundcover |
+ |
+ |
- |
+ |
+ |
|
Mulching |
o |
+ |
- |
+ |
- |
|
Minimum/Zero tillage+ |
+ |
+ |
- |
o |
- |
|
Fallowing |
+ |
+ |
- |
o |
- |
|
Early land preparation |
+ |
+ |
- |
+ |
+ |
Note: + (increase); - (decrease); o (no effect); '(short-temm effect)
ALLEY CROPPING
Alley cropping is a system of intercropping rows of food crops with rows of fast-growing trees or shrubs. Generally, it is practiced in areas with flat to gently rolling topography. The crop rows are oriented in an east-west direction.
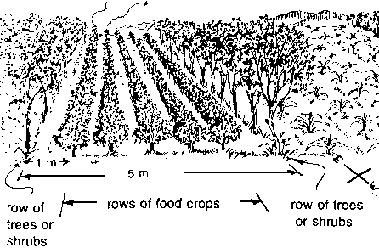
Alley croping
PROCEDURE
1. Site Selection. The area to be devoted to alley cropping should have a flat to gently sloping topography and should be less productive for purely food crop production.
2. Land Preparation. After clearing and weeding the area, layout the rows of trees or shrubs and food crops in an east-west direction with the following distances: in between rows of tree crops, 5 meters; in between rows of tree and food crops, 1 meter; in between individual tree plants, 25 to 150 centimeters. Distances between rows and individual food crops shall depend on the type of plant to be grown. With use of a harrow or hoe, cultivate only the rows where tree and food crops will be planted.
3. Planting of trees and food crops. Plant trees with food crops during the planting season. Allow the tree crops to grow one full year while conducting normal farming operations on the food crops.
4. Maintenance. Conduct pruning of the tree crops in the second year, twice or every three months at 0.5 meter height. Leaves and small stems should be used as mulching materials for food crops.
BENEFITS
1. increases soil nitrogen.
2. Helps control weeds.
3.
Serves as windbreaks, controls soil erosion.
4. Provides livestock feed and
firewood.
5. increases available moisture by improving infiltration and
reducing runoff.
6. Helps achieve higher yields over conventional cropping
system.
TROUBLE-SHOOTING PROBLEMS
Common problems encountered in alley cropping are competition between trees/shrubs and food crops for sunlight, space, water and nutrients.
How to minimize competition for sunlight:
1. Orient the rows in an east-west direction to avoid shading.
2. Use of trees/shrubs that are self-pruning or can withstand frequent pruning.
3. Use of trees/shrubs that have small crown and light branching characteristics.
4. Use of trees/shrubs with leaf arrangements that permit penetration of light or those that have leafless periods.
5. Use of trees/shrubs that are shade-tolerant during their establishment stage.
6. Use of food crops that do not cast too much shade and/or are not climbers that affect the growth of trees in the establishment stage.
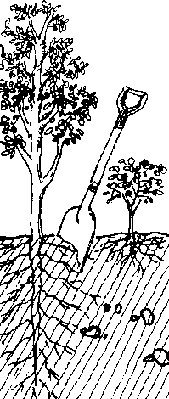
Figure
How to minimize competition for space:
1. Use of multipurpose trees/shrubs that produce either fodder, fueiwood or food.
2. Proper spacing of the rows of trees/shrubs to allow sufficient space for food crops.
3. With the use of plow or spade, cut the lateral roots of trees that expand to the area of food crops.
How to minimize competition for water and nutrients:
1. Use of trees/shrubs and food crops whose litter fall is
easily decomposed.
2. Use of trees/shrubs and food crops that fix atmospheric
nitrogen.
3. Use of trees/shrubs with root systems deeper than those of food
crops.
4. Avoid using food crops whose nutrient requirements rapidly exhaust
the soil.
5. Practice crop rotation and mulching.
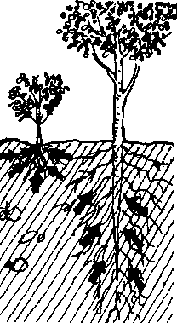
Figure
TABLE 5. SUGGESTED TREE SPECIES FOR ALLEY CROPPING.
| | |
CHARACTERISTICS. | |||||||||||
|
SCIENTIFIC NAME |
COMMON NAME |
1 |
2 |
3 |
4 |
5 |
6 |
7 |
8 |
9 |
10 |
11 |
12 |
| |
| | |
| | |
| | |
| | |
|
|
Albizia lebbek |
Langil |
x |
- |
x |
x |
x |
x |
x |
- |
- |
x |
x |
- |
|
Albizia lebbekoides |
Kariskis |
- |
- |
x |
- |
x |
x |
- |
- |
- |
x |
- |
- |
|
Albeia procera |
Akleng parang |
x |
x |
x |
- |
x |
x |
- |
- |
- |
x |
x |
- |
|
A/nus japonica |
Alnus |
x |
- |
- |
x |
x |
x |
- |
- | |
- |
- |
- |
|
Alnus nepalensis |
Alnus | |
x |
- |
- |
x |
x |
x |
- |
x |
- |
- |
x |
|
Azadirachta indica |
Neem |
- |
- |
x |
x |
x |
- |
- |
x |
- |
x |
x |
x |
|
Cajanus cajan |
Kadios |
x |
x |
- |
- |
x |
x |
- |
x |
x |
x |
- |
- |
|
Calliandra calothyrsus |
Calliandra |
x |
x |
- |
x |
x |
x |
x |
x |
- |
x |
- |
- |
|
Cassia siamea |
Thailand shower |
- |
- |
x |
x |
- |
- |
x |
- |
- |
x |
x |
- |
|
Desmodium gyroides |
Karikut-rikut |
x |
- |
- |
x |
x |
x |
x |
x |
- |
- |
- |
- |
|
Desmodium rensonli |
Rensonii |
x |
x |
- |
x |
x |
x |
x |
x |
- |
x |
- |
- |
| | |
CHARACTERISTICS | |||||||||||
|
SCIENTIFIC NAME |
COMMON NAME |
1 |
2 |
3 |
4 |
5 |
6 |
7 |
8 |
9 |
10 |
11 |
12 |
|
Erythrina onentalis |
Dapdap |
x |
- |
x |
x |
x |
x |
x |
x |
x |
- |
- |
- |
|
Flemingia macrophylla |
Malabalatong |
x |
- |
- |
x |
x |
x |
x |
- |
- |
- |
- |
- |
|
Gliricidia septum |
Kakauate |
x |
x |
x |
x |
x |
x |
x |
x |
x |
x |
- |
- |
|
Gmelina arborea |
Gmelina |
- |
- |
x |
- |
x |
- |
x |
x |
x |
x |
x |
- |
|
Leucaena diversifolia |
Acid Ipil-ipil |
x |
x |
x |
- |
x |
x |
x |
x |
x |
x |
x |
- |
|
Leucaena |
Ipil-ipil |
x |
x |
x |
x |
x |
x |
x |
x |
x |
x | | |
|
leucocephala |
| | |
| | | | | | | | | |
|
Moringa oleffera |
Malunggay |
x |
x |
x |
- |
x |
- |
- |
x |
x |
x |
- |
- |
|
Pithecellobium dulce |
Kamachile |
x |
- |
- |
x |
x |
x |
- |
- |
- |
x |
x |
x |
|
Psidium guajava |
Bayabas |
- |
- |
x |
x |
x |
- |
- |
- |
x |
x |
- |
x |
|
Sesbania grandiflora |
Katuray |
x |
x |
x |
x |
x |
x |
- |
x |
x |
x |
- |
- |
|
Spondias purpurea |
Sineguelas |
- |
x |
x |
x |
x |
- |
- |
- |
x |
- |
- |
x |
| | |
CHARACTERISTICS | |||||||||||
|
SCIENTIFIC NAME |
COMMON NAME |
1 |
2 |
3 |
4 |
5 |
6 |
7 |
8 |
9 |
10 |
11 |
12 |
|
Swietenia macrophylla |
M a hog a n y |
x |
x |
x |
x |
x |
- |
x |
- |
- |
- |
x |
- |
|
Syzygium cumini |
Duhat |
x |
- |
- |
x |
- |
- |
x |
- |
x |
x |
x |
x |
Legend:
1 Self-pruning and/or withstand frequent pruning
2 Small crown, light branching
3 With leafless period, leaf pemmit sunlight penetration
4 Shade-tolerant at establishment stage
5 Litterfall easily decomposed
6 Nitrogen-fixing
7 Deep-rooted
8 Fodder/forage
9 Food
10 Fuelwood
11 Lumber and other wood products
12 Medicinal
|
| ||||||||||||||||||||||||||||||||||||||||||||||||||||||||||||||||||||||||||||||||||||||||||||||||||||||||||||||||||||||||
In-row tillage
INTRODUCTION
In-row tillage, or iras-iras as it is more commonly called locally, is a minimum tillage system where only about 60 percent of a field is cultivated. It is practiced in Southern Cebu where hillside farms are of heavy limestone (rocky and dry). the technology is also especially applicable to easily erodible areas, i.e., steep to moderately steep slopes. It is not suitable in unstable and loose soils. The iras-iras minimizes erosion, at the same time gradually builds up the soil and ultimately increases yields.
PROCEDURE
1. Measure a contour baseline on the upper portion of the farm using an A-frame. Develop this line into a contour drainage canal, thick hedgerow or rockwall to protect the lower portion of the Farm from runoff water.
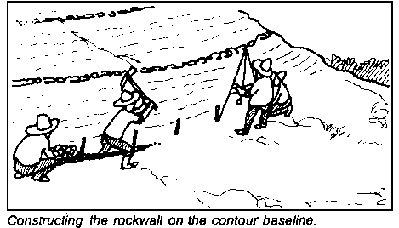
Constructing the rockwall on the
contour baseline
2. Measure 100 cm below the baseline and lay out a contour line using an A-frame.
3. Below the contour line, dig a furrow, 40-60 cm wide and as deep as possible.
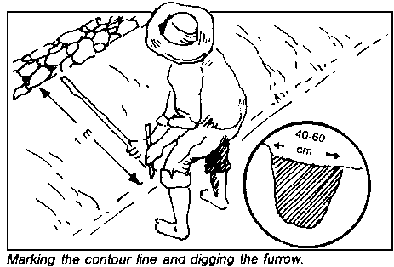
Marking the contour line and digging
the furrow
4. Loosen but do not remove the in the furrow. Remove rocks and place them on the lower side of the furrow.
5. Tamp the soil on the lower side of the furrow.
6. Measure 1 m below the preceding contour line and construct a second furrow as in step 3. Then, develop three more furrows down the slope following the steps previously indicated.
7. Eighty (80) cm below the contour line of the fifth furrow, make another SO cm-wide furrow and develop it into a thick hedgerow or rockwall to further stabilize the hillsides.
8. Repeat procedures 2-7 until the whole farm has been covered.
9. Plant the main crop on the furrows. The uncultivated spaces in between should be planted with cover crops to stabilize them. (Important: organic fertilizers on the furrows two to three weeks before planting.)

Recomended measurements
MAINTENANCE OF IRAS-IRAS
1. Replant gaps in the hedgerows and repair damaged rockwalls.
2. Replant uncultivated strips between furrows with cover crops to prevent soil from falling into the furrows.
3. Before the iras-iras becomes stable, the soil keeps moving downward. It is necessary to widen furrows. Spread the soil that accumulate on them.
4. Do not pull the weeds that grow as this will loosen the soil and stones on the strips. Just cut the weeds close to the ground.
5. Use the cut weeds and crop wastes/residues as mulch to help preserve the soil moisture.
|
| ||||||||||||||||||||||||||||||||||||||||||||||||||||||||||||||||||||||||||||||||||||||||||||||||||||||||||||||||||||||||
Making an A-frame
One does not need to have expensive soil surveying equipment to locate the contour lines of the land. The Aframe is a simple and practical instrument, which can easily be made by the farmer using locally available materials.

Trees and a peasant
The steps in making the A-frame are as follows:
1. Secure the following materials:
· 3 wooden or bamboo poles with a 1.5 inch diameter (2 of which should be 2.1 In long and one about 1.2 m)· sturdy string for tying or nail
· a rock about the size of a fist or any similar heavy object object
2. Tie or nail the two longer poles at one end, about 10 cm from the end. Make sure they are securely fastened. These will make the legs of the A-frame. Make notches on the points of contact so that the poles will not slip.3. Spread the legs and brace with the shorter pole to make a figure "A". Tie or nail the crossbar (about 10 cm from each end) to the middle of the legs of the "A". The crossbar will support the legs of the frame and will serve as guide in making the level ground position.
4. Tie one end of the string to the point where the two legs of the A-frame are joined.
Measurements5. Tie the other end of the string to the rock or any object for weight. The rock should be heavy enough so that when it is suspended, it will not sway with the wind. The rock should hang about 20 cm below the crossbar.
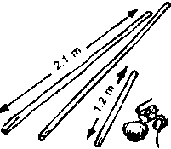
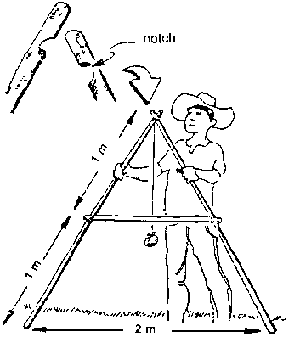
Child Measuring
CALIBRATING THE A-FRAME
1. Locate a reasonably level ground and place the A-frame in an upright position. Mark the spots where the legs (A and B) touch the ground. Then mark the crossbar where the weighted string passes it.
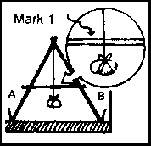
Mark 1
2. Reverse the position of the Aframe's legs such that leg A is exactly on the same spot where leg B was and vice-versa. Again, mark the crossbar where it is crossed by the string.
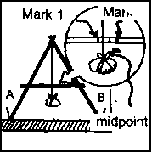
Midpoint
If the two marks exactly coincide, this means that you have found the midpoint on the crossbar and that the A-frame is standing on level ground.
If the two marks are separate, make another mark at the midpoint between them.
3. To check the accuracy, move one leg around until the string passes the level point of the crossbar. Mark the point where the adjusted leg touches the ground. Reverse the placement of the legs of the Aframe. If the string passes the same point, the level position has been located.
4. Check calibration from time to time.
MARKING THE CONTOUR LINES
1. Cut tall grasses and remove other obstructions so that you can move about easily. Two people will make the work much faster and easier. One will operate the A-frame while the other marks the located contour lines.
2. Begin near the highest point. Drive the first stake at the boundary of the area and position the left leg of the A-frame beside and just above it.
3. Adjust the right leg such that the weighted string passes through the midpoint of the crossbar. (This means you have found the contour.) Mark this point by driving another stake just below the right leg of the A-frame.
4. Move the A-frame to the right by placing the left leg on the spot where the right leg previously was. Adjust the other leg again until the string passes through the midpoint mark. Again, mark this with a stake. Follow this procedure until you reach the other side of the field
5. Repeat steps 24 until you reach the bottom of the hill. The vertical distance between contour lines should be 1.5 m (the actual distance varies with the slope of the hill), which can easily be determined as shown in the figure on this page
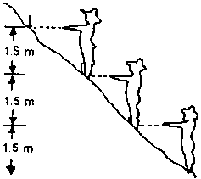
Height
6. After the contour lines have been determined, some of the stakes will be astray from the general curve of the contour line.
|
| ||||||||||||||||||||||||||||||||||||||||||||||||||||||||||||||||||||||||||||||||||||||||||||||||||||||||||||||||||||||||
Controlling Cogon and Talahib
Decades of continuous slash-and-bum cultivation and other inappropriate agricultural practices, especially in upland hilly to slightly rolling farms, have resulted in rapid land degradation due to soil erosion. Consequently, hundreds of thousand hectares of formerly productive famlands have become barren and unproductive. These farmlands are usually abandoned or left in fallow. Two common weed species -- cogon (Imperata cylindrica) and talahib (Saccharun. spontaneum) - tend to dominate these abandoned or fallow areas. These two weed species are considered by farmers to be indicators of poor soil fertility - hence, poor farm productivity.
Four techniques found effective in controlling cogon and talahib are the following: hapi-hapi, an indigenous technology from the Visayan region; roll-over method; slash-mulch-plant method; and, planting of fast-growing multipurpose nibogen-fixing trees.
HAPl-HAPI
Hapi is a Cebuano term which means "to press or to crush. It has been loosely translated into hapi-hapi to mean to crush standing cogon by using a piece of wood. The hapi-hapi technology is designed to disturb and slow down the growth of cogon while a mantle of kudzu (Pueraria phaseoloides) is established and allowed to grow nominally and shade out the cogon.
Simple Steps and Guidelines for the Hapi-hapi
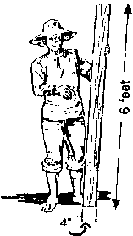
Peasant throw seeds
1. Broadcast kudzu (Puerana) pods or seeds over the cogonal area. About 2-3 kgs of seeds or 5-10 cans of pods are needed per hectare.
2. Prepare a plank measuring 2 meters long, 10 cm wide and 5 cm thick. Locally available materials -such as coconut trunk or any straight and round pole - can be used.
3. The kudzu plants usually start twining over the cogon six months after broadcasting/seeding.
At this stage the first stage hapi-hapi is done using the wooden plank. This is carried and dragged over the standing cogon forcing it to lodge (hap/). At the same time, step on top of the plank from end to end to exert more weight which will crush the vegetation.

Peisage
4. Perform the hapi-hapi, preferably in the morning or late afternoon. The first hapi-hapi disturbs and slows down the growth of cogon so the kudzu can grow faster and creep over the cogon This retards the regrowth of cogon; whereas, if you cut the cogon with a sharp sharp the regrowth is much faster. By employing hapi-hapi, the creeping kudzu has a competitive advantage over cogon, hence better growths
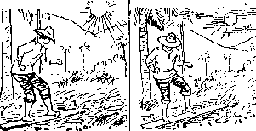
Figure
5. Do the hapi-hapi at least twice. It is highly recommended to do the second hapi-hapi when the cogon has started to rise again and when the kudzu is on its peak of vegetative growth (usually in the months of May-June after they have produced seeds).
Figure
6. Four to five days are required to practice hapi-hapi on a 1hectare farm.
7. Broadcasting kudzu pods/seeds followed by hapi-hapi in cogonal areas restores soil fertility thus, improves the growth and yield of coconut trees and other plants with economic values.
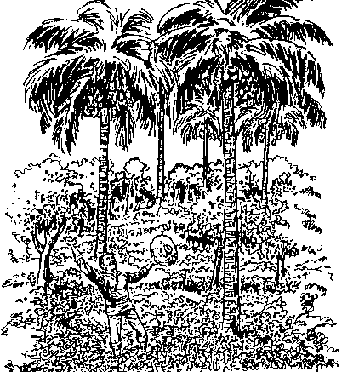
Peasant thanking God
Considerations/Options:
Establishment of Kudzu in Slightly Rolling to Hilly Cogonal Areas
1. The farmer may cultivate a portion (0.5 sq m) randomly scattered throughout his parcel and drill the seeds.
2. Farmer may broadcast kudzu pods or seeds first then burn the area. This will also hasten kudzu establishment followed by hapi-hapi when cogon and kudzu are vigorously growing.
3. Stony areas (with big rocks) - Hapi-hapi would be difficult but adjusting the length of the wooden plank would solve the problem. However, broadcasting kudzu on this kind of land would still suppress cogon; but, it takes time
Use of Other Creeping Vines/Legumes
Farmer may try other creeping vines/legumes that thrive in the locality or have competitive ability with cogon.
Use of Leguminous Tree Species and Other. High value or Shade-tolerant Crops in Between Coconuts
This can be done after two years when kudzu has completely shaded out the cogon. Establish your crop following the contour.
ROLL OVER METHOD
With the use of this method, a slopy cogonal-talahib area with growth density ranging from 60100 clusters/sq. R. (at 5-20 strands per cluster) can have a decreased reemergence from 8040 percent. Runners underneath the soil decay one month after the rolling activity. Rolled over grasses decompose or dry up to as much as 90 percent in a month's time It takes more than six months for the regrowth to reach population density to as much as it was before. Rolling-over can be used to clear an area for planting or for other purposes.
Procedure
Take a tree trunk heavy enough to press down the grass. With the force and weight of the body on one foot, roll the tree trunk towards the direction where the grasses are inclined.

Peasant with a bamboo stick
A bamboo about 6 inches in diameter and 6 feet long can also be used. Tie the bamboo with a rope 2 feet from both ends. Hold the rope with both hands. With the weight of the body at one foot, press the grasses to the ground. Lift the bamboo and press it again, repeating the procedure until the whole area to be rolled over has been thoroughly pressed.
SLASH-MULCH-PLANT METHOD
Marginal lands with profuse cogon and talahib growth which are difficult to plow can still be used for beneficial crops like beans, cowpeas, eggplant, tomatoes and rootcrops. This method also prevents erosion due to the presence of the mulch.
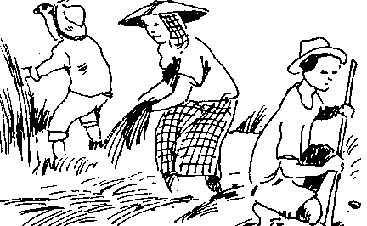
Working hardly
Procedure
1. Slash the cogon and talahib to the base and spread them as mulch over the cleared area.
2. Dig holes at distances the crops so require.
3. Remove grass roots or runners from the dug holes. 4. Plant the vegetable seeds or the seedlings.
PLANTING OF FAST-GROWING
MULTIPURPOSE/NITROGEN-FIXING TREES
The trees take about three years to grow before density of grasses is kept at a minimum for other plants to thrive. Plant tree species that can compete well with reemerging grasses previously cut prior to tree planting. Choose also fast - growing trees with high - shading capacity. Aside from controlling the growth of cogon and talahib, the trees also help regenerate the soil.
Procedure
1. Locate the contour lines with the use of an A-frame.
2. Cut cogon/talahib along contour lines 1 meter wide.
3. Dig holes for seedlings and remove the runner or roots of the grasses from the dug holes.
4. Plant tree seedling at 1 meter distance or as desired.
5. During the first year, ring-weed trees to about 1 meter diameter to facilitate growth and minimize competition with regrowth of grasses.
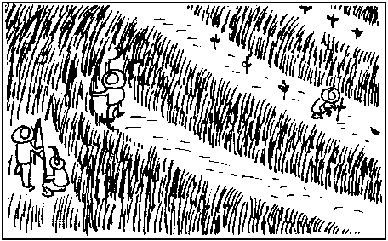
Measuring and
working
|
| ||||||||||||||||||||||||||||||||||||||||||||||||||||||||||||||||||||||||||||||||||||||||||||||||||||||||||||||||||||||||
Use of derris as botanical pesticide
Derris
Derris elliptica, commonly known as Tubli, Tibanglan, Tiba-lau, Malasiag, Bauit or Tugleng Pula, is a bushy leguminous vine usually found growing near river banks or streams. The dark-green compound leaves usually have 9-13 sword-shaped to oblong leaflets with pronounced pointed tips.
The roots of Tubli contain rotenoids, a highly potent insecticidal chemical which is widely used for the control of a variety of insect pests in the home, on domestic animals and on the field. It is also widely used as fish killer. On field crops, it has a short (3-5 days) residual toxicity and the residues are non-toxic to man.
SELECTION OF PLANTING MATERIAL
Twist the roots of Tubli plants and observe the amount of milky sap that oozes out. Get stem cuttings only from whose roots contain a lot of sap since potency has been associated with sap content.
PROPAGATION
Tubli is easily propagated using 10-30 cm mature brown stem cuttings with 1-3 nodes and at least 5 mm in diameter. Plant the cuttings in sand or well drained top soil, either in plastic bags or in mist beds.
When rooted directly in plastic bags, place them in shaded locations and spray with water at least 3 times a day. Fitly to sixty percent of the cuttings will root successfully. The plants will be ready for transplanting in 34 months.
Rooting can be increased to almost 100 percent if the cuttings are allowed to root for at least 45 days in mist beds prior to bagging.
PLANTING
Tubli grows best when grown in unshaded areas. It is planted from 0.3-1.0 m apart, either in between perennial crop rows as a cover crop or as part of a contoured vegetative terrace. Plant at the start of the rainy season.
CARE AFTER TRANSPLANTING
Tubli is a relatively slow grower and will need frequent during the first year. Irrigation improves plant growth. Though it is N-fixer, it will benefit from the application of 50 and 100 9 14-14-14 during the first and second years, respectively.
HARVESTING
Tubli roots can be harvested 4 months from transplanting although the highest root yield per plant is attained at 1.5-2 years from planting. Early harvesting is suggested in areas with deep soils to forestall the development of deep roots which are difficult to harvest.
PROCESSING
Tubli roots can be dried, powdered, then mixed with clay (kaolinite) at a ratio of 1:4. The mixture can be dusted directly on plants stored in sealed, black plastic bags for future use.
For spraying, freshly harvested roots are crushed finely and suspended in water at the rate of 40 9 fresh roots per 20 l water. Spray Derris extract only after 5 p.m. to maximize toxic effects. The solution can be used as shampoo for animals to eliminate fleas and ticks.
For the elimination of trash fish, a jute bag containing about 1 kg of crushed root is immersed in the pond.
Note: The above rates are tentative and should be adjusted depending on the original toxicity of the roots and the type of pest.
|
| ||||||||||||||||||||||||||||||||||||||||||||||||||||||||||||||||||||||||||||||||||||||||||||||||||||||||||||||||||||||||
Fire control in the uplands
Fire is a major hazard during the dry season in newly established plantations, especially if located adjacent to cogonal areas. The presence of dry weeds and cover crops in a plantation during the dry season increases the possibility of fire. Aside from intentional sabotage, a carelessly thrown cigarette butt can easily cause a major conflagration in such areas. To minimize the possibility of fire from within the plantation, incorporate the dry grass or cover crops thru cultivation.
NATURAL FIRE BREAKS
Any area free from vegetation will deter the spread of fire. Examples of these include streams, canals and roads. The removal/minimization of vegetation beside these natural firebreaks during the dry season will increase their ability to contain a fire.
FIRE LINES
These are 10 m wide vegetation-free strips usually established at the borders of the plantation and at given intervals inside the plantation. Fire lines at the borders can be established using tillage equipment or by controlled fires started during the early part of the dry season. The second option is quite risky and should be done by experienced personnel.
Fire lines and natural fire breaks are the first line of defense in case of fire spreading from nearby areas. People should be stationed at the outermost fire lines, ready to beat off the small fires being initiated in the property by sparks coming from the conflagration.
COUNTER-FIRE
If a major fire is detected early enough and if the wind changes direction towards the fire, a controlled counter fire can be initiated outside the borders of the plantation so that it will spread towards the major fire. The spread of the major fire towards the plantation can be effectively stopped in this manner. The counter-fire can also be initiated on the upper slopes of a hill on the other side of which is the spreading fire.

Counter-fire
|
| ||||||||||||||||||||||||||||||||||||||||||||||||||||||||||||||||||||||||||||||||||||||||||||||||||||||||||||||||||||||||
Cultural management of pest infestation
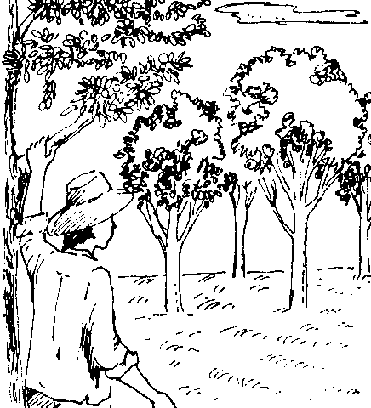
Watching somewhere
An integrated approach to pest management where the role of pesticides is minimal is possible when the farmer is aware of the biology and environmental responses of key organisms in the farm ecosystem.
Cultural management practices, if applied properly, can help prevent pest breakout. Improper or non-application of specific cultural management practices may predispose the crops to pest infestation. The objective is to create a microenvironment in the farm which favors the crop and deters most pests.
SITE SELECTION
1. Rainfall. The distribution of rainfall affects pest populations. For instance, the coffee berry borer problem is difficult to control in areas with well-distributed rainfalls primarily because the spread-out harvest period allows overlapping generations of this pest. And, the mango anthrachnose problem also makes mango cultivation difficult in such areas.
2. Humidity. One of the reasons why scales are not a problem during the rainy season is the proliferation of entemogenous fungi which parasitize the scale insects. Coffee rust is also inhibited in humid areas. However, most other fungi and bacteria thrive in humid locations.
3. Temperature. The incidence of citrus scab increases with elevation. In contrast, the coffe rust pathogen becomes more destructive in the lower elevations.
4. Soil pH. Acid soils have been associated with increased incidence of Panama wilt of banana and abaca.
5. Drainage. Waterlogging predisposes the plants to root rot pathogens. The high humidity in waterlogged banana plantations predisposes the plants to leaf pathogen infection.
6. Location. It is wise to avoid planting in areas where major diseases of the choice crop species abound. For example, planting citrus in the general Batangas area would be tantamount to committing suicide because of the endemic citrus pests and pathogens (viruses) in the area. The same goes for the ring spot virus of papaya which is already endemic to the Laguna, Batangas and Cavite areas.
STANDING VEGETATION
The current vegetation in an area targetted for planting with perennial crops should be evaluated in terms of alternate host potential. For example, wild Heliconia are alternate host plants of the pineapple mealybug. This is particularly important, especially if the standing plants are old ones scheduled for replanting. In such cases, the inoculum load (disease incidence) should be considered before deciding on specific planting materials.
VARIETAL SELECTION
If possible, use resistant cultivars. For example, saba banana is practically immune to the corn weevil. The S 795 and S 288 arabica varieties are highly resistant to coffee nust.
NURSERY PRACTICES
The nursery should be isolated from potential sources of inoculum. Seed bed media should be sterilized if not replaced regularly. The seed bed should be well-drained in order to prevent damping off.
Use pest-free propagules in the nursery. Periodic spraying with pesticides should be able to keep down the incidence of general foliage feeders and pathogens. In case of nematode infestation, nematicides should be applied to each plasticbagged seedling.
CLEARING PROCEDURES
Remove remnant stumps if crops (like rubber) highly susceptible to rots are to be planted. Burning as a method of clearing sterilizes the first 5-10 cm top soil layer and rids them of various weed propagules and soil borne insect pests and pathogens. It also eliminates infected plants.
PLANTING METHODS
1. Time of planting. Plant abaca and banana just before the rainy season so that the wounds on the propagules can heal before the wet soil condition which will favor pathogens. This is known as field-curing. This is also practiced in the case of kakawate cuttings planted directly to the field. in pineapple, slips and suckers are allowed to air-dry so that the butt end will dry up and become less susceptible to pathogens.
2. Planting density. High density systems result in greater
humidity immediately around each plant.
This leads to higher black lead
streak incidence in banana and greater pod rot incidence in cacao.
3. Cropping system. Theoretically speaking, it is not advisable
to mix crop species which share the same major insect pests/pathogens. In some
crop combinations like rubber and cacao, this premise has been shown to be true;
but in other cases, like in coconut, papaya, pineapple combinations, this
principle has not been verified to be operant. All these crops are attacked
by
Phytophthora palmivora.
4. Tillage practices. Inter-row cultivation to control weeds in mature perennial crops is unpopular because it leads to root injury which can increase incidence of rootrots.
5. Shade management. Shade increases humidity which predisposes the plants to fungal and bacterial infestations. However, plants exposed to full sunlight are predisposed to mistle toe and insect attacks.
6. Cover cropping. Cover cropping favors hyper parasite wasp populations that attack slug caterpillars. However, they may act as alternate host plants. For example, Crotollaria is host to coffee berry borer. Some cover crop species are useful as follow crop for nematode-infested pineapple plantations.
7. Mulching. Mulching has been observed to reduce nematode
populations putatively due to its favorable effect on Paecilomyces
lilacinus.
However, if placed too closely on the trunk, it may enhance
termite/wood beetle infestation.
8. Pruning and thinning. A major function of pruning and
thinning operations is the elimination of infected organs or trees from the
plantation.
Pruning thinning also help open up the canopy not only to
eliminate shaded/humid pockets inside but also to facilitate the penetration of
pesticidal sprays.
9. Fertilizer practices. A well-nourished plant can withstand infection/lnfestation better than weak plants. Overbearing dieback is common in many perennial crops that were not properly supported with water and nutrients. High N fertilization has been shown to reduce the effects of the shot hole borer in tea. Chlorine fertilization reduces the incidence of coconut leaf spots.
10. Irrigation. Drought predisposes plants to pathogen attack in the subsequent rainy period.
11. Harvesting procedures. The complete removal of fruits for at least three to four months in coffee and cacao plantations can control the berry borer and the pod borer problems of the respective crops. Harvesting fruits at the mature green stage and preventing the fruits from ripening in the plantation help reduce fruit fly infestation. In all crops, it is advisable to remove and burn/bury infested fruits during the harvesting operation.
|
| ||||||||||||||||||||||||||||||
Soil and Water Conservation (SWC) Technologies and Agroforestry Systems (IIRR, 1992, 171 p.)
Organic fertilizer sources:
1. Basket Composting
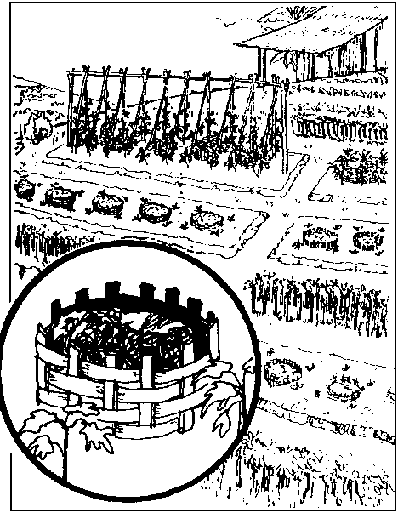
Basket composting
INTRODUCTION
One of the first efforts of the Mindanao Baptist Rural Life Center (MBRLC) in Bansalan, Davao del Sur. was to develop a gardening system which would provide vegetables throughout the year. It is called Food Always In The Home (FAITH) gardening. The FAITH Garden basically consists of three sections planted to:
· short-term vegetables (two to four months), e.g., tomato, sweet pepper, pechay, etc.
· medium-term vegetables (six to nine months), e.g., eggplant, winged beans, etc.
· Iong-term vegetables (throughout the year), e.g., kangkong, alugbati, etc.
The central feature of the garden is a series of raised garden beds in which bamboo baskets are set for the production of the so-called "basket compost".
BASKET COMPOSTING
Basket composting is the process by which your decomposable home garbage, garden and farm waste and leguminous leaves like ipil-ipil are allowed to rot in baskets which are half-buried.
Basket composting has been practiced at the MBRLC for many years and is proven to give the following benefits:
· You can directly use plant nutrients derived from rotting materials without waiting for the usual three to four-month period in the traditional method of composting.· Your basket compost holds the composting materials in place; therefore, it will minimize nutrient depletion by runoff.
· Stray animals (like goats and pigs) and fowls (such as chickens and ducks) are prevented from scattering the compost materials.
· Your home and its surroundings will become cleaner because garbage and wastes are collected and are put inside the basket composts.
· It serves as reservoir and collector of the much needed moisture and nutrients for your plants.
· The organic matter in the compost strengthens the soil aggregate, making it resistant to heavy rainfall, thus lessening erosion.
· You can produce more nutritious vegetables at less cost.
Anyone is free to modify or improve the method of basket composting, but this is the general procedure in doing it:
1. Prepare the materials.
· long bamboo strips (two to three cm width)· bamboo stakes (at least 30 cm length)
· home organic garbage, farm and garden wastes, leaves of ipil-ipil, kakawate, rensoni and/or Flemingia (if available)
· dried manure (goat, duck, chicken, horse, and/or carabao
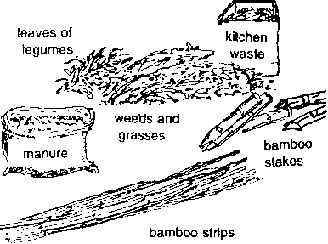
Leaves and legumes
2. Prepare garden plots.
· Clean garden site.
· Save weeds and grasses for composting materials
· Prepare garden plot thoroughly.
3. Make holes.
· Dig holes along the center of the plots at least 12 cm in depth and 30 cm diameter.
· Space holes 1 m apart.

People working
4. Make the baskets.
· Drive seven stakes around the holes; uneven number of stakes makes perfect brace for weaving.· Weave the long strips of bamboo around the stakes to form a basket. Without bamboo strips, closely space the stakes (about 1 cm apart).
Half-bury the baskets in the holes. The basket serves as erosion control and as container that prevents the chicken and other fowls from scattering the compost.

Basket
5. Put organic wastes.
· Place the rotting garbage and manure into the basket first.· Fill to the brim with other organic wastes. Fresh manure can be used.
· Place the undecomposed mater composed materials like ipil-ipil leaves or any recommended leguminous leaves, grasses and weeds next Cover the organic wastes with a thin layer of soil.

Planting
6. Plant seeds or seedlings.
· If the materials placed at the bottom part of the basket are almost decomposed (within 2-3 days), you can start planting seeds or seedlings. Plant them six to eight inches around the basket.· If the composting materials placed in the baskets are green leaves (called 'green manure'), plant the seeds or seedlings two to three weeks later. This will give enough time to start decomposing.
· If green leaves of ipil-ipil are used, put five kilograms of the leaves to the basket at the start. Add two kilos of leaves every two weeks.
7. Water the seedlings.
· Water the newly transplanted seedlings. Later on, when they can grow on their own, just water the basket.· Water only at the center of the basket, instead of watering the plants. The lower part of the basket is cool, moist and has abundant nutrients for crops. Later on, the roots will grow into the basket.
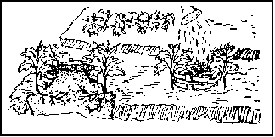
Legumes
8. Incorporate decomposed materials.
After harvesting your vegetables and your compost are used up, remove the decomposed materials and incorporate them into the soil while cultivating.
Add new composting materials to the basket for the next plants. Avoid using diseased plants for composing. Use the basket while still intact.
Note: Basket composting is compatible with and can be integrated with the bio-intensive gardening technology.
Source: MBRLC Editorial Staff (1990). How to Make FAITH (Food Always in the Home) Garden in your Horneyard.
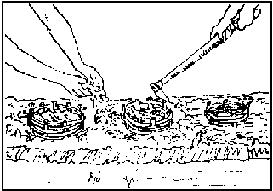
Figure
2. Fertilizer from Livestock and Farm Wastes
MATERIALS
Dried rice straw/rice stubbles, grass clippings, coffee hulls, sawdust, etc. These materials help prevent nutrient loss. They contain residual plant food of their own, adding to the overall nutrient value of the compost.
Feeding animals
BEDDING METHOD
1. Chop or shred the materials (except coffee hulls and sawdust) to make them easier to spread and later on easier to decompose.

Cutting plants
2. Spread a six-inch layer of litter bedding over the floor space. Allow manure and urine to accumulate.

6 inches of litter bedding
3. Three to four days after the bedding materials are fully soaked with urine, mix them so as to incorporate the manure. Remove the bedding and store it in a pit or a pile fully covered to conserve the nutrients. Collected bedding material can also be used in preparing liquid fertilizer. The compost is ready for use in one and a half months or earlier.

Collection and mixing of bedding
materials

Liquid fertilizer preparation
4. Provide fresh bedding materials as in #2.
TECHNOLOGICAL PROFILE
· A feedlot cable with an initial weight of about 150 kg would produce a total of 2.23 tons of fresh manure over a fattening period of 180 days.
· On the average, a cattle or a carabao excretes fresh manure equivalent to about 7.5 percent of its body weight.
· Manure - By wise management, animal manure can return to the soil 70 percent of N. 75 percent of P and 80 percent of K.
· Urine - Excess nitrogen from the digested protein is excreted in the urine as urea in cattle and goats.
· Fifty percent of the value of the waste is contained in the urine.
· Urine contains 2/3 of the N and 4/5 of the K discharged by an animal.
· Elements in urine are more quickly available because they are in solution.
· Urine is also an especially good activator for converting crop residues to humus.
NOTE:
The amounts of fresh excrement produced by farm animals are subject to wide variations, being governed by the kind of animal, its age, the amounts of food it eats, its activity and other factors. The amount produced annually per 1,000 pounds of live weight is given in the following table:
TABLE 6. AMOUNT OF EXCREMENT PRODUCED BY FARM ANIMALS.
|
SOURCE |
FRESH EXCREMENT |
LIQUID % |
|
Cattle |
12.6 |
85 |
|
Horse |
5.8 |
66 |
|
Poultry |
5.6 |
62 |
|
Sheep |
5.9 |
66 |
|
Swine |
13.2 |
85 |
TABLE 7. POUNDS OF NITROGEN, PHOSPHATE AND POTASH PER TON OF ANIMAL MANURE.
|
SOURCE |
NITROGEN |
PHOSPHATE |
POTASH |
|
Cattle |
10.0 |
2. 7 |
7.5 |
|
Horse |
14.9 |
4.5 |
13.2 |
|
Poultry |
29.9 |
14.3 |
7.0 |
|
Sheep |
23.0 |
7.0 |
21.7 |
|
Swine |
12.9 |
7.1 |
10.9 |
On the average, a ton of cow manure has NPK values equivalent to 100 pounds of 2 12-3-9 chemical fertilizer. Similarly, horse manure averages 14-5-11, sheep and goat manure 19-7-20, hog manure 10-7-8 and chicken manure about 20-16-9. In addition, this manure will supply organic matter and trace elements.
References:
P.S. Faylon and M.R. Deriquito. Livestock Manure as Fertilizer: Waste Not, Want Not. J.F. Rodale. The Complete Book of Compost. The Encyclopedia of Organic Gardening. pp. 714-716. Nyle C. Brady. The Nature and Properties of Soils. 8th Edition (New York: MacMillan Publishing Co. 1974).
3. Liquid Fertilizer from Leguminous Trees
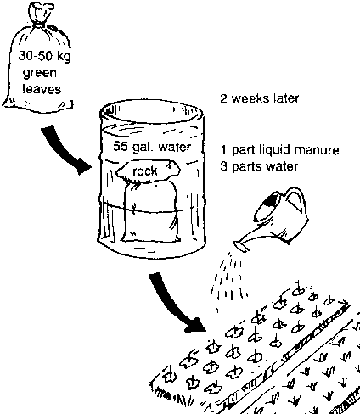
Green leaves and water
Liquid fertilizer supplements can be made from leaves of leguminous trees and water. (Traditionally, only fresh manure has been used.) Liquid fertilizers are used in small gardens to boost up the growth of young seedlings or as a remedy for plants suffering from nutrient deficiencies.
TABLE 8. NUTRIENT CONTENT OF LIQUID FERTILIZER.
| |
ORGANIC |
TOTAL | |||
|
TREE |
NH4-N |
N |
N |
ppm |
ppm |
|
SPECIES |
ppm |
ppm |
ppm |
p |
K |
|
1. Glincidia septum |
169.0 |
12.0 |
1810 |
1.8 |
218.5 |
|
2. Leucaena leucocephala compare |
97.5 |
35 5 |
133.0 |
11.1 |
234.0 |
|
Cow manure |
26.7 |
4.9 |
31.6 |
2.6 |
158.5 |
Note: Very significant readings for iron, calcium, magnesium and zinc were also noticed.
· You may test leaves of other leguminous trees in your area. If leguminous leaves are not available, any green plant material may be used (e.g., Cassia siamea, Cassia spectabilis).
· Keep the drum always covered If a drum is not available, then a pit lined with clay or plastic sheeting or even a large earthen pot may be used.
· Replace the leaves with fresh ones when the liquid fertilizer has been exhausted.
· It is possible to raise a reasonable vegetable plot in well-dug soil (12" - 18" deep at least), using liquid fertilizer alone.
· Liquid fertilizer is a critical component of a bio intensive garden in the tropics, especially in the rainy season when leaching is common.
4. Use of Green Manures
The term green manure generally refers to the use of fresh organic materials such as leaves, twigs and small stems which are used as a soil enrichment material. The green material does not only provide the soil with needed macro elements (such as Nitrogen, Phosporous and Potassium), but trace elements as well (such as magnesium, manganese, cobalt, and iron). In addition' the green manure: (1) provides organic matter which helps improve soil structure, increases the soil's water holding capacity; (2) provides a replacement for commercial fertilizers; and, (3) helps shade weeds. Some green manures can also be grown with food crops to save land area and labor.
MATERIALS FOR GREEN MANURE
Many plants which belong to the Legume Family are commonly used as green manures. These include cover crops such as Kudzu (Pueraria phaseoloides), "Hetero" (Desmodium heterophylla), Centro (Centrosema pubescens), Siratro (Macnaptilium atropurpureum); upright legumes such as: Ipil-ipil (Leucaena diversifolia), Rensoni (Desmodium rensonil), Flemingia (Flemingia macrophylla), Madre de cacao (Gliricidia septum), Rostrata (Sesbania rostrata) and Rice bean (Vigna umbellata). Non-legumes include grasses such as Napier (Pennisetum purpureum) and Guinea grass (Panicum maximum).
Essentially, any material may be used as long as it is fresh and not very woody in form.
METHODS OF USING GREEN MANURE
There are two standard methods in using green manure. These are (1) growing the green manure crop in the crop field; and, (2) importing the green manure in fresh or processed form to the crop field.
1. Growing the green manure crop in the field. This method involves growing a cover crop, usually a legume such as spineless mimosa (Mimosa invisa) or Hetero (Desmodium heterophylla), in a field and then plowing the plant in the soil after a few months' growth. The cover crop is planted for one season, plowed under and allowed to decompose. The next crop is usually a main food crop, such as corn. The green manures should be allowed to rot three to four weeks before planting the following food crop. (See Selection of Cover Crops and Batao in the Upland Cropping System in pages 149-157 for other examples).
A second method involves planting food crops that have a short growing season and leaves which do not shade the ground too much with the green manure crop. Corn and peanuts are good examples. Since the green manure crop needs some light, the food crops should be spaced further apart but seeds should be planted closer together in a row.
A third method involves the planting of hedgerows of upright legumes such as Rensoni (Desmodium rensonii) Flemingia (Flemingia congesta) and Madre de cacao (Gliricidia septum) in the field along the contour (e.g., SALT, alley cropping). These plants are periodically harvested and the leaves and small branches placed on the soil surface between the hedgerows as a mulch. The leaves are allowed to decompose. Crops may or may not already be planted in the field. In some cases, the farmer may physically incorporate the green leaves into the soil by using a hoe. If this is done, there should be a waiting period of about one month before the field crop is planted in the field. (See Simple/Double Selection of Hedgerow Species for more examples, pages 65-69).
It is highly recommended that two different species (one with big leaves and another with small leaves, e.g., Flemingia and Rensoni) should be planted in the same hedgerow along contours. Flemingia has leaves which decompose slowly while the Rensoni leaves are soft and decompose quickly.
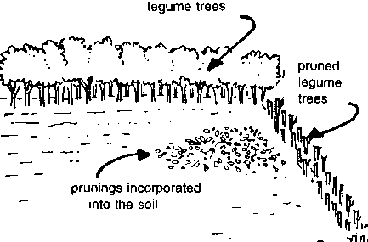
Legumes trees
2. Green manures imported in the field. Green manures need not be grown right in the crop field. Farmers can plant them around their field as fences or in vacant areas. The branches are pruned two to three times a year and the prunings are carried to the field where they are either incorporated into the soil or used as a mulch.
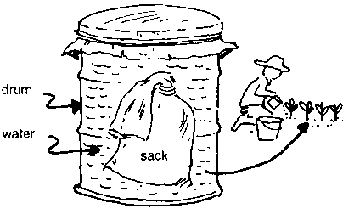
Drum and sack
3. Special methods of using green manure:
Green manure tea.
This method is described in detail as a separate topic in another section. (See Liquid Fertilizer from Leguminous Trees, pages 136-137). In general, it involves taking legume or other fresh leaves and placing them in a jute sack or the like. The sack is soaked in water for 10 days. The tea is used to water high-value crops (like sweet potato, eggplant, cabbage) while the partially decomposed leaves from the tea bag can be used as a mulch or compost material.
Compost.
This method involves using green legume leaves to activate a compost pile since the fresh green leaves have a supply of nitrogen. When the composting process is finished, the material is used as a fertilizer by placing it in a hole and covering it with soil. A seedling is planted on top. This method is generally used for high-valued crops such as vegetables.
CONSIDERATIONS:
1. Non-legumes such as wild sunflowers are used as a green manure either by incorporating the leaves and stems directly in the soil or allowing them to partially dry before incorporation. Wild sunflower is also a phosphorous trap, as it accumulates the element as it grows.
2. Cogon and other grasses or weeds can be cut before the powering stage and placed in crop fields as mulch.
3. Green manures can be applied to furrows or between the crop rows rather than as a blanket covering. This method concentrates the nutrients and the roots of the row crop, such as corn will pick up the slow released nutrients from the furrow. The weed growth in the furrow or inter-row area will also be reduced. For minimum tillage systems, placing the green manure in furrows in between rows allows easier access to the crop rows for planting and weeding.
Green manure applied between crop
rows
4. farmers frequently air-dry green leaves before using them as a crop fertilizer. This is fequently done with leaves such as ipil-ipil. The drying process releases Nitrogen from the leaves but other nutrient elements such as phosphorous, potassium and trace elements remain in the dry leaf. This process prevents accidental fertilizer bum from fresh leaves.
5 Experience has shown there are several kinds of leaves which are not good for green manuring because they contain substances which are detrimental to the plants and the soil. These are Pine needles, Eucalyptus sp. leaves and Gmelina arborea leaves.
|
| ||||||||||||||||||||||||||||||||||||||||||||||||||||||||||||||||||||||||||||||||||||||||||||||||||||||||||||||||||||||||
Biofertilizers
The national goal of increasing production of agroforestry products is heavily dependent on the use of chemical fertilizers. This goal is difficult to attain because the country cannot produce all its chemical fertilizer requirements. Production of chemical fertilizers requires high inputs of energy. As an agrobased economy. agricultural productivity is dependent on chemical fertilizers which are mostly imported. If not for government subsidies, the use of chemical fertilizers to produce agricultural and forestry products would have been very expensive and out of reach to most farmers. The fertility of most uplands is usually poor because of nutrient losses due to high erosion rates. Nitrogen and phosphorus are two essential nutrients that are severely deficient in most uplands. These elements along with other essential nutrients can limit growth and productivity in the uplands.
In the early 80's, the country experienced the paralyzing effect of the energy crisis. The cost of fertilizers increased. This had a tremendous impact in reducing agricultural productivity. It was during that time that the country had to search for alternative technologies to replace chemical fertilizers. This search led to the use of biofertilizers.
Biofertilizers are defined as microbially-based fertilizers which are effective in promoting growth/yield of plants. Two common biofertilizers are: nitrogen-fixers and mycorrhiza. The atmosphere contains 78 percent nitrogen by volume but this is not readily available to all plants. Nitrogen gas has to be fixed by microorganisms such as bacteria, algae, etc. The fixed nitrogen is converted to organic forms, which can be utilized by plants. Thus, plants like legumes which form symbiotic associations with nitrogen-fixers (rhizobia) can derive most of their nitrogen requirements from this system.
Mycorrhiza is a symbiotic association between the roots of plants and a fungus. The mycorrhizal fungus can improve the absorption of unavailable nutrients (e.g., fixed phosphate) which are then donated to the host plant. In addition, mycorrhiza can promote the absorption of water even under water-stressed conditions. Mycorrhiza may also produce growth hormones and control some biologically pathogenic organisms. Together, nitrogenfixers and mycorrhiza can provide the nitrogen and phosphorus requirements of plants. In addition, mycorrhiza can facilitate the absorption of other essential nutrients.
TYPES OF BIOFERTILIZERS
Two groups of commercial biofertilizers are available locally in the Philippines. The first group is made up of nitrogen-fixers fixers which are bacterial-based. These are NitroPlus containing Rhizobium effective for mung beans, peanut and soybeans; and, BIO-N which contains Azospirillum effective for rice and corn
The second group of biofertilizer is made up of mycorrhizal fungi which infect roots of the host plant where they proliferate. The fungus increases the absorption of nutr ents and water, produce growth hormones and serve as biocontrol for pathogenic soil borne organisms. The mycorrhizal technologies are divided into five groups: MYCOGROE, MYCOBEADS, MYKOVAM-1, MYKOVAM-2 and Direct seeding Blocks (DSB). MYCOGROE and MYCOBEADS are effective for reforestation using pines, eucalyptus and agoho. MYKOVAM-1, MYKOVAM-2 and DSB are effective for agricultural crops, fruit trees and reforestation species.
These products are commercially available from BIOTECH, UP Los Bathos, College, Laguna. For more information, inquire directly from BIOTECH.
|
| ||||||||||||||||||||||||||||||||||||||||||||||||||||||||||||||||||||||||||||||||||||||||||||||||||||||||||||||||||||||||
Selection of cover crops
Cover crops are plants which are grown to cover and protect the soil. They help add fertility, improve soil structure and water retention and have a lot of practical benefits such as animal fodder, food and added farm income.
Cover crops can be used in a variety of ways in agricultural systems:

1. Interplanted or relay-planted
with maize or other grain crops
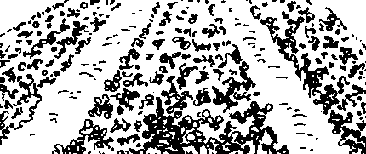
2. Planted alone in the cropping
cycle
3. Planted under trees in orchards
or plantations

4. Planted as a fallow crop when the
land is being rested
Note: For suggested species suitable to the above systems (1-4), please refer to accompanying table under systems applicable.
Cover crops offer farmers the following benefits:
1. Improved soil fertility through the addition of significant amounts of nutrients (more than 200 kg N/ha)2. Suppressed weed growth
3. Reduced labor demands in soil preparation and in weeding
4. Reduced cost of inputs such as fertilizers, herbicides and hired labor
5. Improved soil structure: cover crops can provide up to 30 tons of organic matter per hectare. Improved soil structure means a better medium for plant growth; in addition, it improves the soil's ability to retain moisture during dry periods.
6. Soil and water conservation: cover crops help reduce erosion by protecting the soil surface for extended periods of time.
7. Rehabilitation of degraded marginal lands
8. Additional benefits: human food, animal forage, fuelwood and an added source of income
There are many plants which can be used for cover crops, depending on local conditions (rainfall, soils, local farming practices) and the objectives of farmers. However, most of the cover crops belong to the family of plants known as Leguminosae (beans).
The following general characteristics are considered important in selecting plants for use as effective cover crops:
1. Rapid, prolific growth habit2. Ability to fix significant amounts of nitrogen
3. Tolerance to a wide range of soil conditions (poor fertility, texture or structural qualities, extremes in pH, etc.)
4. Good drought tolerance. This is an especially important factor since most of the green manures are grown during the dry season.
5. Seed availability or the ability of the plant to produce its own seed locally
6. Shade resistance, since cover crops are frequently interplanted grown in relay with taller grain crops or trees
7. Proven pest resistance
8. Easy to control. Cover crops must be readily removed from the farm when the time comes for land clearing.
Potential problems with cover crops:
1. Cover crops can be difficult to establish and farmers often perceive them to require extra work. Some farmers have been concerned that cover crops might compete with their staple crops.2. Some cover crop species can be very aggressive and may be difficult to eliminate from the farm
3. Cover crops can become an alternate host to pests which attack food crops.
4. Rats and snakes may hide in the dense foliage of cover crops.
In general, the most popular cover crops are indeterminate (continuously produce flowers and pods), single-season legume species. However, perennial species can be of great value under certain circumstances; determinate bean species and even tuber crops such as camote can be used as effective cover crops. Some of the cover crops which have been used successfully by farmers are shown in Table 9.
There are many other species of plants which have been used traditionally by farmers to serve the same purpose as the above-mentioned cover crops. Many of them are as yet undocumented. Additionally, there are other plants which could also be used. Cover crops are gaining attention from farmers and agricultural scientists and they deserve much more field trials and research.
TABLE 9. SELECTED COVER CROPS.
|
SCIENTIFIC NAME |
COMMON NAME |
REMARKS |
SYSTEM APPLICABLE |
|
Mucuna pruners |
Kokoa Velvet bean |
Very vigorous growth - excellent fallow species; drought tolerant; pods |
1,2,3,4 |
|
Dolichos lablab |
Batao Lablab bean |
Drought-tolerant, pods edible |
1,2,3 |
|
Canavalia ensiformis |
Jack bean |
Drought-tolerant |
1,2,4 |
|
Canavalia gladiata |
Sword bean |
Drought-tolerant |
1,2,4 |
|
Cajanus cajan |
Kadios Pigeon pea |
Excellent drought- tolerant provides food and fuelwood |
2,4 |
|
Crotolaria sp. |
Sun hemp |
Determinant growth habit |
1,2.4 |
|
Vigna umbelata |
Tahori rice bean |
Food and green manure | |
|
Vigna unquiculata |
Paayap black bean |
Food and green manure |
1,3 |
|
Psophocarpos tetragonolobus |
Sigarillas manure |
Food and green |
1,3,4 |
|
Psophocarpus palustns |
Winged bean |
Non-edible species |
3,4 |
|
Pueraria phaseoloides |
Tropical kudzucrops or as extended fallow |
Good under tree |
3,4 |
|
Desmodium heterophylla | |
Excellent under plantation crops |
3,4 |
|
Tephrosia candidaplantation crops | |
Used under |
3,4 |
|
Dioscorea alata |
|
Excellent for food or income |
3,4 |
|
Ipomoea batatas |
Camote |
Good food and extended cover |
3 |
| |
Sayote | |
3 |
| |
Squash | |
2,3,4 |
| |
Yam bean | |
2,4 |
|
| ||||||||||||||||||||||||||||||||||||||||||||||||||||||||||||||||||||||||||||||||||||||||||||||||||||||||||||||||||||||||
Batao in the upland. Cropping system
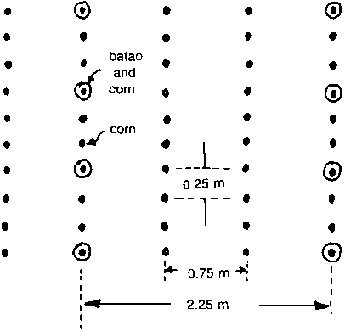
Figure
· Batao (Lablab purpureus) or hyacinth bean and com are planted simultaneously at the same hill at the stab of the rainy season.
· Plant population -- 53,333/ha for corn and 5,926/ha for batao
· Batao is planted in hills together with corn so that:
- they will not be damaged during inter-row cultivation;- no com row is sacrificed for a batao row; and,
- batao can use corn as pole.
· Corn intercrop is managed in
the same way as monocrop corn except during harvesting
Harvest only the corn
ears. Leave the corn stover to serve as support for the batao.
· Corn stalk can support the batao until its flowering and pod formation. Batao bears more pods when propped than when allowed to grow prostrate on the ground
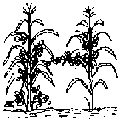
Batao plant
MANAGEMENT OF BATAO CROP
The first harvesting of green batao pods can start about three weeks after the corn harvest (grain). Harvest the green batao pod every week. There could be 5 to 6 primings or a total green pod harvest of about 2.5 t/ha
Allow the last priming to mature as seed source.
MANAGEMENT OF BATAO HERBAGE
Fodder. After the harvest of pods, batao herbage can be used as fodder for cattle in summer when feeds are scarce.
Green manure. Allow batao to grow beyond the summer period to achieve rapid regrowth at the onset of the rainy season.
Before land preparation for the next crop, either chop the vines with a scythe right on the field or collect and chop them with a mechanical chopper. Vines can also be chopped manually using bolo and chopping board. Chop to a length of 15-20 cm so that it would not hamper the plowing operation.

Working
IMPORTANCE OF BATAO HERBAGE
Spread the chopped herbage on soil surface.
Incorporate the herbage by plowing.

Figure
Note: Other than batao, alternative legume species could also be used, such as winged bean (Psophocarpus tetragonalobus). However, it should be planted three weeks after sowing the corn.
|
| ||||||||||||||||||||||||||||||||||||||||||||||||||||||||||||||||||||||||||||||||||||||||||||||||||||||||||||||||||||||||
Increasing the woody contents in leaf litter
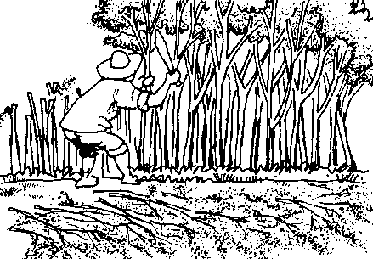
In the woods
In the natural forest, most available nutrients are stored in plant materials. But in cultivated areas, where usually the amount of water from the rain is much more than the rate of evaporatranspiration, there will always be excess water. This water will cause a high rate of erosion and runoff, taking much of the highly soluble nutrients and will also leach nutrients out of the soil. In this situation, it becomes very difficult for nutrients to be stored.
The solution is to keep the nutrients in the plants and attach to it a vigorous nutrient recycling process. One often overlooked aspect in soil and water conservation is the role of lignin in organic matter, which really is a key issue to look at.
Plowing or tilling is actually one of the cardinal sins. The need to plow is a sign of the lack of lignin in the soil. It is the lignin contained in organic matter, especially twigs and stems, which improves the soil structure and determines the porosity of humus and reduces the need for tilling the soil.
There are several sources of lignin. One source is the original organic matter, that is, the cell walls of woody tissues, especially plentiful in mature plants. Another source is from the decomposition of insects that eat organic matter.
Some species that can be used for rapid fallowing are Flemengia congests, Desmodium gyroides, Cajanus cajan, Desmantus sp. These species provide a lot of stems and twigs. The twigs decompose slowly, gradually releasing the elements they are made of. Leaching is reduced while soil structure is improved. This, in turn reduces the need for tillage, the worst culprit causing erosion. The intention is to produce a great amount of organic matter from woody tissues with a high lignin content which will result in a soil that can hold more water for a longer period of time.
To balance the need for plant nutrients and organic matter, diversify plant species in the hedgerows to include species with different decomposition rates, i.e., Glincidia which rapidly decomposes and Flemengia which is slower.
It is true that, with all this wood in the soil, it is hard to weed, but it is a good idea to get lazy for a while. As long as the crops are above the weeds, it is okay. Of course, there is competition among plants for nutrients but it is also better to have many species of weeds rather than only one or two.
Note: Based on notes from a lecture delivered at the 1989 ATIK Workshop by Dr. Romeo S. Raros, Department of Forestry, Visayas State College of Agriculture, Baybay, Leyte, Philippines.
|
| ||||||||||||||||||||
Soil and Water Conservation (SWC) Technologies and Agroforestry Systems (IIRR, 1992, 171 p.)
Examples of indigenous agroforestry systems:
1. Multistoried Sequential Cropping: The Cavite Model
INTRODUCTION
The search for addressing the environmental degradation problems facing the uplands and hilly lands in most parts of Asia, Africa and Latin America inevitably ends up in the selection of an agroforestry-based intervention strategy. Perennials such as trees are an important component of such stabilization strategy. However, some of the best designers of widely adopted traditional agroforestry systems have been the farmers themselves. One such example is the Polycultural, Multistoried cropping system of Cavite, Philippines, where over 12,285 hectares of land are devoted to agriculture planted to various crops which could include coconut, coffee, banana, papaya, pineapple, upland rice, tuber crops and different kinds of fruit trees along with the shade-producing Gliricidia septum. This agroforestry system was developed by the farmers themselves and has evolved over the years. This article discusses various technical aspects of this approach as practiced by the majority of the Cavite farmers.
THE AGROFORESTRY SYSTEM DESIGN
Typically, coffee, upland rice, banana, pineapple, papaya, Glidoidia, fruit trees and low-growing tuber crops are grown together. However, variations are abundant. The following are some of the more common crop combinations which can be seen in Cavite:
1. coconut + papaya pineapple + banana + taro2. coconut + upland rice + pineapple + daisy + banana + sweet potato + chayote + ginger
3. coffee + upland rice + corn + papaya + pineapple + peanut (sometimes it includes coconuts and/or fruit trees)
4. coconut + banana + lanzones + coffee + palay + taro + ginger + guava + santol + mango
The above combination, however, is sequentially established. It usually starts with a core pattern depending on land ownership and financial capabilities. These are (1) coconut + papaya + pineapple and (2) coconut + papaya + pineapple + coffee + banana. All over annual indoor permanent crops are introduced after the first harvest of pineapple is made, 14-18 months. In some cases, fruti trees like lanzones, jackfnuit, mango, santol and others are either planted earlier or are already established in the field. A step-by-step outline of the sequential planting strategy used by farmers is shown in Table 10. The upland rice, which will be eventually replaced even as the coffee seedlings are planted, and the pineapple crops which will replace it keep the soil in between the coffee (usually grown on slopy land) covered and protected from erosion But, more importantly, along with the interplantings of papaya, it brings in income even in the first few years when the coffee is still getting established and too young to bear fruit. The choice of pineapple, which will occupy the land for most of the first two ro four years, is based on sound principles of ecology and economics. Pineapples are drought-tolerant and also typhoon-resistant. Pineapples compete well with weeds, and eventually, when established, will smother the growth of weeds cuffing down the weeding costs entailed in any young coffee plantation. Pineapple residue is used in cattle feed. Finally, insects and diseases are minimal. The papaya and cuttings of Gliricidia septum provide shade to the area.
Gliricidia which is planted the same time as the coffee is specially important as a shade crop throughout the first few years of the establishment of the coffee crop. As the coffee starts yielding, the pruning of Gliricidia becomes critical in the rainy season, when the cloud cover is heavy and solar radiation is reduced. But in summer, the shade improves the micro-climate reducing evapo-transpiration and so no pruning in summer is advised. Gliricidia is also used for preparation of farm tools such as ploughs, pruning aids and in animal feeds or in the control of ticks. Mulch from leaf droppings and prunings serves to fertilize the soil.
Bananas used to be an important component of the system, if only the typhoons would spare thern. The potential for increasing the income from the system is greatly increased with bananas. As with Gliricidia, it is effective in manipulating solar radiation, reducing soil temperatures and improving water conservation. Eventually, pineapple can give way to more intense banana-based cropping. Root crops such as taro, cassava and yam are randomly sown within the system and provide feed for livestock and food for the family.
With this combination of crops in a polycultural system, there is an assurance of income as early as three months (from upland rice). The cash flows into the household are spread across the year rather than one season only. Table 11 indicates what the harvesting schedule for the more important crops from such a system could be.
Family labor utilization is evenly spread and maximized. The entire growing season is utilized. The system is entirely rainfed. With the introduction of fruit it trees such as soursop and star apple, which do not have dense shade-inducing canopies, further diversification of income is brought about.
The intensive planting of trees of various heights in the same system tends to use the vertical space above the ground very effectively and efficiently. The tree-mix improves the microclimate around the coffee, thus reducing air temperatures during January to May periods, thus improving fruit setting.
POSSIBLE IMPROVEMENTS TO THE SYSTEM
As can be seen from Table 10, the system is dependent on frequent chemical fertilization, given the intensive land usage pattern and the inadequate biomass output of sparsely planted Gliricidia. Here are some changes being introduced into the already sophisticated farmer-derived system, in order to reduce the current dependence on chemical fertilizer and to reduce typhoon losses:
· Increasing the number of nitrogen-fixing trees (plant population) so as to increase nitrogen contribution and reduce the current dependence of coffee trees on chemical fertilizers.· Increasing the diversity of cultivars and species of nitrogen-fixing trees. Besides the Gliricidia currently used, Calliandra calothyrus, Flemengia congesia.
Leucaena diversifolia, Desmodium gyroides, Desmodium rensonil and Tephrosia candida can be used. Selective pruning from 4-5 fl high at the outset of the rainy season is essential to increase the solar radiation to coffee during the cloudy days in the rainy season. Ipil-ipil should be cut above 6 ft as a protection against psyllid infestation.
Reduced radiation from overshading could mean reduced coffee yields. Dense planting of such trees in the spaces between coffee has drastically reduced weed growth.
Introducing more soursop fruit trees and bananas into the system to diversify income. If the number of multipurpose trees (MPTS) is increased as suggested above, the losses of bananas from typhoons will be greatly lessened, thus allowing farmers to increase the population of bananas. All banana residues are returned to the soil.
With the increase in numbers of multipurpose trees, black pepper can be raised and more income is generated, without in anyway reducing yields of coffee or without occupying additionai space.
More MPTS mean more fodder for livestock, permitting the farmers to retain more animals on the farm. This means more income to the farmer given his only investment is the cost of animals. But equally important is the animal manure contribution which at present is rarely used because of lack of adequate quantity. Replacing at least some of the chemical fertilizers used by farm yard manure means higher net returns from the coffee. By introducing livestock on the farm, the farmers might reduce their risks from crop losses in the typhoons/droughts or by drops in market prices.
Livestock numbers can be increased significantly if farm grown fodder and feeds are available.
ADVANTAGES
Perennial tree-based systems are less affected by typhoons.
Diversified cropping provides assured regular income and reduced risks from price fluctuations.
Assured income flows even in the first year of planting coffee trees from interplanted short duration crops.
The use of space, light and land space is maximized.
Erosion and weeding costs are minimized due to the growth of pineapple between coffee trees.
The food, fuel and fodder needs of the family are met.
The use of chemical fertilizers is reduced due to the presence of leaf litter, leaf mulch and leaf trimmings from nitrogen-fixing trees.
Family labor is maximized throughout the year.
Tillage is minimized.
Micro-climate is improved.
Biological activity is also improved.
OUTPUTS
Year 1 - Upland rice, rootcrops, papaya, vegetables
Year 2 - Pineapple, papaya, rootcrops, banana
Year 3 - Banana, pineapple (some coffee)
Year 4 - Coffee, fruit trees, bananas, black pepper, shadetolerant tubers (example: taro).

TABLE 10. SEQUENTIAL PLANTING IN A
MULTI-STORIED SYSTEM.

TABLE 10. SEQUENTIAL PLANTING IN A
MULTI-STORIED SYSTEM. (continued)
TABLE 10. SEQUENTIAL PLANTING IN A
MULTI-STORIED SYSTEM. (continued)
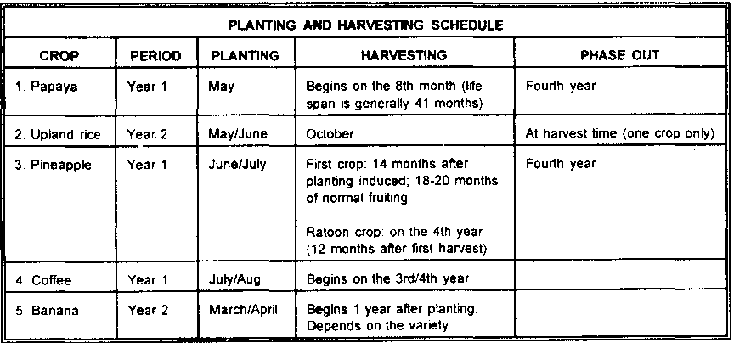
TABLE 11. CROPPING PATTERN.
| |
AGRO-CLIMATIC DATA(Silang Cavite) | |
|
Elevation |
- |
800 to 1500 feet |
|
Climate |
- |
Type 1 (Distinct Wet |
| |
|
(May-December) and Dry |
| | |
(January to April |
|
Rainfall |
- |
annual average of 2000- |
| | |
2500 mm |
|
Temperate |
- |
77-90°F |
|
Range | | |
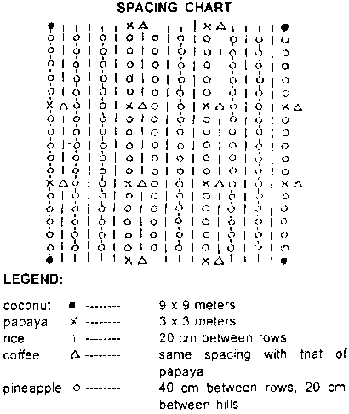
Spacing
chart
2. Home Garden: The Baguio Experience
Agroforestry, as a land-use scheme, has long been advocated by various hill tribes/dwellers in the Philippines. In the Cordilleras, for instance, the practice of growing agricultural and forest crops along with the raising of livestock in home lots have been observed for centuries, even before the term agroforestry developed.
The system is expressed in the ancient practice of mayong (Ifugao term for family-owned forest). And closer to this is Baguio's own version of home gardens.
Home garden is basically a multistoried agroforestry system where the canopies of the component species are arranged to occupy different vertical strata. Tall fruit trees, plants of medium height and small-growing vegetable species are raised concurrently in the same unit of land. In Bagulo, the technology has evolved from an unplanned or typical/traditional concept to a systematic type of land-management practice that it is now.
Although dwellers still employ their own indigenous ways of backyard farming, other existing agroforestry practices are adopted, thus elevating home gardens into a more updated practice and, consequently, more responsive to the needs of the uplanders.
MULTILAYERED AGROFORESTRY SYSTEM
Agricultural crops, tree crops and animals are produced in the same unit of land. The plants have spatial arrangement that is generally not well planned. It attempts to copy the multistoried structure of the tropical rainforests. The upper layer is dominated by trees such as pine trees, alnus, mango, rimes, acacia (Samanea saman), santol and caimito. The middle layer is composed of smaller fruit crops such as coffee, nangka, guava, citrus, banana and papaya. The ground layer is planted with a variety of vegetable crops, spices and medicinal plants. Small animals like pigs, chicken, dogs, turkey, geese, ducks, etc., are also components.
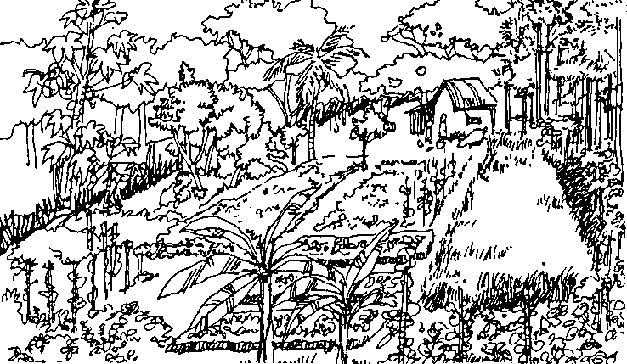
Home garden
BENGUET PINE-COFFEE COMBINATION
Deferent coffee species (C. arabica, C. robusta) are grown under old Benguet pine (Pines kesiya) trees. In developing a new plantation, the Agroforestry Communication (1986) recommends planting pine trees five to seven years ahead at 3 × 3 meters spacing. At sixth to eighth year, coffee can be planted between the pine trees, which are about four meters high by that age. The pines may be harvested at the twentieth year with uninterrupted coffee growing of 15 years.
AKLENG PARANG-AGRICULTURAL CROPS COMBINATION
AkJeng parang (Albizia procera) trees are planted at about 45 trees per hectare. Other tree species like avocado, dita, akle and mahogany may also be grown with akleng parang. On individual small plots of 100-150 sq m, upland rice, ube (yam), banana, pineapple, sweet potato, com and ginger are planted. Most crops are planted from May to July and harvested in December. After two to three months fallow, corn and beans are planted.
ALNUS-COFFEE COMBINATION
Coffee arabica and C. robusta are grown under alnus (Alnus japonica) trees at 2 × 2 m spacing to as wide as 15 × 15 meters. Alnus trees provide nitrogen and shade to coffee. Its branches, pruned at a height of 3 to 5 meters from the ground, are used as fuelwood.
ALNUS-CHAYOTE COMBINATION
Alnus trees are used as living posts where a network of wires are attached. Chayote (Sechium edule), an edible fruit-bearing vine, is allowed to climb over the netted wires which are suspended 1.5-2.0 m high from the ground. Farmers use sinus as guide posts because replacement is not made onen unlike when they use bamboo poles or lumber.
MAHOGANY-AGRICULTURAL CROPS COMBINATION
Mahogany (Swietenia macrophylla) trees, planted at 10 × 10 m spacing and with a diameter of about 6-10 cm and a height of 5-8 m, are used as living trellis of either ube or tugui being grown near their base. Gabi, pineapple, ginger and banana are also intercropped. Manual weeding is done by cultivating the soil and uprooting the weeds, which are later used as mulch in between rows of crops.
ALNUS-COFFFE-SWEET POTATO COMBINATION
In this mulbstorey cropping, farmers grow coffee under sinus trees and sweet potatoes beneath the coffee. According to the farmers, this practice produces healthy growth of coffee and robust stems and fruits of sweet potato compared to those planted separately.