 |
| ||||||||||||||||||||||||||||||
Institut f�r berufliche Entwicklung e.V.
Berlin
Original title:
Arbeitsmaterial f�r den
Lernenden
“Messen und Anrei�en”
Author: Fritz Dienemann
First edition © IBE
Institut f�r berufliche Entwicklung e.V.
Parkstra�e
23
13187 Berlin
Order No.: 93-35-3301/2
|
| ||||||||||||||||||||||||||||||
1. The Purpose of Measuring and Scribing
Measuring and scribing are essential working operations of woodworking techniques. They are necessary to guarantee accuracy of fit of wood joints as well as dimensional stability and the design of the workpieces.
Lengths or angles of an object are measured by comparing with a measuring instrument (e.g. a folding rule) on the scale of which the exact measuring rate can be read off. Scribing is transferring the required sizes on the workpieces.
|
| ||||||||||||||||||||
Measuring and Scribing - Course: Manual woodworking techniques. Trainees' handbook of lessons (Institut f�r Berufliche Entwicklung, 12 p.)
2. Tools for Measuring and Scribing
2.1. Measuring Tools
In manual woodworking it is necessary to measure lengths, widths and thicknesses as well as bevels (angles) of workpieces.
Table 1 shows the most usual length measuring tools with their features and possibilities of application.
Table 1: Length Measuring Tools
|
Name |
Features |
Application |
|
Folding rule |
- 1.....2 m - graduation - 1 mm - less accuracy due to hinged connection |
- taking off constructional dimensions - scribing when cutting to size solid wood, panels and verneers |
|
Steel rule |
- 0.....300 mm - graduation - 1 mm - inflexible steel tapes with etched graduation |
- scribing for wood joints - check measurements |
|
Measuring tape |
- 0.....2 m - graduation - 1 mm - flexible steel blade of stainless steel medium - accuracy |
- scribing before cutting to size - scribing and checking for finish cutting - scribing for wood joints |
|
Measuring staff |
- 0.....3 m - graduation - 1 m - inflexible wood rods - only for minimum accuracy requirements |
- first check of arriving sawn timber and panels - scribing for rough cutting |
|
Vernier caliper |
- 0.....300 mm - graduation - 0.1 mm - the workpiece is placed between the measuring faces |
- exact measuring of thickness - measuring of radiuses and bore hole depths |
In case of often appearing sizes fixed length gauges and angle gauges are used for scribing and checking. Gauges represent only special sizes. They don’t haw any moving parts, i.e. they are fixed on a certain size. Table 2 shows the mostly used gauges with their features and application possibilities.
Table 2: Gauges
|
Name |
Features |
Application |
|
Distance gauge |
- self-manufactured woods indicating the distance between an edge and the working area to be recessed |
- scribing of several parts of the same kind |
|
Curve gauge |
- curved templates |
- scribing of rounded corners and surface roundings |
|
Working square |
- angle of 90° |
- checking the angularity and transferring the markings angularly |
|
Mitre rule |
- angle of 45° |
- scribing of frame mitres |
|
Bevel protractor |
- any angle can be fixed |
- scribing of all kinds of mitres |
2.2. Scribing Tools
Besides the already mentioned measuring tools
- the marking gauge,
- the pencil and
- the scriber are needed for scribing.
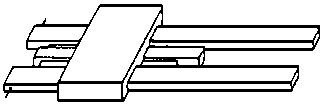
Figure 1 Marking gauge

Figure 2 Scriber
Attention - the scriber is a sharp tool and careless handling can lead to injuries!
Name at least six tools for measuring and scribing.
1. ____________________________
2. ____________________________
3. ____________________________
4. ____________________________
5. ____________________________
6. ____________________________
|
| ||||||||||||||||||||||||||||||
Measuring and Scribing - Course: Manual woodworking techniques. Trainees' handbook of lessons (Institut f�r Berufliche Entwicklung, 12 p.)
3. Measuring and Scribing
Exact knowledge of the working techniques “Measuring and Scribing” is essential for good working results. Therefore they haw to be carried out carefully and to be checked conscientiously. The following activities are distinguished with regard to the techniques:
- drawing of parts belonging together
- measuring and scribing on one plane (mainly on wide faces)
- measuring and scribing on two planes (wide and narrow faces)
For making wide face joints the piece parts are marked with a triangle. Thus mixing up or incorrect joining is avoided.
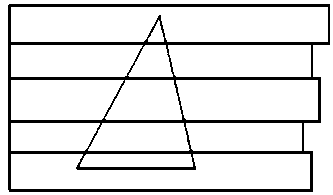
Figure 3 Drawing of piece parts of a
wide face joint
The drawing of frame joints and face comer joints is done in two stages:
- marking the reference edge (bevelled edge) with an angle sign
- after selecting and placing together the parts, the parallel parts are marked with a triangle.
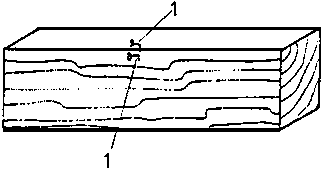
Figure 4 Marking of an angle
reference edge
1 angle reference edge with angle sign
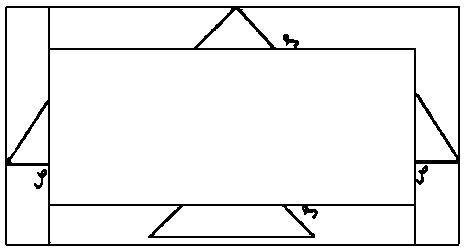
Figure 5 Marking of frame parts
belonging
together
3.1. Measuring and Scribing on one Plane
When measuring sawn timber panels, pay attention to small losses with regard to the use of these materials. The sequence of operations includes the following activities:
- Prepare the necessary tools and materials (e.g. drawings).- Put the board on the work bench (best side to the top).
- Mark the length reference edge with a pencil and a straightedge.
- Measure the width of the workpiece (pay regard to the working allowance and the cut) on three places and scribe with the straightedge and the pencil.
- Measure the workpiece length at the length reference edge (pay regard to the working allowance) and scribe with the working square and the pencil.
- When drawing the pencil line, pay attention to the exact leading of the pencil.
- Check the measurings.
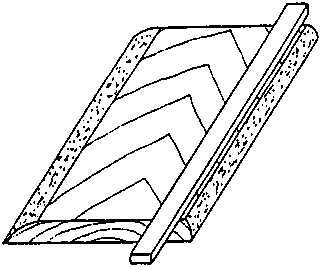
Figure 6 Scribing of a length
reference edge
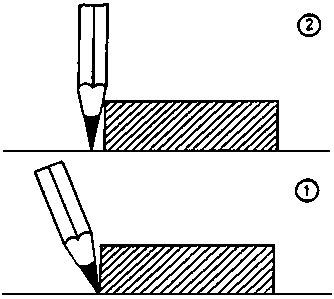
Figure 7 False and right leading of
the pencil
(1) right, (2) false
Why must the workpieces be scribed before being
processed?
__________________________________________________________________________
__________________________________________________________________________
__________________________________________________________________________
When can wanes (or parts of them) remain in the
workpiece?
__________________________________________________________________________
__________________________________________________________________________
__________________________________________________________________________
3.2. Measuring and Scribing on two Planes
When sawing to final size and scribing wood joints, it is necessary to mark two or more faces (wide and narrow faces) with scribed lines and dots.
According to the required accuracy the measuring can be carried out with a folding rule, a measuring tape or a steel rule. For scribing are used: a scriber, a marking gauge and in case of faces which are visible after being worked a sharp pencil. The wood to be scribed is smoothened, planed to width and thickness, marked with angle signs and drawn together.
The sequence of operations includes the following activities:
- Prepare the necessary tools and materials (drawings or front view).- Clamp together parallel running woods with a screw clamp (angle signs to the top).
- Measure the finished size length and scribe with the scriber and the working square.
- Measure the finished dimensions and scribe them with the scriber and the working square.
- Unclamp the woods.
- Transfer the necessary markings angularly.
- Set the marking gauge to the required sizes.
- Put the marking gauge against the angle face of the work-piece and scribe as many faces as necessary.
- Compare the sizes of workpiece and drawing.
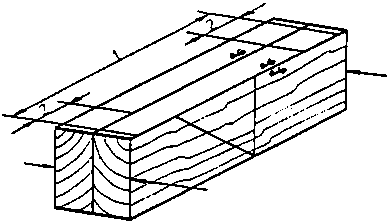
Figure 8 Scribing the finished
dimensions
1 inside length, 2 width of the cross frame woods
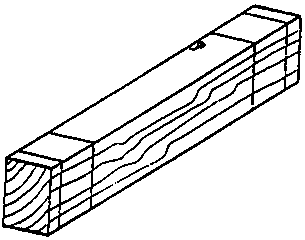
Figure 9 Transferring the markings
angularly
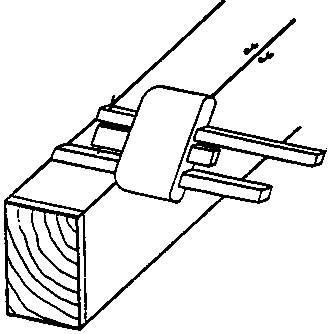
Figure 10 Scribing of the parallel
markings with a marking gauge
Why are the visible faces scribed only with a
pencil?
__________________________________________________________________________
__________________________________________________________________________
__________________________________________________________________________
3.3. Scribing with Templates
When manufacturing workpieces with rounded edges (rounded comers and surface roundings), in case of single-part production the form can be constructed and scribed directly on the face of the parts. If several forms of the same kind are required, scribing should be carried out with templates. Before preparing the templates it is to be decided whether they should get a working allowance or not. When preparing the templates you should work carefully because possible inaccuracies recur on all parts being scribed afterwards.
Scribing with a template is relatively simple and includes the following activities:
- Prepare the necessary tools and templates.- Put the workpieces on the work bench.
- Place the templates so that the flow of the wood fibres guarantees greatest consistency and that possible wood defects can be cut off.
- Scribe the form of the template with a pencil.
- Check the scribed lines.
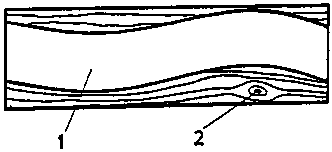
Figure 11 Scribing with a template
1 flow of the wood fibres, 2 wood defects
Which advantages has the application of templates for making
equally curved
parts?
__________________________________________________________________________
__________________________________________________________________________
__________________________________________________________________________
|
| ||||||||||||||||||||||||||||||
4. Working Rules for Measuring and Scribing
Handling of measuring tools:
- The ambient temperature should be 90° C if possible.
- Put the line rules parallel to the measured length.
- Read off the measured value at an optical angle of 90°.
- The joints of the folding rule must be fully stretched.
- Put on and use the vernier caliper carefully.
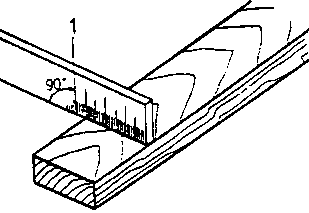
Figure 12 Reading off the measured
value vertically
1 reading off the measured value at an optical angle of 90°
Scribing parallel to the edge:
- Scribe by marking off measures on two or three points.
- Link the markings with the straigthedge and the pencil.
- Scribe with the marking gauge:
· Set the steel points of the marking gauge to the finished dimensions.
· Put the marking gauge against the angle edge (reference edge) of the workpiece.
· Lead the marking gauge along the edge and scribe with the steel points.
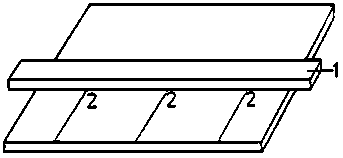
Figure 13 Marking off measures for a
parallel marking
1 straightedge, 2 points for marking off the measures
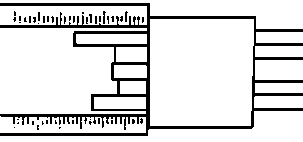
Figure 14 Setting the marking gauge
Scribing at right angles to the edge:
- Apply a working square.
- For markings over or under 90° use a mitre square or a bevel protractor.
|
Handle the bevel protractor carefully - check the set angle from time to time! |
Scribing with templates:
- Handle and preserve the templates carefully for reuse.
- In case of longish forms of the workpiece pay regard to the fibre flow of the wood.
Why must the joints of the folding rule be fully
stretched?
__________________________________________________________________________
__________________________________________________________________________
__________________________________________________________________________
Why should the marking gauge always be put against the angle
face of the
workpiece?
__________________________________________________________________________
__________________________________________________________________________
__________________________________________________________________________
Why must the angle of bevel protractors be checked from time to
time?
__________________________________________________________________________
__________________________________________________________________________
__________________________________________________________________________