 |
| ||||||||||||||||||||||||||||||||||||||||
|
| ||||||||||||||||||||||||||||||||||||||||
Institut f�r berufliche Entwicklung e.V.
Berlin
Original title:
Arbeitsmaterial f�r den
Lernenden
“R�ndeln und Kordeln”
Author: Horst K�th
First edition © All surfaces finished.
Institut f�r berufliche Entwicklung e.V.
Parkstra�e
23
13187 Berlin
Order No.: 90-35-3207/2
|
| ||||||||||||||||||||||||||||||||||||||||
1. Purpose and meaning of knurling
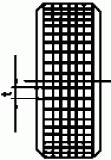
Cylindrical parts, such as screw heads, round nuts, gripping surfaces on measuring tools and all kinds of handles or grips which have to be gripped firmly, must have roughened gripping surfaces. Good grip of such gripping surfaces of operating elements is ensured by providing them with knurled portions. According to the patterns produced, the knurled portions are called straight knurling, cross knurling or spiral knurling.
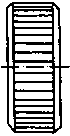
Figure 1 Straight knurling
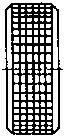
Figure 2 Cross knurling
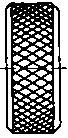
Figure 3 Spiral knurling
This non-cutting technique is no real turning operation. As an embossing operation it belongs to the metal forming techniques, but it is done on the lathe and is a very simple and cheap method.
Gripping surfaces thus produced are sufficient in terms of
- accuracy to size
- shape (good grip)
- surface finish and
- fit.
|
| ||||||||||||||||||||||||||||||||||||||||
2. Design and types of knurling tools
By the knurling technique the outer surface of the parts is formed by means of a single-wheel or double-wheel knurling holder.
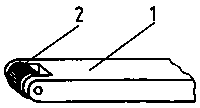
Figure 4 Straight knurling holder
1 knurling holder
2 knurling wheel
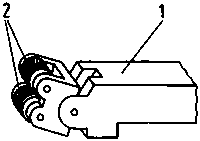
Figure 5 Spiral knurling holder
1 knurling holder
2 knurling wheels
The tools are toothed steel wheels (or rolls or knurls) pressing the pattern into the surface.
Straight knurling holders are solid and have one wheel (see Fig. 4). The wheel should run with a little clearance in the borehole as well as in the holder.
Straight knurlings are produced by means of straight or hollow knurling wheels (mostly cylindrical) with one wheel only in the knurling holder.

Figure 6 Straight knurling wheel
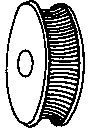
Figure 7 Hollow (concave) knurling
wheel
The spiral knurling holder, the head of which is tiltable, holds two wheels (see Fig. 5).
Spiral knurling holders have a special matching edge bearing which must fit well at the upper edge of the tool slide when clamping so as to prevent the holder from being forced away during the operation.
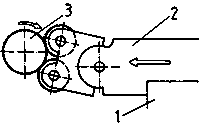
Figure 8 Spiral knurling tool -
clamping with matching edge bearing
1 matching edge
2 knurling tool
3 workpiece
With cross knurlings the tooth pitches (grooves) are crossing at right angles. Cross knurlings are produced by knurling with two wheels having straight teeth in opposite directions.
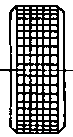
Figure 9 Cross knurling
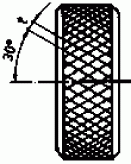
Spiral knurlings are also produced by two wheels having tooth-type grooves in the form of a 30° right-hand or left-hand spiral (2 wheels with oppositely inclined teeth).
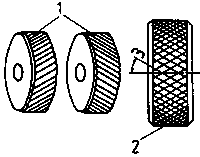
Figure 10 Spiral knurling
1 pair of knurling wheels
2 knurled portion
3 degrees (30°)
The groove distance is the pitch (t) which differs depending on the material, width and diameter of the workpiece.
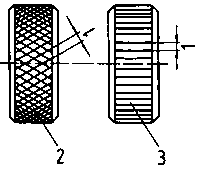
Figure 11 Form and pitch of teeth
1 pitch (groove distance t)
2 spiral knurling wheel
3 straight knurling wheel
Table 1 Recommended pitches for straight, cross and spiral knurlings
|
Dimensions of the workpiece |
for any material |
for hard rubber |
for brass aluminium, fibre |
for steel | |
| |
straight knurling |
cross knurling |
spiral knurling | | |
|
Diameter |
Width |
Pitch | |||
|
up to 8 |
any width |
0.5 |
0.6 |
0.6 |
0.6 |
|
8...16 |
up to 2 |
0.5 |
- |
- |
- |
| |
2...6 |
0.6 |
0.6 |
0.6 |
0.8 |
|
16...31 |
up to 2 |
0.5 |
- |
- |
- |
| |
2...6 |
0.6 |
0.6 |
0.6 |
0.8 |
| |
more than 6 |
0.8 |
0.8 |
0.8 |
1.0 |
|
32...64 |
up to 6 |
0.6 |
0.6 |
0.6 |
0.8 |
| |
6...14 |
0.8 |
0.8 |
0.8 |
1.0 |
| |
more than 14 |
1.0 |
1.0 |
1.0 |
1.2 |
|
64...100 |
up to 6 |
0.8 |
0.8 |
0.8 |
0.8 |
| |
6...14 |
0.8 |
0.8 |
0.8 |
1.0 |
| |
14...30 |
1.0 |
1.0 |
1.0 |
1.2 |
| |
more than 30 |
1.2 |
1.2 |
1.2 |
1.6 |
|
more than 100 |
up to 2 |
0.8 |
- |
- |
- |
| |
2...6 |
0.8 |
0.8 |
0.8 |
1.0 |
| |
6...14 |
1.0 |
1.0 |
1.0 |
1.2 |
| |
14...30 |
1.0 |
1.2 |
1.2 |
1.6 |
| |
more than 30 |
1.2 |
1.6 |
1.6 |
2.0 |
The knurling wheels are made of hardened tool steel and normally have a diameter of 15 - 20 mm. The teeth are similar to small cutting edges of tools.
Recommended pitches of straight, cross and spiral knurlings are given in the following table.
|
| ||||||||||||||||||||||||||||||||||||||||
3. Preparation of knurling
Prior to knurling, all necessary working tools and materials are to be properly made available.
Setting up of the lathe basically involves the following steps:
Clamping/chucking of the workpiece for knurling
The parts to be knurled are mainly chucked in hard chuck jaws since the screws, knobs, etc. are mostly to be provided with a thread, i.e. they will be subjected to further machining.
Moreover, the gripping surfaces need not absolutely run true. If, however, true running is necessary or machined surfaces are to be protected, the parts are chucked in soft chuck jaws which are to be turned internally for this purpose.
Checking the diameter to be knurled for size.
By pressing the teeth into the workpiece, the diameter of the knurled portion will increase by approximately half the tooth pitch since there is no chip removal.
Therefore, the diameter of the workpiece must be turned smaller by 1 to 1/2 tooth pitch depending on the material.
(d1 = d - t/2)
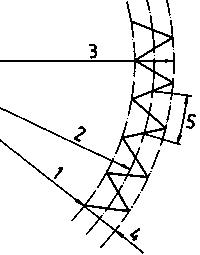
Figure 12 Increase in diameter
1 root circle
2 pitch circle
3 top circle
4 height
5 pitch t
Example: A steel part with a grip of d = 30 mm shall be spiral-knurled over a width of 40 mm. According to table 1 in section 2 the spiral-knurling pitch is 1 mm. By experience it is known that after knurling the diameter of the workpiece will be approx. t/2 bigger than before.
Therefore the grip is to be turned to
|
d1 = d - t/2 |
d1 = 30 mm - 0.5 mm |
d = 29.5 mm |
A grip of d = 26 mm shall be straight-knurled over a width of 20 mm.
What is the straight-knurling pitch and to which size is the
nominal diameter to be
turned?
__________________________________________________________________________
__________________________________________________________________________
Clamping of the tool for knurling
All straight and spiral knurling holders are generally to be clamped at right angles to the axis of rotation and to be positioned slightly below centre (approx. 1 mm).
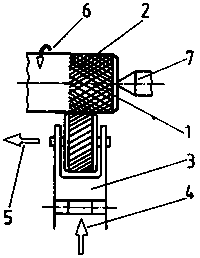
Figure 13 Clamping of the straight
and spiral knurling holder at right angle to the axis of rotation
1 axis of rotation, 2 workpiece, 3 spiral knurling holder, 4 direction of tool pressure, 5 feed direction of tool, 6 direction of rotation of workpiece, 7 live centre of tailstock
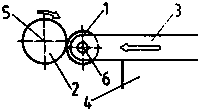
Figure 14 Clamping of straight
knurling holder below centre
1 straight knurling wheel, 2 workpiece, 3 knurling holder, 4 tool support, 5 centre of workpiece, 6 centre of tool (below centre of workpiece)
Since the spiral knurling holder must exert double the pressing force compared to the straight knurling holder, it is more rigid and, moreover, provided with an edge to match the tool carrier (see Fig. 8).
All knurling wheels are fixed by unhardened steel pins.
Setting of the cutting values
Like with longitudinal turning and facing, the values to be set are determined by means of tables of recommended values depending on the kind of operation and on the lathe.
The rotational speeds of the workpieces should be a little lower than for turning with the same tool material (tool steel v = 6...10 m/min).
Example: A steel part (St 36) with a grip of d = 30 mm shall be straight-knurled over a width of 50 mm.
What is the rotational speed?
Cutting speed for tools of tool steel:
v = 6 - 10 m/min. Since St 36 has no special strength,
v = 10 m/min is selected.
|
Given: |
d = 30 mm |
Required: n =? |
r.p.m. |
| |
p = 3.14 | |
|
|
|
v=10 m/min | |
|
| |
| | |
| |
| | |


If possible, the cutting depth should be produced in one feed setting.
Feed in axial direction will be necessary for longer spiral knurlings.
The longitudinal feed of the spiral knurling tools must always comply with the spiral-knurling pitch to avoid overlapping.
Making available coolant and lubricant
Cooling is absolutely necessary (normally by soluble oil or cutting oil) since the heavy pressing force produces heavy friction.
The following rules are to be observed:
- The knurling wheel must always be clean.- All holders are to be clamped at right angles to the axis of rotation.
- The spiral knurling holder’s matching edge bearing must be located at the upper edge of the tool slide to prevent the holder from being forced away.
- The straight knurling technique is used for all metals.
- The spiral knurling technique is used mainly for steel.
- The cross knurling technique is used for hard rubber, plastic material, etc.
What is the rotational speed for cross knurling of knobs of hard rubber with a gripping surface of d = 24 mm and 20 mm width?
Formula: 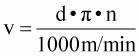
|
Given: |
_________________________________________________ |
|
Required: |
_________________________________________________ |
|
Calculation: |
_________________________________________________ |
| |
_________________________________________________ |
| |
_________________________________________________ |
| |
================ |
What is the purpose of knurled
portions?
__________________________________________________________________________
__________________________________________________________________________
__________________________________________________________________________
__________________________________________________________________________
Why is the diameter becoming bigger by
knurling?
__________________________________________________________________________
__________________________________________________________________________
__________________________________________________________________________
How are knurling tools to be
serviced?
__________________________________________________________________________
__________________________________________________________________________
__________________________________________________________________________
Why is a low cutting speed selected for
knurling?
__________________________________________________________________________
__________________________________________________________________________
__________________________________________________________________________
|
| ||||||||||||||||||||||||||||||||||||||||
4. Straight knurling of small widths on simple cylindrical parts
By straight knurling gripping surfaces are produced, e.g on screws, round nuts and control knobs. Attention is to be paid to the following:
- The workpiece is clamped in a chuck. For longer parts the live centre is used as counter-support.- Hard chuck jaws are mainly used.
- The knurling wheel is fixed in the holder by an unhardened steel pin (see Fig. 4).
- The knurling tool holder is to be clamped approx. 1 mm below centre and at right angle to the work-piece axis.
- Mislocation (oblique position) of the tool will result in failures and should be avoided.
- By operating the cross-slide screw, the tool is pressed against the workpiece.
- Firm and safe clamping of the workpiece and tool are important because of the high pressing force.
- If possible, the knurling should be produced in one feed setting.
- Sufficient cooling and lubrication are to be ensured.
- The edges of the workpiece are to be chamfered after knurling since the material is also pressed to the end faces. The amount of chamfer should be approximately equal to the pitch (chamfer = t).
- By visual inspection the grooves are checked for cleanliness.
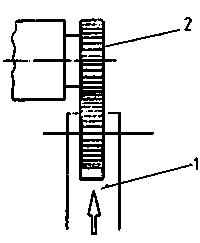
Figure 15 Working position of tool
1 straight knurling holder
2 workpiece
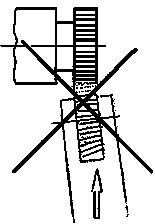
Figure 16 Misplacement of tool
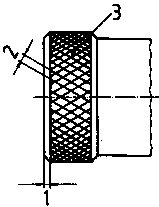
Figure 17 Chamfering of workpiece
1 chamfer
2 pitch
3 workpiece
What is the purpose of straight
knurlings?
__________________________________________________________________________
__________________________________________________________________________
__________________________________________________________________________
|
| ||||||||||||||||||||||||||||||||||||||||
5. Spiral knurling of small widths
With this technique attention is to be paid to the following:
- The workpiece is mostly chucked in hard chuck jaws.- The knurling wheels are fixed in the holder by unhardened steel pins (see Fig. 5).
- The knurling wheels must always be clean.
- The knurling holder is to be clamped approx. 1 mm below centre and at right angle to the workpiece axis.
- The matching edge bearing of the knurling tool must be perfectly fitting.
- By operating the cross-slide screw, the tool is pressed against the workpiece.
- If possible, the knurling should be produced in one feed setting.
- Good cooling and lubrication are to be ensured.
- The workpiece is to be chamfered after knurling.
- By visual inspection the knurling is checked.
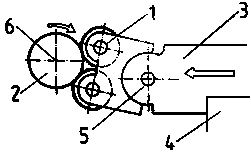
Figure 18 Clamping of spiral knurling
holder below centre
1 spiral knurling wheel, 2 work-piece, 3 spiral knurling holder, 4 tool support (below centre of workpiece), 6 centre of workpiece
|
Measure and test only with the machine at rest or the workpiece unloaded. |
Why are the workpieces provided with chamfers only after
straight or spiral
knurling?
__________________________________________________________________________
__________________________________________________________________________
__________________________________________________________________________
How are spiral knurling tools to be clamped and
serviced?
__________________________________________________________________________
__________________________________________________________________________
__________________________________________________________________________
What safety requirements must be met in spiral
knurling?
__________________________________________________________________________
__________________________________________________________________________
What tools are used for chamfering the
workpieces?
__________________________________________________________________________
__________________________________________________________________________
__________________________________________________________________________
|
| ||||||||||||||||||||||||||||||||||||||||
6. Cross knurling of small widths
With this technique attention is to be paid to the following:
- The workpiece is mostly chucked in internally turned chuck jaws because material with low mechanical strength is knurled.- The pressing force depends on the material of the workpiece. If necessary and possible, a live centre is to be used as counter-support.
- The knurling wheels are fixed in the holder by unhardened steel pin.
- The knurling wheel must be clean.
- The knurling holder is to be clamped (approx. 1 mm) below centre and at right angle to the workpiece axis.
- By operating the cross-slide screw, the tool is pressed against the workpiece.
- If possible, the knurling should be produced in one feed setting.
- Good lubrication is to be ensured. Attention! The materials knurled (e.g. plastics) have other properties than steal!
Sticky or smeary lubricants are not to be used.
- The workpiece is to be chamfered after knurling.
- By visual inspection the knurling is checked.
|
Firm and safe clamping of the workpieces is essential because of high pressing forces generated in chipless forming. |
|
| ||||||||||||||||||||||||||||||||||||||||
7. Straight knurling of convex parts
With this technique attention is to be paid to the following:
- Mostly the workpiece is clamped in hard chuck jaws.- Concave knurling is mainly applied for straight knurling of control knobs.
- The knurling wheel is fixed in the holder by an unhardened steel pin.
- The possibilities of application depend on the width of the portion to be knurled and the concave knurling wheels available.
- The knurling holder is to be clamped (approx. 1 mm) below centre and at right angle to the workpiece axis.
- By operating the cross-slide screw, the tool is pressed against the workpiece.
- If possible, the knurling should be produced in one feed setting.
- The knurling wheel must be clean.
- The workpiece is to be chamfered after knurling.
- The knurling is checked by visual inspection.
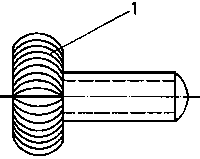
Figure 19 Control knob
1 gripping surface
|
| ||||||||||||||||||||||||||||||||||||||||
8. Spiral knurling of big widths
With this technique attention is to be paid to the following:
- The workpiece is held in a chuck with live centre as counter-support.- Depending on the state of machining of the parts, chucking is either in hard or in soft chuck jaws.
- The knurling wheels are fixed in the holder by unhardened steel pins.
- The knurling holder is to be clamped (approx. 1 mm) below centre and at right angle to the workpiece axis.
- The matching edge bearing of the tool must be properly located.
- By operating the cross-slide screw, the tool is pressed against the workpiece.
- The tool slide is laterally moved step by step or the longitudinal feed is used.
- The feed must comply with the spiral-knurling pitch to avoid overlapping.
- The tool must not be immediately applied to the full width.
- If possible, the knurling should be produced in one feed setting. For hard materials re-pressing will sometimes be necessary. In such cases the tool is not to be retracted but to continue in the same grooves to avoid overlapping.
- Basically the operation must not take longer than necessary since the cold forming process makes the material harder and more brittle.
- Good cooling and lubrication are to be ensured.
- The workpiece is to be chamfered after knurling.
- Measuring and testing is first by means of the vernier caliper, followed by visual inspection of the knurled portion.
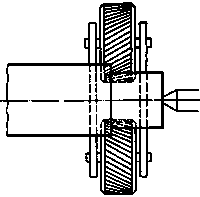
Figure 20 Spiral knurling of long
parts

Figure 21 Spiral knurling of a wide
portion with longitudinal feed
1 workpiece (long)
2 spiral knurling tool
3 pressing of tool
4 weed of tool
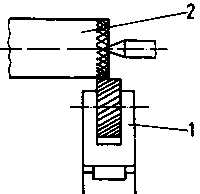
Figure 22 Tool not to be applied
immediately to the full width
1 tool
2 workpiece
How are knurling tools
constructed?
__________________________________________________________________________
__________________________________________________________________________
__________________________________________________________________________
Which types of knurling do you
know?
__________________________________________________________________________
__________________________________________________________________________
Explain the process of spiral knurling of wide
portions!
__________________________________________________________________________
__________________________________________________________________________
__________________________________________________________________________
__________________________________________________________________________
__________________________________________________________________________
__________________________________________________________________________
__________________________________________________________________________