 |
| ||||||||||||||||||||||||||||
|
| ||||||||||||||||||||||||||||
Institut f�r berufliche Entwicklung e.V.
Berlin
Original title:
Arbeitsmaterial f�r den
Lernenden
“Putzen und Schleifen”
Author: Rolf Jakoby
First edition © IBE
Institut f�r berufliche Entwicklung e.V.
Parkstra�e
23
13187 Berlin
Order No.: 93-35-3307/2
|
| ||||||||||||||||||||||||||||
1. Purpose and Meaning of Smoothing and Sanding
Smoothing and sanding are chip-producing woodworking techniques for finishing of wood surfaces aiming at:
- final shaping of the workpiece,
- improvement of the surface finish.
Smoothing is the manual technique of shaping and finishing the surfaces by:
- planing,
- filing,
- working with the scraper (sheet steel).
Sanding is the technique of final fine-finishing of the surfaces by sanding tools.
What is the purpose of smoothing and
sanding?
__________________________________________________________________________
__________________________________________________________________________
__________________________________________________________________________
|
| ||||||||||||||||||||||||||||
2. Types and Mode of Action of Smoothing and Sanding Tools
Smoothing of flat wood surfaces by planing is performed by means of the double plane. Smooth surfaces are achieved by planing by
- a narrow opening in the plane face,- a sharp plane cutter edge,
- setting a maximum distance of 0.5 mm between the breaker edge of the plane-cutter flap and the cutting edge,
- a small projection of the cutting edge at the plane face.

Figure 1 Fine setting of the double
plane
1 narrow opening in the plane face, 2 plane cutter edge, 3 distance of the flap breaker edge to the cutting edge, 4 distance of the cutting edge to the face
Profiled and curved surfaces are planed by means of special planes, such as
- double rabbet plane,
- plane with profiled plane face and adequately profiled plane cutters with flap,
- plane with curved plane face.
The hand tools for size-finishing and smoothing of curved surfaces are rasps and files of different shapes. The chips are removed by successive cutting edges which are called “cuts”. The cuts are cut or milled into the basic body, the blade. At the top end the blade is designed as tang to which the handle is fixed.

Figure 2 Parts of rasps and files
1 cuts, 2 blade, 3 tang, 4 handle
Rasps are used for rough-smoothing of the workpiece. Files are used for the subsequent finishing by removing very thin chips. The files differ according to the different jobs and quality requirements. They differ with respect to
- the arrangement and distances of the cut rows,
- the shape of the file blade.
There are single-cut and double-cut files. Single-cut files have an angle of 110 to 115 degrees between the cut rows and the axis of the file.
Double-cut files have, in addition to the undercut, a second cut (overcut) at an angle of 52 to 56 degrees to the axis of the file.

Figure 3 Types of files according to
the cut rows, angles of cut rows (1) Single-cut file
1 single-cut file blade, 2 axis of the file, 3 angle of the undercut rows to the axis

Figure 3 Types of files according to
the cut rows, angles of cut rows (2) Double-cut file
1 double-cut file blade, 2 axis of the file, 3 angle of the undercut rows to the axis. 4 angle of the overcut rows to the axis
The following rules apply to the selection and use of the files:
- Single-cut files and big distances between the cut rows remove bigger chips.
- Double-cut files and small distances between the cut rows remove fine chips and produce smooth surfaces.
The shape of the file blade depends on the purpose of use. The main shapes are:
- flat file,
- flat round file,
- half round file,
- round file.

Figure 4 Profiles of different files
1 flat file, 2 flat round file, 3 half round file, 4 round file
When filing resinous and glued woods, the cuts of the file are filled with chips, resin and glue. The files are to be cleaned as follows:
- Softening and swelling of the dirt in water.
- Subsequent brushing out of the dirt using a root brush or fine brass brush.
|
Burning out or scratching out of the dirt by means of pointed objects or a sharp wire brush would damage the cuts and reduce the service life of the file. |
Small irregularities of the surface left after planing or filing are removed with a scraper. The sheet-steel scraper has a length of about 150 nun, a width of 50 nun and a thickness of 1 mm. The fine chips are removed by a uniform, sharp ridge at the longitudinal edges of the tool.
Sharpening of the scraper involves the following operations:
- Clamping in a clamping fixture.- Levelling of the longitudinal narrow faces by means of a flat metal file.
- Whetting of the longitudinal narrow faces with coarse and fine whetstones and whetting fluid.
- Whetting of the wide faces by means of whetstones and whetting fluid.
- Burnishing of the wide faces by means of a scraper burnisher humidified with oil until there is no ridge anymore.
· Scraper burnisher to be firmly pressed on the wide face during burnishing.
- Burnishing of the ridge by moving the scraper burnisher along the longitudinal narrow faces and pressing it towards the wide face.
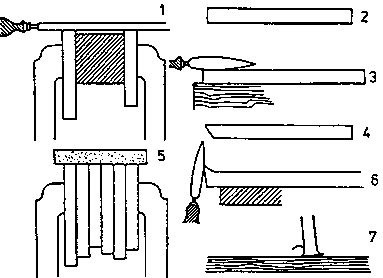
Figure 5 Sharpening of the scraper For
better file support, a wooden block is to be clamped between two scrapers
1 filing, 2 filed and whetted, 3 burnishing, 4 burnished, 5 whetting, 6 burnishing of the ridge, 7 scraper in use
Finally the surfaces are fine-finished by sanding using flexible sanding tools.
They consist of
- the flexible abrasive carrier
- and the adhesive-bonded abrasives.
Abrasive carriers mainly used are:
- water-proof and non water-proof paper,
- rigid fabric
and for special applications:
- metal or plastics or a combination of these materials.
Abrasives are sharp-edged and very hard mineral or synthetik materials. Synthetic abrasives are harder than mineral abrasives.
The table shows the types and hardnesses of the abrasives.
Table 1 - 1. Types of Abrasives
|
Type of abrasive |
Hardness (to Mohs) |
|
Mineral abrasives: | |
|
1.1. Cullet |
4 to 6 |
|
1.2. Flint |
5 to 7 |
|
1.3. Garnet |
7 |
|
1.4. Emery |
7 to 8 |
|
1.5. Natural corundum |
8 to 9 |
|
Synthetic abrasives: | |
|
1.6. High-grade corundum |
8 to 9 |
|
1.7. Silicon carbide |
9.5 to 9.75 |
The quality of the sanded surface depends on the size of the abrasive grains and on their distance from each other (distribution density). The following rules apply to the selection and use of the abrasive grains:
- Grains of big size and big distance produce a rough surface.- Grains of small size and smaller or no distance produce a smooth, clean surface.
- When the abrasives are dull, further use is possible by shining the sanding tool and then the abrasives are to be replaced.
The tools for manual sanding are sanding pads around which the flexible sanding tools are clamped. Wide faces are sanded by means of sanding pads consisting of
- cork,
- soft wood with glued-on felt support.
Figure 6 Sanding pad
1 softwood, 2 felt support
Hard-wood sanding pads are used for sanding of narrow faces. Profiled and curved faces are sanded by means of sanding pads with counterprofile.
Figure 7 Sanding pads with adequate
shape for sanding of profiled and curved faces
1 workpiece, 2 sanding pads with counterprofils
|
| ||||||||||||||||||||||||||||
3. Finishing of Flat Wide and Narrow Faces
Finishing of flat wide and narrow faces involves the following operations:
Clamping of the workpiece in a carpenter’s bench or work bench with the face to be finished on top
- To avoid pressing marks on the workpiece, clean packing faces of wood or other solid materials are to be used.- Long workpieces are to be supported at the free end by a vertically adjustable rest.
- The working direction and grain direction of the workpiece are to be taken into account.
Planing with the double plane and fine-chip setting
The planing strokes should be long and overlap a little.
Working with the scraper
The scraper is mainly used for finishing of hard wood. With soft wood, the wood grains would press into the face during working and no chip would be removed.
The scraper is to be guided lightly over the face with both hands
- with drawing cut,
- with the ridge edge slightly oblique to the working direction,
- parallel, oblique or square to the wood grain direction, depending on the requirements.

Figure 8 Guiding direction of scraper
Sanding with sanding tools
Sanding includes the steps:
- Selection of the flexible sanding tool.- Selection of the sanding pad.
- Wrapping the flexible sanding tool around the sanding pad and holding it with the hand.
- Sanding movements to be performed with slight, uniform pressure on the face in the following working directions:
· across the wood grain in the case of surfaces to be provided with covering coat of paint,
· parallel to the wood grain in the case of surfaces with straight-line grain direction,
· circular or with the wood grain in the case of surfaces with irregular grain direction.
- Uncovered edges of the workpiece are to be sanded throughout (smoothing off of edges) with slight, uniform pressure.

Figure 9 Holding of the flexible
sanding tool at the sanding pad
Checking the surface for flatness and smoothness.
The surface quality is to be checked by:
- comparison of the face with a straightedge according to the light-gap testing method.
- sighting over the face.
The face is flat if the sighted workpiece edges are congruent.
The face is smooth if no shadow effect caused by irregularities is visible.
- touching the face with the hand.
The face is smooth if no irregularities are sensible.
Why must uncovered workpiece edges be
sanded?
__________________________________________________________________________
__________________________________________________________________________
__________________________________________________________________________
|
| ||||||||||||||||||||||||||||
4. Finishing of Profiled Faces
The use of the tools and the working steps for finishing of profiled faces depend on:
- the surface finish of the profiles produced manually or on machines,
- the shape of the profiles,
- the possibilities for using the tools.
Profiles with heavy and medium irregularities can be finished with any suitable and available smoothing and sanding tools. Profiles with slight irregularities are finished by sanding.
The selection and use of the tools depend on the shape of the profiles. Profiles are finished by tools with counterprofile or in sections by several different tools. The sanding pads with counterprofile required for sanding of profiles are specially made from hard wood.
Smoothing of profiled faces involves the following operations:
- Clamping of the workpiece with the profiled faces on top, if possible.
- Planing.
- Working with the scraper.
- Sanding.
- Checking for smoothness by
· sighting over the profiled faces and/or
· touching the profiled faces.
For profiled faces having just slight irregularities, the operations planing and scraper working can be skipped.
|
| ||||||||||||||||||||||||||||
5. Working to Size and Finishing of Curved Surfaces
Shaping and finishing of faces curved by sawing tools involve the following operations:
- Clamping of the workpiece with the faces to be worked on top, if possible.
- Shaping and finishing.
The selection and use of the tools depend on the shape and size of the curves.
- Slightly curved radii are worked with:
· plane with adjustable face,
· fine-set double plane,
· scraper,
· sanding tools.
- Slightly curved hollow faces are worked with:
· plane with adjustable face,
· plane with fixed, curved face,
· scraper,
· sanding tools and sanding pads with adequate shape.
- Highly curved radii are worked with:
· flat rasps,
· flat files,
· scraper,
· sanding tools.
- Highly curved hollow faces are worked with:
· half round rasps,
· half round files,
· flat round files,
· scraper,
· sanding tools and sanding pads with adequate shape.
Curved faces are worked with rasps and files with
- one hand gripping the handle of the tool,
- the other hand guiding the tool at the blade,
- the tool guided with the wood grain, if possible, or obliquely to the wood grain,
- the tool guided parallel to the curving.
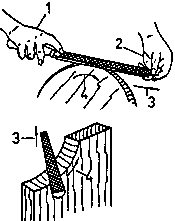
Figure 10 Guiding of rasps and files
1 gripping of the tool at the handle, 2 guiding of the tool at the blade, 3 guiding with and obliquely to the wood grain, 4 guiding parallely to the curving
Checking of the curved faces for:
- working accurate to shape
· with templates placed on the face and compared with the face to the light-gap method.

Figure 11 Checking a curved face with
a template
1 workpiece, 2 template
- smoothness by
· sighting
· touching.
Why must the rasps, files and sanding tools be guided preferably
with the wood grain or obliquely to the wood
grain?
__________________________________________________________________________
__________________________________________________________________________
__________________________________________________________________________