 |
| |||||||||||||||||||||||||||||||||||||||||||||
Institut f�r berufliche Entwicklung e.V.
Berlin
Original title:
Arbeitsmaterial f�r den
Lernenden
“Arbeiten an Holzdrehmaschinen”
Author: G�nter Hanisch
First Edition © IBE
Institut f�r berufliche Entwicklung e.V.
Parkstra�e
23
13187 Berlin
Order No.: 93-35-3406/2
|
| |||||||||||||||||||||||||||||||||||||||||||||
1. Purpose of Turning
Turning is a cutting process. The workpiece encompasses a turn. Chips are removed by the hand-wielded tool. This process is also called turning and is one of the oldest wood processing techniques. This technology is used to yield a great variety of shaped workpieces.
The two main types of bent turning, namely turning long trunks and cross sections, constitute the principal forms of turning.
Thereby virtually all turned products can be made.
What is the purpose of
turning?
_________________________________________________________________________
_________________________________________________________________________
_________________________________________________________________________
|
| ||||||||||||||||||||
Operations on Wood Turning Lathes - Course: Mechanical woodworking techniques. Trainees' handbook of lessons (Institut f�r Berufliche Entwicklung, 19 p.)
2. Assembly of a Lathe

Figure 1 - Wood turning lathe
1 cheeks, 2 stand, 3 spindle stock, 4 spindle, 5 chucking device, 6 gears, 7 motor, 8 tailstock, 9 tailstock centre, 10 support strip
The basic machine frame consists of two cheeks to which all the other elements have been attached. The cheeks hinge on two stands, the most important machine part is the headstock. It has been arranged on the left end of the cheeks and contains the spindle to which various chucking aids can be attached. The spindle is driven via gears from the motor. The gears make possible a rotational speed alignment to the respective workpiece diameter. A tailstock with tailstock centre serves as end support to the chucking device when processing longer workpieces. The turning tools held by hand are placed onto the support strip which can be adjusted in three directions and set in line with the respective tasks in hand.
2.1. Chucking Facilities for Workpieces
Turning out differently shaped workpieces and the utilisation of various kinds of materials presupposes the employment of various chucking facilities for clamping the workpieces to the machine spindle.
A number of frequently used chucking facilities feature among the basic accessories of a wood turning lathe. Further chucking devices can be provided for special processing technologies.
Chucking devices for long trunk turning
Trifurcatel
The trifurcate consists of a centre point and two driving spikes. The workpiece is clamped between the trifurcate and the tailstock centre. Thereby, the workpiece is fixed to the trifurcate with a light hammer blow.
Avoid splitting the workpiece at all costs. Otherwise the workpiece breaks during processing - danger of accidents -.
Turning whilst employing this chucking method is termed “turning between the centres” and is mainly utilised for processing longer workpieces.

Figure 2 - Trifurcate
Tongue or hollow chuck
This serves to chuck short trunk pieces without using the tailstock centre. By means of the previously twisted tenons the workpiece is driven into the conical bore of the chuck. The workpiece fits more snugly is the tenons are moistened somewhat beforehand.
Tongue and hollow chucks can also be used for certain hard wood turning operations. Turning without a tail-stock is known as “free-hand turning” or “overhead turning”.
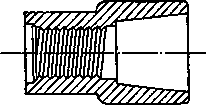
Figure 3 - Hollow chuck with
fastening screw thread
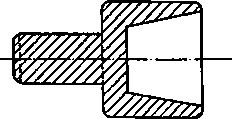
Figure 4 - Hollow chuck for
clamping into a three-jaw chuck
Jaw chuck
Three- and four-jaw chucks can be used for chucking both long trunks and cross pieces. Jaw chucks comprise two sets of chucking jaws:
- a set of chucking jaws to chuck thin or hollow workpieces
- a set of chucking jaws to chuck thick workpieces.
When chucking heed the differing compressive strengths of the woods in various grain directions. During turning operations the workpiece must not be chucked again otherwise it no longer runs exactly true.
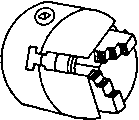
Figure 5 - Three-jaw chuck

Figure 6 - Internal jaws
Figure 7 - External jaws
Chucking facilities for cross piece turning
Screw chuck
The screw chuck augments the jaw chuck and is subsequently supplied for the driving or face plate. It comprises multi-layer wooden disks. This wooden disk is attached to the envisaged chuck and then level-turned. An inserted wooden screw for chucking the workpiece is in the centre. During turning the chuck cannot absorb too great chucking forces.

Figure 8 - Screw chuck
Driving and face plate
Bigger, flat workpieces can be attached to these chucking facilities by means of wooden screws. Beforehand the holding points are marked on the workpiece. Thereby, ensure that the screw holes do not impair future utilisation. If the workpiece diameter is less than that of the plate a 5 mm or so thick dummy disk is positioned between the workpiece and the chucking device. Thereby the workpiece narrow surface can be processed without damaging the disk.
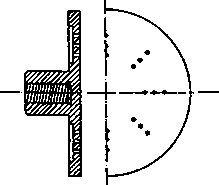
Figure 9 - Chucking plate,
faceplate
Why are different chucking facilities used for
turning?
_________________________________________________________________________
_________________________________________________________________________
When is a trifurcate used as a chucking
means?
_________________________________________________________________________
_________________________________________________________________________
Why must the workpiece not split when hitting the plugging
chisel
grippers?
_________________________________________________________________________
_________________________________________________________________________
Why should be jaw chuck not be rechucked during turning
operations?
_________________________________________________________________________
_________________________________________________________________________
What is the task of the face
plate?
_________________________________________________________________________
_________________________________________________________________________
|
| |||||||||||||||||||||||||||||||||||||||||||||
3. Tools
Turning out variously shaped workpieces makes necessary the processing of materials in different grain directions and in varying profiles. Commensurately, a number of special tools are required. The faces, edges and angles of the turning tool are presented in Figure 10.
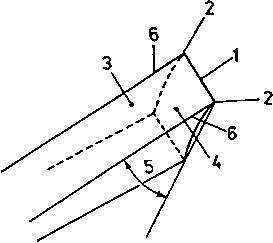
Figure 10 - Faces, edges and
angles of turning tools
1 main cutter, 2 comer, 3 chipping face, 4 flank, 5 taper angle, 6 trail cutter
The basic equipment of a wood turning lathe includes the following items:
Tubes
These tubes are used for long trunk and cross piece operations. Basically we differentiate between two types, roughing and forming tools. The roughing tool is used for preturning a cornered workpiece. It has a wide and flat shape. The cutter is straight and has lightly rounded comers. The taper angle of the cutter is, as applies to all turning tools, ground in line with wood hardness.
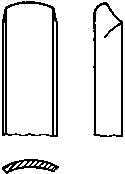
Figure 11 - Roughing tool
The forming tool is used to turn all rounded shapes of the workpiece. It is mainly used for long trunk operations. Tools of differing widths are employed for various workpiece shapes. As opposed to the jack tube, the cross-section of the form tube is not uniform. As a result varying angles arise at differing tool cutter points during chip removal. This feature exerts a positive influence on handling the tool when turning chamfers and curves. The cutter is ground slightly curved and the comers are somewhat rounded.
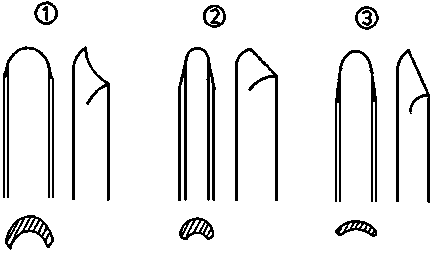
Figure 12 - Forming tool
(1) wide forming tool, (2) narrow forming tool, (3) forming tools ground for soft wood processing
Planer
A planer is used exclusively for long trunk turning. Because of its shape it is also known as a square-nosed tool.

Figure 13 - Planer
(1) double edge ground planer
1 burr, 2 tip(2) single edge ground planer with rounded burr
1 burr, 2 tip
The blunt-angled comer of the cutter, the burr, is for turning small curves. The burr can easily be round-ground. The sharp comer can be used for turning notches.
Tubes and planers are the main rool types for manual turning. Whereas the tubes (also called wood planers) are used for long trunk and cross piece work, the planer is only employed for long trunk operations.
Finishing tool
This finishing tool is used for smoothing and facing the cross pieces of disk-shaped workpieces. The finishing tool is only ground on one side. This tool is not really suitable for form turning. Chip removal is mainly through scraping whilst the taper angle must be selected in accordance with the material. A very unclean top surface results when this tool is used for long trunk operations.

Figure 14 - Finishing tool
Steel section
The steel section is very similar to the finishing tool. It is somewhat smaller and, through the addition of various profiles, can be prepared for special tasks.
Figure 15 - Steel sections
(various forms)
Cutting tool
This tool is solely for cutting long trunk turned parts. The cross-section form must resemble a knife or sword. Its advantage is that the wood grain surfaces are cut cleanly and wood losses are kept down to a minimum. It is difficult to rework the workpiece on these surfaces. When grinding the tool, heed the clearance angle adjacent cutters.
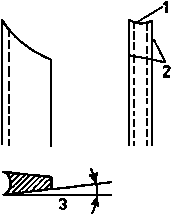
Figure 16 - Cutting tool
1 main cutter, 2 trail cutter, 3 clearance angle
Which tools are used for
turning?
_________________________________________________________________________
_________________________________________________________________________
What is the purpose of the cutting
tool?
_________________________________________________________________________
_________________________________________________________________________
|
| |||||||||||||||||||||||||||||||||||||||||||||
4. Tool Maintenance
Turning tools are subject to considerable albeit varying strain when processing differing wood types. Thus, certain basic requirements must be met by sound tools.
- It must be of high-grade steel which is sufficiently hard and elastic.
- The most suitable taper angle must be ground for the respective wood type.
- The tool must possess sufficient heat conductivity capacity. The subsequently arising frictional heat can cause structural changes to the tool cutting edge. This would denote a softening of the tool.
- The tool must be extremely sharp.
- The tool must be easy to handle as regards its form and size.
Table 1: Tool plane angle related to material and its raw thickness
|
Processing material |
Raw thickness in g/cm3 |
Taper angle in degrees (º) |
|
soft wood |
0.35... 0.50 |
20... 25 |
|
hard wood |
0.51... 0.70 |
25... 35 |
|
very hard wood |
0.71... 0.90 |
35... 40 |
Clean and properly sharped tools are an essential precondition for sound quality of the workpieces being processed and for accident-free operations.
Tools subject to considerable wear and tear are ground on the abrasive wheel. When grinding by means of dry-operating abrasive wheels the tools should be placed in water at short intervals otherwise they can easily anneal.
The taper edge must be heeded according to table one. First of all those tools with straight cutters are ground on the grinding disk (abrasive wheel). Because of the uneven wear and tear of the grinding disk the steel sections and tubes are the last items to be ground. Grinding is completed when all dents and gaps in the cutting edge have been removed and a small burr has formed on the cutter edge. Tool oilstoning is undertaken by a wet oilstone. Thereby the oilstone is moved by hand in a circular motion on the tool cutting edge.

Figure 17 - Oilstone
Flanks and cutting faces are oilstoned reciprocally. If possible, the oilstone should have a fine grain. A specially shaped oilstone is required for sharpening the tubes.
Figure 18 - Shaped oilstone
Oilstoning continues until no grinding traces are perceptible in the cutting edge area. A burr must not emerge during oilstoning.
Tools are only ground anew once resharpening by means of oilstoning is no longer possible.
Blunt tools require considerable cutting forces.
This increases the risk of accidents and inferior surface quality results.
|
| |||||||||||||||||||||||||||||||||||||||||||||
5. Mode of Operation of a Wood Turning Lathe
The chucked workpiece begins turning as the machine is switched on. Spindle rotational speed is chosen in line with the wood processing underway. Chips are removed by means of the manually-used turning tools.
|
| ||||||||||||||||||||||||||||||
Operations on Wood Turning Lathes - Course: Mechanical woodworking techniques. Trainees' handbook of lessons (Institut f�r Berufliche Entwicklung, 19 p.)
6. Turning Technology
6.1. Wood Selection
When selecting wood for turning operations the following requirements vis-a-vis material must be heeded:
- According to its purpose and subsequent further processing the wood shall possess sufficient stability and the necessary grain and colour standards.- Only select properly dried wood.
- The workpiece must not have any fissures. Otherwise it may splinter during processing - danger of accidents!
- Long trunk workpieces with knots and knot ends may break during processing.
- Ensure no alien bodies (nails, screws,...) are in the wood.
Straight, round woods (branches or thin trunk pieces) can be used for long trunk turning operations. Such woods, however, require special care. Fissures arise at the grain ends if drying ensues too quickly. Such tearing can be prevented if:
- the grain ends are coated with cold glue,
- the bark around the trunk is notched,
- no too thick round wood is selected,
- the wood dries slowly and not in the sun.
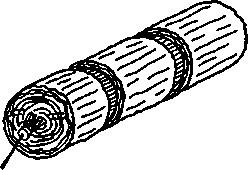
Figure 19 - Round piece of
wood prepared for drying
Thick trunks are split once, thrice or four times and the grain ends protected from too rapid drying. This prevents to a marked degree the emergence of drying fissures.
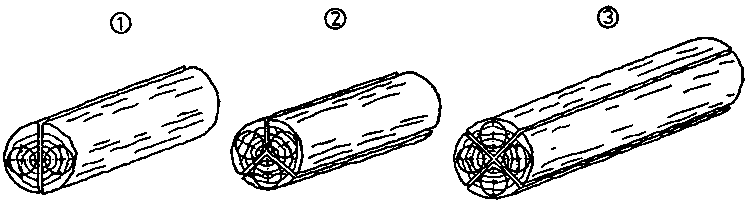
Figure 20 - Splitting trunks
(1) split simply
(2) split threefold
(3) split fourfold
The partial sections, after drying, are set up as blanks for turning operations. This ensues through splitting, sawing or planing.
Blanks of considerable diameter can also be yielded by sticking together thin board pieces with joints. These joints should, if possible, not be visible. Heed the wood structure of the various partial pieces (Figure 21). Blanks for various operations can be simply yielded by ripping up thick sawn timber (Figure 22).
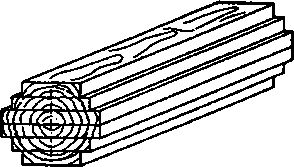
Figure 21 - Blanks made of
board pieces

Figure 22 - Blanks
which arise by splitting up thick sawn timber
Much care is required when marking workpiece centre points. Workpieces which have not been centrically chucked may easily, because of the unevenly influencing centrifugal forces, detach themselves from the machine. - Danger of accidents!
Furthermore, material consumption increases given inaccurate marking and chucking.
How can dry fissures be prevented at the grain ends of raw
woods?
_________________________________________________________________________
_________________________________________________________________________
Why should a workpiece be chucked centrically in the
machine?
_________________________________________________________________________
_________________________________________________________________________
6.2. Turning Long Trunks
Round turning
After workpiece marking and punching the plugging chisel (trifurcate) is lightly struck with a hammer and chucked with the tailstock centre under medium pressure. Thereby the driving tongue of the chucking device shall engage the diagonal lines of the grain end wood faces. This reduces the danger of splitting and, unimpeded by the tailstock, the hammer can be directed to the top, right-hand comer of the workpiece.
The suppport strip should be positioned close to the workpiece without, however, restricting the movement of the turning workpiece. The height of the support strip is determined by the necessary cutting rake for the various wood types.

Figure 23 - Arrangement of
wood during long trunk turning
(1) very hard wood, (2) hard wood, (3) soft wood
When turning, select the most favourable cutting speed for the wood being processed. This ensues by selecting the proper spindle rotational speed.
Table 2: Spindle rotational figures related to tool diameter
|
Workpiece diameter in mm |
Revolutions per min-1 | |
| |
soft wood |
hard wood |
|
to 50 |
2500 |
2000 |
|
to 80 |
2000 |
1400 |
|
to 200 |
700 |
700 |
Prevent bigger workpieces from splitting by applying suitable chucking means.
Initially turning is undertaken using the roughing tool. The tube is thereby placed firmly on the support strip at roughly right-angles to the rotational axis of the workpiece. The right hand seizes the grip whilst the left hand directs it to the strip. If turning is undertaken carefully the tube with the hollow side is somewhat inclined in direction of feed. The feed can be reciprocal depending on the length of the support strip, respectively the workpiece length.
Once the workpiece has been turned uniformly round it is smoothed by means of a planer which is held at some 65º to the rotational axis of the workpiece.
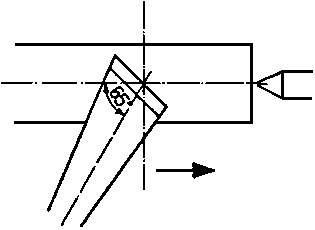
Figure 24 - Handling a turning
tool
Position the planer higher up so that the cutter does not yet engage. Then the workpiece is slowly pulled back until chip removal takes place. The most favourable cutting angle is determined by trial and error depending of wood hardness. The tool shall cut rather than chisel. Cut chip removal yields a smooth top surface which requires little reworking. Turning by means of a planer requires a great deal of practise.
The turning process is over once the necessary size and required surface quality have been attained.
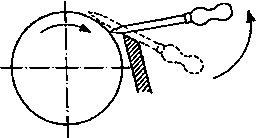
Figure 25 - Tool positioning
as turning process commences
At which height, related to the rotational axis of the
workpiece, must the support strip be set when turning soft
wood?
_________________________________________________________________________
_________________________________________________________________________
Form turning
This work technique presupposes prior round turning with a roughing tool. Frequently profiles are presented in Figure 26.
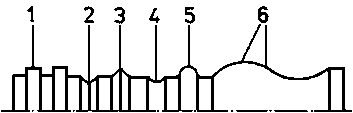
Figure 26 - Frequent profiles
during form tuning
1 rod, 2 candle, 3 sharp rod, 4 chamfer, 5 round rod, 6 curve and chamfer
A templet of cardboard or a templet drawing is prepared. This aid is often held behind the workpiece during turning whereby the forms are compared. Prior to turning all profile limitation lines are carried over to the workpiece. The templet is positioned onto the support strip and the pencil point is held carefully to the rotating workpiece.
Turning is undertaken by means of the forming tool. The tool is held like a roughing tool. However, turning is only permissible from the greater to the smaller workpiece diameter section, thereby ensuring clean cutting faces.

Figure 27 - Profile templet
Cutting-off
A special cutting-off tool is required for this purpose. This tool is not part of the basic equipment of the wold turning lathe, however it can be easily made from a kitchen knife or a thin, flat file.
This operation serves to split up workpieces to precise lengths and also to separate small parts.
The support strip must be so set that the tool cutter is brought into play at the workpiece rotational axis level. Workpieces chucked inbetween the centres should not be completely cut off. Otherwise the workpiece may jam with the tool at the separation point and become damaged. This possibility denotes an additional accident danger with bigger workpieces.
Prior to cutting off the workpiece must be completely prosessed unless a special chuck, for instance a tongue clamp, is available for further working.
6.3. Turning Cross Pieces
Here the wood processing direction constantly changes. Mainly used are the roughing and finishing tools. The support strip is so set that the tool cutter engages at centre of rotation level. Initially the roughing tool is employed for preturning. The tool is moved from the workpiece centre to the edge and back again. Thereby the roughing tool with cavity is somewhat inclined to the respective direction of feed.
Next the surface is processed with the finishing tool until the required quality has been attained. Chamfers and curved sections cannot be processed using a finishing tool. Instead a tube must be used.
In the case of thin workpieces the narrow faces are processed from the wide face. Chip removal must ensue in the workpiece centre with minimal feed movement. Cutting conditions near the rotational axis also worsen due to cutting speed reductions towards the workpiece centrepoint. In the case of complicated turning operations in the centre section of the workpiece face, a slight increase in spindle rotational speed can improve cutting conditions. However, increasing the rotations speed is not possible with bigger workpieces for then too great centrifugal forces might cause the workpiece to splinter. This is extremely dangerous!
6.4. Grinding Surfaces
Grinding seeks to improve surface quality. According to wood variety grinding is undertaken with middle-fine to fine abrasive paper commonly used in wood processing work. The abrasive paper pieces are folded, bent of formed into thin strips depending on the profile size. Employing the prescribed processing rotational speed the workpiece is treated as for turning. When grinding the abrasive paper is always moved counter to the rotational movement of the workpiece. Consequently, no abrasive dust can collect between the abrasive agents. Nor are any burnt spots caused through too great frictional heat.
Always hold the abrasive paper so that it cannot wind itself around the rotating workpiece. - Danger of accidents!
Only grind the workpieces slightly. The workpiece shape must not be altered through grinding!
Why must the prescribed rotational speed not be exceeded given
extreme workpiece
diameters?
_________________________________________________________________________
_________________________________________________________________________
|
| |||||||||||||||||||||||||||||||||||||||||||||
7. Basic Labour Safety Provisions for Turning
As applies to all wood-working machines, as regards the wood rurning lathe, order and cleanliness are essential precondition for accident-free operations. Heed the following requirements:
- Only use sharp rools with snugly fitting handles.
- Encase chucking devices with protruding parts.
- Never leave locking wrenches in position.
- Do no check the measurements of workpieces whilst the machine is switched on.
- Do not remove chips as the machine is running.
- Position the support strip as closely as possible to the workpiece.
- Do not place tools on the machine cheeks.
- Wear clothing with closely fitting sleeves.
- Ensure that long hair is under a head covering.
- When turning never wear watches, bracelets, finger rings and long necklaces.
- Never chuck workpieces with dried out fissures for they can crack during turning.
- Do not exceed the rotational speeds as set out in table 2 for otherwise bigger workpieces cannot cope with the centrifugal forces.
Broken log pieces present a serious danger of injury.