| The Self-Reliant Potter: Refractories and Kilns (GTZ, 1987, 134 p.) | ||||
| 1. Refractories | ||||
| 1.1 Introduction | ||||
| 1.2 Refractory raw materials | ||||
| 1.3 Production of refractory items | ||||
| 1.4 Kiln furniture | ||||
| 1.5 Firebricks | ||||
| 1.6 Testing refractories | ||||
|
| ||||||||||||||||||||||||||||||||||||||||
For the construction of kilns it is necessary to use bricks and mortars which will endure intense heat. For glaze firings it is also usually necessary to have materials for stacking pottery in the kiln chamber. Saggars, kiln shelves and props are examples of kiln furniture.
Industrial standard
By industrial standards a clay is called refractory when it does not soften below 1580 °C. However, in most cases we will have to be satisfied with clays that soften at a much lower temperature because real refractory clay may not be available or is too expensive. In any case, most potters will not bring their kiln above 1250 °C and will only maintain the maximum temperature for a short period.
Potter's refractory
For the purpose of this book the term refractory will cover clays and materials that are suitable to be used in a potter's kiln fired up to 1250 °C. In case the kiln is to be fired at a lower temperature, it might be possible to use ordinary building bricks and saggars made by less reamed methods than those described below. However, the principles remain the same and the additional effort will often be rewarded by a longer life for the kiln and kiln furniture.

Fig. 1-1: Tube kiln of Korean type.
The potters of the Far East were the first to use refractory clays for their
kilns.
1.2.1 Kaolin
1.2.2 Fireclay
1.2.3 Aluminous
materials
1.2.4 Bauxite
1.2.5 Laterite
1.2.6 Silimanite, kyanite,
andalusite
1.2.7 Zircon
1.2.8 Silica
1.2.9 How to get refractory
materials
In most cases refractory items for ordinary potteries will have
to be made of clay.
1.2.1 Kaolin
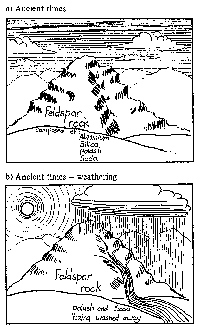
Kaolin, also called China clay, is the best refractory clay type. A pure kaolin clay will not soften below 1750 °C. Kaolin has been created by the decomposition of feldspar(fig. 1-2).
Primary clay
Pure kaolin is found at the site of its parent rock (primary clay) and has not been mixed with impurities which would reduce its refractoriness and change its colour. Kaolin clays possess little plasticity due to their large clay particles.
Porcelain
Pure white burning kaolin is much in demand for making porcelain and is therefore expensive. However, for the production of refractory items, kaolin firing to a buff colour is acceptable.
Sand content
Often it is possible to find a local source of kaolin. It will normally be mixed with a considerable amount of sand which is left behind when the parent rock has changed into clay. Sometimes only a small part of the parent rock is changed into clay and in other cases raw kaolin occurs in pockets amongst granite rocks. The raw kaolin is normally white but some types of rock produce a pinkish colour which may still be a suitable refractory clay. Solid firebricks can often be made from raw unwashed kaolin. Kaolin is also used in the production of paper and rubber.
Figure
Fig. 1-2: Exposed to the action of
weather the feldspar rock is slowly changed into clay. Chemically this change is
written:
Feldspar: Na, KO2 ·Al2O3 · 6SiO2
kaolin: Al2O3 ·
2SiO2
+
silica snad: 4SiO2
+
potash, soda: K +
Na
The potash and soda are washed away and add to the salt in the
oceans.
1.2.2 Fireclay
Fireclays are produced in the same way as kaolin but have been transported away from the location of the parent rock (secondary clay). Fireclays are also refractory, but often more plastic than kaolin. The colour of raw fireclays varies from white to yellow, brown or grey, and the sand content can be more than 50%.
Sometimes the term fireclay is used only for the clays lying
below and between coalseams. Such clays do not occur under all coal-seams and
they might not always be refractory. However, there is a good chance of finding
a suitable fireclay where coal-seams are located. Even under inferior coals such
as lignite it is sometimes possible to find suitable clays.
1.2.3 Aluminous materials
Generally the more alumina in a refractory body the better is
its refractoriness. So if alumina-rich materials are available at a reasonable
price they should be added to the refractory body. The local institute of
geology or mining should be approached about the availability of some of the
following materials:
1.2.4 Bauxite
Al2O3H2O
melting point: 1600
- 1850°C
density: 2.9 g/ml
hardness: 1-3
Bauxite is the raw material from which the metal aluminium is produced. It is found in many places though only a few deposits are utilized. Even deposits which are not suitable for aluminium production may be useful to the potter.
Bauxite grog
Red bauxite is less refractory than white or grey bauxite. The bauxite has no plasticity and needs a binding clay. The raw bauxite should be ground, mixed with 25% plastic clay, shaped in rough bricks which are fired to about 900 °C, and then crushed. This material can then be used as ordinary grog in a refractory body. A standard mixture is 75% bauxite grog and 25% fireclay. Bauxite grog can also be used as a substitute for a portion of the grog in the production of ordinary refractory bodies.
Calcination
The process described above of firing the rough bricks of
bauxite is called calcination. The raw bauxite cannot be used without
calcination (calcination at 700-900 °C; above 1000 °C bauxite becomes
hard to grind) because it shrinks a lot during firing, giving off about 25% in
water.
1.2.5 Laterite
In the tropics laterite soils are widespread. It is a reddish
clayey material which hardens when exposed to air. Most laterites contain too
much iron oxide and other impurities to be of use for refractory purposes.
However, some purer forms of laterite can be used. Laterites vary a great deal
and their usefulness has to be tested by experimental use. Bauxite is rather
similar to laterites but has a higher aluminium content.
1.2.6 Silimanite, kyanite,
andalusite
Al2O3.SiO2
Melting point:
1850°C
Density: 3.2-3.6 g/ml
Hardness: 6-7
Silimanite is found mainly in India while andalusite and kyanite
are more widespread. Although these materials may cost too much for most
potters, they are good refractory materials and produce long-lasting kiln
shelves and saggars. In India some smaller potteries have started to use
silimanite for their saggars and found this to be economical as it has extended
the life of the saggars. The three materials are rather similar except that
silimanite and andalusite can be used raw while kyanite needs to be calcinated
above 1350°C at which temperature it expands by 17%. (If intended for use
below 1350°C the calcination may be omitted) The materials are non-plastic
and can be used in mixtures as grog. A saggar body could be 60% silimanite, 30%
fireclay and 10% plastic clay.
1.2.7 Zircon
ZrSiO4
Melting point: 2550°C
Density:
4.2-4.7g/ml
Hardness: 7-8
Zircon or zirconium silicate is commonly found as beach sand. As
it is much heavier than normal sand, zircon has usually been separated from
other sands by wave action. It is highly refractory and is useful in making
special setters for tiles and plates. Bigger items such as saggars would, with
the addition of zircon, become too expensive and heavy. When zircon is used to
make pressmoulded items, an addition of 10% fireclay is necessary' while items
to be hand-moulded or thrown on the wheel need 30 - 40% clay. Zircon is very
suitable for painting kiln shelves and saggars. The kiln wash is made from
either pure zircon mixed with water or with the addition of kaolin. The wash
prevents glazed ware from sticking to the settings.
1.2.8 Silica
SiO2
Melting point: 1710°C
Density: 2.6
g/ml
Hardness: 7
Silica is found as part of rocks and clays and it is so common that it makes up 60% of all materials in the crust of the earth.
Occurrence
As a free mineral, not combined in clays and rocks, it occurs as quartz rock, silica sand, sandstone, flint pebble and as semi-precious stones such as agate, opal and jasper.
Refractory
The addition of silica makes a clay mixture more refractory. However, items exposed to sudden temperature changes should contain as little free silica as possible. Some forms of silica contract and expand suddenly at certain temperatures (fig. 1-3) and this causes the cracking of items such as kiln shelves and saggars. Firebricks for the kiln structure will be less exposed to sudden temperature changes and may contain some silica without giving problems.

Figure
Cost
For use in refractory bodies, quartz rock would be too costly
and should be reserved for glaze-making. Silica sand is often more readily
available and has the advantage that its particle size as found is suitable for
immediate use. All sands contain silica in the form of small quartz crystals but
a particular sand may contain many other minerals which may reduce its
refractoriness. In general, the whiter the sand, the purer it is. White beach
sand and the sand remaining from kaolin mining are the purest types of
sand.
1.2.9 How to get
refractory materials
Industries
Information about where to get materials may be obtained from existing ceramic industries, glass factories or cement factories which all need good refractory materials. Even if firebricks are available they might prove too expensive and in any case raw refractory clay will still be needed for the production of kiln shelves or saggars.
Geological institutes
Other sources of information are geological institutes and mining corporations but sometimes they are not well informed and are only concerned with big commercial deposits of high grade. Do not give up if they tell you that there is no refractory clay available. Clay sufficiently refractory for use up to 1200-1250°C is quite common and there is a fair chance of finding some.
Surveying
In the end, potters may have to look for refractory materials themselves. Before starting to dig holes everywhere, ask local farmers and traditional potters if they know about a white or grey-coloured clay. A white clay is often already in use for other purposes such as whitewashing houses. Also contact local well-sinkers who should have some knowledge of what soils are hidden below the surface. Apart from kaolin, fireclay and silica sand, which can usually be found locally, the other refractory materials listed above normally have to be purchased from a supplier.
1.3.1 Clay cleaning
1.3.2 Grog
1.3.1 Clay cleaning
Some refractory clays can be used as dug for the production of firebricks but usually and especially for the production of slabs and saggars, the sand in the clay must be removed. Kaolin-type clays often contain more than 50% sand which should be removed at the site in order to save its transport cost to the pottery. Some deposits contain as little as 15% clay but it may still be feasible to wash out the clay. The removal of sand is done by adding water to the clay in a pond and stirring it until the clay is suspended in the water. The sand will settle first and the water clay mixture is transferred to another pond where the clay will settle more slowly. The stirring may be done mechanically or by hand; the principle is the same.
Washing ponds
For the clay cleaning, two or more shallow ponds (for example 4 x 2 metres and ½ metre deep) should be dug in the ground close to the clay source. The sides of the pond can be made of brickwork but simple wickerwork plastered with clay will do. The pond is half filled with water and clay is added until the pond is filled. The raw clay is stirred with a shovel until all the clay particles are separated from the coarser sand. With coarser types of clays, like kaolin, the stirring may not take more than 30 minutes but with finer clay a longer period is needed and it may be necessary to let the mixture soak for a day. When no more lumps are left and the feel of the material at the bottom of the pond is no longer clayey but sandy, the clay slip mixture is transferred to the second pond. The slip can run by itself if the second pond is placed lower or it can be transferred with a bucket. In the latter case the slip could be poured through a screen into a small pit connected to the second pond. In the second pond the clay is left to settle. The rate of settling depends on the fineness of the clay. For highly plastic clays it may take weeks but for kaolin clays it will often take less than a day. After the clay has settled the clear water on top should be run off cautiously without stirring the settled clay. The water can be reused by transferring it to the first pond by the help of a pump or by bucketing. The bucket or the pump inlet should not be dipped into the settling pond because that would stir the clay. Instead the surplus water should be conveyed to a small third pond from where it can be returned to the first pond. If there is a small stream nearby, the waste material can be used for making a small dam to provide water for the claywashing.
Washmill
For large quantities of clay an animal-powered washmill can be used (fig. 1-7). This can be operated continuously and raw clay can be added while the stirring is taking place. This addition will force clay slip to run off at the top. The raw clay will sink to the bottom where the action of the stirring blades will disintegrate it. The clay will become suspended in the water while the coarser materials remain at the bottom. The clay slip is then led into settling ponds through a screen. If a very pure clay is needed, the clay slip can be led through a grooved tray (fig. 1-7) where the grooves will retain the very fine sand. (This fine sand is likely to be mica which is fusible compared to more refractory silica sand.) From time to time the tray should be turned upside down for cleaning and occasionally the washmill will have to be emptied of sand.
Grog is burned clay which has been crushed to grains of various sizes. It is used for making solid firebricks, saggars and slabs, etc. The grog is mixed with a plastic clay which binds it together. The additional firing and crushing make it more costly to use grog instead of raw clay but the benefits soon become obvious.
These are:
1. The firebricks or saggars are much less likely to crack with
sudden changes of temperature.
2. They will better withstand loads without
bending.
3. The tendency of spallinging¦ is greatly reduced.
4. The
drying shrinkage is reduced as less water is used in the clay and grog
mixture.
5. Firing shrinkage is reduced because the grog has already been
fired once. Generally the higher the content of grog the better the refractory
properties, but shaping, especially of saggars, demands a certain plasticity.
Grog production
Grog is produced by firing lumps of raw clay in the kiln, or the raw clay can be formed into rough bricks, which are easier to set in the kiln. The clay used for making grog should be more refractory than the bond clay which binds the grog grains together. The grog clay should contain as little sand (free silica) as possible. A grog clay lacking plasticity will be difficult to form into rough bricks and will be troublesome to stack in the kiln. An addition of about 10% plastic clay will solve the problem. If possible the grog clay should be fired at a temperature which is higher than the temperature the finished refractory items are likely to be used at later. However, this can be difficult for small potteries which cannot afford to build special kilns for grog and firebrick production. Alternatively, the grog bricks can be placed at the hottest spots in the kiln.

Figure 1-7 Animal powered washmill
for clay cleaning. A grooved tray leads to the settling tanks
Broken saggars
When the pottery has been in production for some time broken saggars or kiln slabs and old firebricks should suffice for the grog production. However, care should be taken to remove any layer of ash slag or melted glaze as these materials will lower the melting point of the finished product.
Crushing
After firing, the grog is initially reduced by a hammer to lumps the size of about 5 cm. For the final crushing the hammer pictured in fig. 1-8 should be adequate for most smaller potteries. The hammer is operated by stepping on the shorter end of the lever and then left to fall by its own weight onto the grog which is placed under the metal or stone hammer by a second person. For bigger potteries a jaw roller, impact crushers or pan grinder (fig. 1-9) may prove more useful for crushing large amounts of grog. A hammer mill (fig. 1-10) designed for milling corn can be used by changing the screen and reinforcing the cage to withstand the abrasive action of the grog. Grog particles should be angular and plate-like rather than rounded. For these shapes a hammer mill is more suitable compared with the other machines.
Grog size
The size of grog should normally be between 1 mm and 5 mm. In general, fine grog mixtures tend to withstand loads better but are more prone to cracking after repeated heatings. Therefore smaller items can be made with a higher proportion of fine grog while bigger items should contain a greater amount of coarse grog. Otherwise equal amounts of fine and coarse grog should be used.
Dust
In any case the grog should have the dust fraction removed. Dust will reduce the plasticity, lower the melting point and it contains much free silica. The dust is best removed by washing.
Aluminous grog
Andalusite, silimanite, kyanite, bauxite and laterite minerals mentioned earlier can be substitutes for clay grog in the refractory mixtures described below. In clay mixtures these materials act in the same way as grog.
1.4.1 Saggars and slabs
1.4.2 Thermal shock
1.4.3
Saggars
1.4.4 Shaping
1.4.5 Kiln shelves
1.4.6 Drying of saggars and
slabs
1.4.7 Firing saggars
1.4.8 Glazed ware support
1.4.1 Saggars and slabs
Saggars are used for protecting the glazed ware against the action of flue gases and ashes from combustion of solid fuels, which otherwise might cause discolouration and give the glaze a rough surface where ash has settled on the ware. At higher firing temperatures firewood ash melts together with the glaze and if the colour effect of the ash is acceptable an open setting with kiln shelves, also called slabs, is preferable. Saggars are heavier and take up more space compared to the same weight of kiln shelves. However, if the height of the setting is more than two metres a setting with kiln shelves tends to become too unstable while saggars can be stacked to above four metres. The same clay mixture can be used for both saggars and slabs though clay mixtures for kiln shelves need less plasticity.
Grog content
As a rule of thumb the mixture should contain as much grog as the shaping technique allows. Normally that is 40-60% but it depends on the plasticity of the bond clay. It is unusual to find a clay being both highly plastic and refractory, and so usually the bond clay is made from a mixture of a stoneware clay or a vitrifiable plastic clay and a refractory clay such as kaolin. The bond clay should start to vitrify at a low temperature but should not soften before well above the firing temperature. The kaolin crystals in the clay start slowly to change into mullite crystals (fig. 113) above 1000 °C. Mullite grows into long needle-shaped crystals which form a lattice that will reinforce the fired clay in much the same way as iron bars in reinforced concrete.
This lattice-work enables the kiln furniture to carry the load of the ware at high temperatures. The partly melted mass between the grog particles will enable the mullite crystals to grow freely. If the bond clay was too refractory the needle crystals could not grow properly and the slabs would bend. This can be seen from the fact that newly fired slabs tend to bend. However. after they are fired a few times and the lattice-work is allowed time to grow they no longer bend.
As the right proportion of grog and bond clay depends on the quality of raw materials, firing temperature and shaping technique, the local potters will have to find their own recipe by trying a number of different mixtures.

Fig. 1-13: Lattice-work of mullite
crystals reinforces the fired clay. Kaolin crystals change gradually into
mullite at high temperatures. The crystals are shown 100.000 times bigger than
they really are.
Recipes
The following recipes are practical examples of saggar bodies: (parts in weight)
|
recipes |
a |
b |
c |
|
saggar clay |
30 |
25 |
30 |
|
kaolin |
15 |
15 |
30 |
|
grog |
55 |
60 |
30 |
Bodies for making slabs can be made with a higher content of
grog compared to bodies for saggar production.
1.4.2 Thermal shock
In most cases the potter will be more troub- led with cracking of saggars or slabs than with fusion and softening of the kiln furnisure. Due to their shape, saggars tend ta crack more easily than slabs but the problem is often caused by the same problem, thermal shock.
Expansion
All materials expand when heated. Kiln fur niture, ware and the kilnlining itself ex- pand about 1% when heated to 1250 °C and will shrink again as the kiln cools. If the heating and cooling process is slow and even all items in the kiln will expand or shrink at the same rate.
However, if a saggar for example is heated or cooled from one side only, the two different sides of the saggar will expand at different rates. That will cause tension and the saggar could crack. Es pecially around 573 °C and 230 °C the heating and cooling should be done slowly (see p. 115 f.). The following can be done to reduce the problem of cracking:
1. Reduce the amount of sand (free silica) in the clay. Sand is not the only source of free silica. Clay produces free silica when heated above 1000 °C. Kaolin-type clay releases about 36 % whereas other clays as montmorillonites (bentonite) release up to 60 %. Thus a change of bond clay should be considered too.
2. Increase the amount of grog to make the fired body more porous. A porous body will more easily accommodate tensions than a dense body. Porosity of saggars should be 18 - 25 % (see p. 42).
3. If the firing temperature is below 1250°C an addition of 5-12% talc will improve resistance to thermal shock. Talc will reduce the melting point and therefore can be used only at lower temperatures. Talc is used for making corderite bodies which have a high resistance to thermal shock. The formation of corderite is difficult to achieve.
4. Biscuit-fire the kiln furniture.
5. Change the firing and cooling schedule to ensure slow change
of temperature at 230 ºC and 573°C. One pottery found that saggars
lasted 6-11 firings when cooling of the kiln took 24 - 72 hours. The same
saggars lasted 50 or more times when the cooling took 168 hours (Searle,
"Refractories" p.575).
1.4.3 Saggars
Preparation of saggar body
The different clays and grog are measured out according to the
recipe. That can be done either by weight or by volume, whichever is more
convenient. But take care to follow the same method each time so that the
composition of the body does not vary. The grog should be wet before mixing with
the clay. The clay and grog are spread out in alternate layers on top of each
other. Each layer is watered as required. After one day the clay is soaked and
the mixture is turned upside down with a hoe or spade or pugged in a pug mill.
If necessary more water is added. It is then left to mature for two or more days
while covered with plastic sheets or wet bags. Before shaping, the mixture is
thoroughly kneaded either manually or in a pug mill.
1.4.4 Shaping
Saggar shapes
The shape of the saggars should suit the size of ware and kiln to enable the packing to be as dense as possible. The shape is determined by the forming method, i.e. throwing and jolleying will produce only round saggars whereas with hand-moulding and slip-casting more shapes are possible.
Also, separate sides and bottoms will reduce the stress on the saggars due to thermal shock, but it demands accurate shaping.
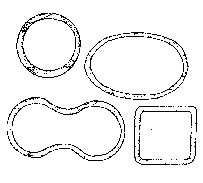
Fig. 1-15: Different shapes of
saggars
Saggars can be made by five different methods: a) thrown on a wheel, b) jigger-jolleying, c) hand-moulding, d) press-moulding and e) slip-casting.
a) Throwing
Saggars up to about 30 cm in diameter can be made by throwing-on
a wheel. The clay is placed on the wheel and beaten into a flat round shape of
the required diameter. The inside of the saggar is then formed by beating the
clay until the bottom has the right thickness (1.5-2 cm).
The excess clay is
now at the outer rim. A thick slurry of the same clay body is added and the clay
at the rim is drawn up to form the wall of the saggar. The thickness of the wall
should be even and the shape of the saggar cylindrical. The bottom is levelled
and the diameter and height of the wall are checked with a ruler. The surface of
the saggar is made smooth with a steel blade.

Fig. 1-16: Saggars shaped for dense
setting of blows
Saggars higher than about 10 cm cannot be thrown in one operation. After the saggar has stiffened more clay is coiled on top and the wall extended by further throwing.
b) Jigger-jolleying
A saggar by this method is normally formed inside a rotating mould (jolleying) by the pressing of a template. This method is especially suitable for shaping of smaller saggars up to 20 cm in diameter. The saggars can be made into shapes which allow a dense setting. A normal potter's wheel can easily be equipped to work as a jigger-jolleying machine. The moulds are usually made of plaster of Paris but can also be made of clay burned below 900 °C to give the moulds high porosity. The saggar clay should be softer than clay for, throwing. The mould should be slightly wet before throwing the required amount of clay into it. The clay is pressed into shape by lowering the template. For bigger saggars it is necessary to press the clay out evenly inside the mould by hand before lowering the template. Excess clay is cut off at the rim and the mould is lifted off to be replaced by another. Depending on the clay and the weather each mould can be used 2-4 times a day.
c) Hand-moulding
The saggar clay for hand-moulding should be stiff. An iron ring or frame slightly bigger than the bottom of the saggar is placed on a board. The board is dusted with fine grog and saggar clay is thrown into the frame and beaten out until it fills the frame. Excess clay is cut off by a wire and the frame is removed. The sides of the saggar are moulded into a long slab of clay paste between two strips of wood fixed to a board. As before, the board is dusted and the clay is then beaten well and excess clay is cut off. This slab is then wrapped around a wooden mould or drum forming the inner shape of the saggar. The slab of clay paste can be moulded on top of a long piece of cloth which will support the clay while wrapping it around the drum. The ends of the strip are cut and kneaded together.

Figure
The drum and the clay are then placed on the previously prepared bottom which has been smeared at the joint with a clay slip. The sides and bottom are then kneaded together and excess clay at the bottom is cut off. This operation is best done on a revolving table.
While the drum is still inside, the outer surface is made smooth with a steel blade or sponge. After removing the drum the inside is also made smooth. The saggar is left to stiffen a bit and is then turned over so that its bottom can be levelled and made smooth.
d) Press-moulding
Slabs and saggars can be pressed in a steel mould. Pressure is applied by a fly-wheel screw press which can be operated manually. Such presses are not very expensive (in India a manual saggar press in 1985 cost about $ 1000) and produce saggars of a quality superior to hand-moulded saggars (although some saggar-makers claim that properly hand-made saggars are superior). The mould is greased with oil to ensure the proper release of the saggar. The quality is considerably improved by applying two or three extra tugs of the press. The mould should be slightly conical to enable release of the upper mould and the saggar, without distorting the clay sides. After a long period of use the mould may need machining to ensure a smooth conical surface.
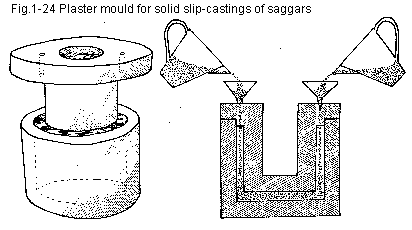
e) Slip-casting
Slip-casting is done by pouring a clay slip into plaster of Paris moulds. The moulds will absorb the water in the clay slip and the clay will harden. After some time the clay shape can be taken out. Saggars are normally cast in solid cast moulds (fig. 1-24).
Slip-casting has the advantage that the shaping does not require plastic clay and so the mixture can contain a much higher proportion of grog compared to the other methods. Although the ceramic industry uses this method extensively, smaller potteries may experience difficulties due to the cost and availability of plaster. Furthermore, chemicals such as water glass or soda are needed for making the clay slip fluid with a water content equal to plastic clay (20-30%). Without these chemicals the water content needs to be 40-50%.
For an open setting, square flat kiln shelves, also called bats or slabs, are used. These are normally made by hand-moulding although they can also be press-moulded and slipcast. Clay mixtures and clay preparation for hand-moulding are similar to those of saggar-making though a higher content of grog is permissible and the clay paste should contain less water (semi-dry).
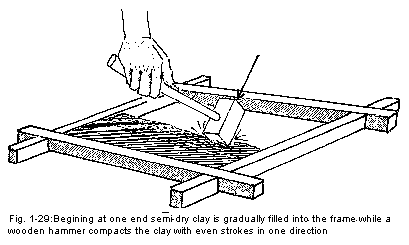
Forming
An iron or wooden frame having the shape and thickness of the finished bats is placed on a solid bench or on a concrete floor and is sprinkled with grog dust. The semi-dry clay paste is gradually added by starting at one end of the frame while beating the clay constantly with a wooden hammer. The stroke of the hammer should always have the same direction, opposite the direction of filing the frame. After filing the frame completely the surface is levelled by running a wooden stick on top of the frame. The surface is made smooth by a sponge and a steel blade used alternately. A plate fitting exactly inside the frame is placed on top of the slab while the frame is lifted off. The four sides of the clay slab are carefully made smooth and the slab is left to stiffen for about a day. It is then turned over and its bottom is made smooth.

Figure
Thickness
The thickness and size of slabs depend on the quality of the raw materials and on the firing temperature. The higher the temperature, the thicker the slabs need to be to carry their load without bending. A slab measuring 30 x 30 cm should before drying have a thickness of 3-4 cm.
Figure
Firing of slabs
The slabs have to be fired once before being used. For the first firing the slabs should be fired while standing on their edge although at high temperatures they tend to warp if not supported from both sides.
Alternatively they could be fired to about 1000 °C the first time. Normally slabs will bend during the first couple of firings. The remedy is to place the bent slabs with the bend upwards at the next firing.
After a few firings the slabs will stop bending because
reinforcing mullite crystals have formed.
1.4.6 Drying of saggars and
slabs
Saggars and slabs should be carefully dried to avoid warping and
cracking. Big saggars are particularly sensitive to stress caused by uneven
drying. After stiffening sufficiently the saggars and slabs could be stacked two
by two or more in order to slow the drying and reduce any tendency to warp.
During dry seasons the items should be covered with plastic sheets. Saggars and
slabs will crack if the outer part sticks to the board or floor on which they
rest but this can be prevented by dusting with grog or setting the saggars on
paper.
1.4.7 Firing saggars
Saggars will last longer if they are fired empty the first time and to a higher temperature than they will be working under later. Often potters will fire their green saggars on the upper layers in the kiln and they will be tempted to fill them with glazed ware too. The individual potter must try out both ways and decide- for himself which is the more economical.
Saggar life
The potter should always record how many fresh saggars or slabs
he fires at each firing so that he can control if the breakage of saggars or
slabs becomes too high. Large saggars made from clay seldom last more than 4 - 6
firings up to 1250 °C. Provided a good-quality fireclay or kaolin is
available for saggar making and the firing and cooling of the kiln is done
carefully, a saggar life of 10-20 firings may be possible. Slabs will normally
withstand many more firings than saggars.
1.4.8 Glazed ware support
Various types of supports for the setting of glazed ware make it possible to place the pots more tightly in the kiln, thereby improving the firing economy. In the chapter "Loading and setting of the kiln" page 105 95., a number of different supports are described.
Clay body
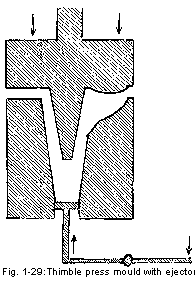
Supports such as spurs, thimbles and stilts are made by press-moulding. The body for this should be made from a fine-grained fireclay or by mixing kaolin, silica sand and plastic clay in the following proportions:
|
kaolin |
60 |
|
plasticclay |
15 |
|
silica sand(by weight) |
25 |
The clay body should be screened with a fine mesh sieve (80-100 mesh).
Figure
Press-moulding
The clay body should be press-moulded in a semi-dry state with a water content of 1015 %. The higher the pressure applied in the mould the less water is needed. The mould could be made of mild steel or brass if a lever press as shown in fig. 1-28 is used. The mould should be made with a simple ejection device, which will push the finished item out of the mould. The mould should be greased with oil before each filing in order to ease the release of the press-moulded item. Alternatively oil could be mixed with the clay body. The mould could also be made of plaster or clay, but then less pressure should be applied.
Crank
Thimbles can be used for stacking flatware such as plates and tiles on top of each other as shown in fig. 1-31 provided that the flatware is made exactly same size.
A bottom and top plate each with three fixed sockets for the thimble pillars hold these together and the top plate also. protects the ware from kiln dust. This kind of arrangement is called a crank and may hold 10-15 pieces. The top and bottom plates are made in a flat mould and formed in the same way as kiln slabs. A template should be made for measuring the exact position of the three thimble sockets, which are calved out afterwards.

Figure
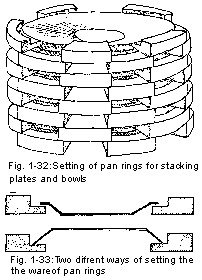
Pan rings
Pan rings are used for stacking glazed plates and bowls on top of each other (fig. 1-32). The pots may rest on the pan rings with their rims upside down or they may hang on the pan rings resting on their rims (fig, 1-33).
Pan rings are made from clay bodies similar to those prescribed for kiln slabs or saggars. The pan rings can be stock-moulded in the same way as solid firebricks (p. 33), but extra care is needed to ensure that the step of the pan ring is filled completely with clay and that the step does not break off when the pan ring is released from the moulds. The curve of pan ring is made with a radius that fits the size of plates or bowls to be stacked.
Figure
Another method of forming pan rings is to place a thick coil of clay on a bat. The coil is laid as a ring with the desired diameter. This ring is then centred on the wheel and a template cut to the profile of the pan ring is used for shaping the ring. The ring is then cut into 8 or 12 pieces and left to dry².
The pan rings are fired and given the same kiln wash as other kiln furniture.
1.5.1 Solid firebricks
1.5.2 Insulating firebricks
1.5.3
Ash bricks
1.5.4 Hollow firebricks
1.5.5 Mortars
Firebricks are used for the construction of a potter's kiln and are also used in many other industries such as glass works, foundries and boilers. If the potters can successfully produce firebricks for their own kilns they may be able to earn extra income by selling firebricks to these other industries. Industry today uses a number of different types of firebricks according to specialized requirements, but this book will deal mainly with solid and insulating firebricks made from clay.
Solid firebricks are used for the fireboxes, chimney, bagwalls,
floor and flue systems, while the kiln lining may be made of insulating
firebricks.
1.5.1 Solid
firebricks
Production of firebricks is less critical when compared to saggars because firebricks are not exposed to as sudden temperature changes and rough handling. Furthermore, the shaping of firebricks demands less plasticity from the clay. Some fireclays and kaolin clays can be used as dug, which is an economical method to produce solid firebricks, but grog may be a worthwhile addition to improve their refractory quality. The proportion of clay to grog will vary according to the plasticity of the clay and the conditions to which the firebricks will be exposed.
Two grades
The addition of grog increases the production cost and it may be preferable to produce two grades. For example, firebricks for fireboxes, grates and bagwalls can be made with the highest possible content of grog (60 - 80%) while the rest of the kiln can be made with less grog (20-40%). The same grading could also be used for the bond clay so that first-grade bond clay, which has had its sand fraction removed, will allow for a higher content of grog.
Bond clay
The clay binding the grog together should be less refractory than the grog. Otherwise the brick will become brittle after firing. But the bond clay should not vitrify excessively or fuse because if the firebrick becomes too dense it will tend to spell after long use though a high grog content will counterbalance this tendency. Often the best solution is mixing two different clays, e.g. a fusible stoneware clay with a fireclay or kaolin clay. The proportion will depend on the quality of the clays and the intended firing temperature
8 solid firebrick recipes
| |
a |
b |
c |
d |
e |
|
Fireclay |
80 |
60 |
50 |
40 |
30 |
|
Fireclay grog |
20 |
40 |
50 |
60 |
70 |
| |
f |
g |
h | |
|
|
Stoneware clay |
10 |
10 |
20 | | |
|
Kaolin |
30 |
40 |
40 | | |
|
Kaolin grog (measured by weight) |
60 |
50 |
40 | | |
The mixing and preparation of the clay and grog should be carried out as described for saggar bodies. However, the moulding of bricks demands much less plasticity and so the water content can be lower.
Slop-moulding
Slop-moulding is done with a very soft clay paste. The mould frame is first dipped in water and then placed on a ground which has been levelled and dusted. The soft clay is forcefully filled into the mould and the top is levelled off by using a stick. The mould is then lifted and the brick is left to dry on the ground. At first the bricks will be too soft to handle but after a day or so they will be strong enough to stack for further drying. They should be stacked as shown in fig. 1-37 so that air can dry the bricks from all sides. The slop-moulding technique is very fast but the bricks will have irregular shapes. It is mainly used for common red bricks, which are also needed for the kiln construction.

Figure
Stock-moulding
Higher density, more accurate shapes and greater firing strength are achieved by stockmoulding. A stiff clay paste is used in this method. The mould has two pieces; the bottom of the mould, which is called a stock, is fixed to a solid table and the top piece, called a frame, fits loosely onto it (fig. l-38). The inside of the brick mould should measure the size of the finished brick plus the total drying and firing shrinkage which can be determined from the testing of the firebrick mixture (p. 40 f.). The moulder should first prepare a lump of clay by bumping it several times on the table, giving it a square form which is slightly bigger than the inside of the mould. From above the head the clay should be thrown with full force into the well dusted mould. The clay should fill all corners of the mould and is then levelled off at the top with a stick. The mould is then lifted, with the brick inside, and an assistant can carry the mould to the drying ground where it is emptied by gently knocking the mould. Normally the bricks can be placed on their edge immediately. For firebricks, dusting is done with fine grog and not sand.

Figure
Special shapes
Wedge and arch bricks are moulded like square bricks but in specially made frames. Small numbers of special shares. such as bricks for skewbacks or rounded bricks for flue channels, can be made by cutting freshly moulded square bricks. The square brick is placed between two templates of wood which have the desired profile, and a wire is then drawn along the templates, cutting the brick (fig. 1.40).

Fig.1-40: Cutting of special
shapes with the help of two templates.
Firing solid firebricks
The problem in firing solid firebricks is that they should be fired at a higher temperature than the one at which they will be used later. (The same applies for insulating firebricks and kiln furniture.) If the pottery is already one that is in production then the bricks should be fired next to the bagwalls or in other hot spots in the kiln. In case no kiln is at hand, the bricks will need to be fired in a clamp kiln where the firing temperature will seldom exceed 900 °C.
Kilns made of these low-fired bricks will tend to crack more
than usual. This is caused by the extra shrinkage of the firebricks when they,
as part of the brickwork in the new kiln, are exposed to a much higher
temperature.
1.5.2 Insulating
firebricks
Insulating firebricks are made of a mixture of fireclay and sawdust. Other combustible materials such as coal, lignite, peat, rice husks, etc. can also be used as fillers and should be prepared like sawdust. The sawdust will burn away in the kiln and leave plenty of holes in the bricks. These holes make the bricks better heat insulators when they become part of a kiln because heat cannot pass through motionless air which is trapped in the holes. The insulating firebricks have several advantages over ordinary firebricks. These are:
1. Less heat escapes through the kiln walls.
2. Less fuel is
needed to heat an insulating inner wall because it is less dense.
3. The
surface of an insulating inner wall is hotter during firing and the increased
glow increases the radiance of heat to the ware.
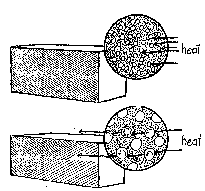
Fig.1-42: Heat going through a
sawdust insulating brick is stopped by all the pockets of air left by the burned
out sawdust particles.; Fig.1-43: If the insulating holes are too big the air
inside the holes can rotate and thereby heat is transferred through the brick.
4. They are cheaper to make by using less clay and needing no grog.
For these reasons insulating firebricks should be used as much as possible. However, due to their open structure they are sensitive to slag attack and cannot be used in salt glazing kilns. Insulating bricks will collapse at a lower temperature compared to grog firebricks made from the same clay.
Sawdust
The sawdust should be screened through a mesh of at least mosquito net size. (This is 16 mesh but 24-30 mesh is preferable.) If the particles are too big the resultant holes in the finished brick will allow the air inside to rotate, which means the air will transfer heat (fig. 143). On the other hand, dust size particles should be avoided. Hardwood sawdust results in smaller pores than sawdust from softwood, but hardwood sawdust is not always available.
Bond clay
For a bond clay, the clay should be as refractory as possible especially if the bricks are for the inner lining. For a back-up insulation behind an inner lining inferior clay may be used. The clay should have good binding power so that it can take a lot of sawdust. The binding power of the clay can be improved by the removal of its sand by washing. A washed kaolin clay with the addition of 10-20% plastic clay often produces very good bricks.
Sawdust/clay mixtures
The more refractoriness and binding power the bond clay possesses, the more sawdust can be added to it. The potter will have to test a number of different mixtures and perhaps even different bond clays. Measured by volume the sawdust content will be about 40-60% with the remaining part bond clay. After adding water to the sawdust and clay, it should be mixed very thoroughly. The mixture is left a few days before moulding.
Moulding
Stock-moulding will produce more accurate shapes, but the sawdust tends to make the Insulating bricks stick to the mould. The softer clay mixture used for slop-moulding is more easily released and the additional amount of water will also increase the porosity of the finished brick. The choice of moulding method could be made after letting the moulder try out both methods. Sawdust bricks take a long time to dry due to the great amount of water taken up by the sawdust. But the bricks will seldom crack during drying because the sawdust reinforces the clay body and gives the clay a very open structure.

Fig. 1-44: Sawdust bricks are placed
a finger's space apart during firing.
Firing
The bricks should be stacked in the kiln as shown in fig. 144.
The burning out of the sawdust will raise the temperature rapidly and it will be
necessary to stop adding fuel while the sawdust burns.
Otherwise, the rapid
increase of temperature will cause distortions in the bricks. The firing is
easier to control if the sawdust bricks are fired in smaller quantities along
with other ware.
1.5.3 Ash bricks
Silica in ash
Ash can be mixed with a bond clay to make insulating bricks for use with temperatures up to around 1100 °C. The refectory value of the finished bricks very much depends on the type of ash which is used. Ash of rice husks contains more than 90% silica and high silica contents are also found in ashes of rice straw and thatching grass.
Ash testing
Some ashes have high contents of minerals which lower the melting point. These are useful in glazes but not in firebricks. It is necessary therefore to make practical tests with the ash in question before using it.
A mixture of four parts ash to one part clay (by volume) is a good starting point.
Ash washing
Ashes high in potash and soda should have these soluble minerals removed by washing so that they are less caustic to work with. The removal of soda and potash will also raise the melting point of the ash. The washing can be done by leaving the ash in a pit outside during the rain.
Amorphous silica
The silica in ash has no crystal forms like the silica found in sand and quartz rocks, and because of this it is called amorphous. The importance of this lack of crystals is that amorphous silica does not shrink or expand suddenly as does the silica with crystal form.
If ash bricks were made using a similar amount of silica but in the form of sand (crystal form), these bricks would be very prone to spelling or cracking due to sudden changes in temperature (thermal shock). The ash bricks using amorphous silica are much less likely to suffer these effects. The disadvantage with ash bricks is that the amorphous silica is much less refractory, and hence they are unsuitable for very high temperatures.
Low duty
Ash bricks may be used in low temperature kilns and as back-up
insulation in high temperature kilns but in either case thorough testing is
necessary before relying on a particular ash and clay mixture.
1.5.4 Hollow firebricks
Fig. 145 shows press-moulded firebricks with two hollow rooms.
These rooms are filled with rice-husk ash during construction. The kiln seen in
the picture is constructed from these bricks and is fired to 1250 °C. Due
to the low thermal mass of the kiln lining, the kiln is very fuel-efficient. It
has been developed by the Central Glass & Ceramic Research Institute of
India with the aim of improving fuel economy of the round down-draught kilns at
Khurja (p. 51).
1.5.5 Mortars
Mortars are used for joining firebricks in the kiln structure. They are also used for protective coatings of brickwork such as the lining of fireboxes. The mortars should resemble the bricks they join so that the joints and the bricks expand and shrink at the same rate during a firing cycle. To enable an easy laying of the bricks the mortar should be plastic.
Grog
Fine refractory grog (passing at least 24 mesh) should be used for reducing shrinkage in the joints. If the joints shrink too much they will fall out after only a few firings. Sand can also be used instead of grog, but too much sand will cause spelling of the joints. The amount of grog or sand depends on the bond clay, which may already contain sand. Usually grog makes up 50-65% of the mortar.
Bond clay
The bond clay could be the same as that used for making the bricks. The bond clay should be refractory, but it is better if the mortar is slightly fusible so that the joints will form a strong bond between the bricks. This can be achieved by adding a fusible plastic clay to the refractory bond clay. The exact amount of fusible clay depends on the firing temperature and if possible a few tests should be done. Normally 20-30% of the bond clay could be fusible clay, and the remaining part be similar to the refractory clay of the bricks.
Mortar recipes
The following recipes are examples measured in weight:
|
(a) |
fireclay |
40 |
| |
grog 40 mesh |
60 |
|
(b) |
kaolin |
25 |
| |
stoneware clay |
8 |
| |
grog 24 mesh |
67 |
|
(c)1 |
sand |
40 |
| |
grog |
40 |
| |
stoneware clay |
20 |
|
(d)2 |
grog(or sand) |
1 |
| |
fireclay |
2 |
1 Japanese mortar quoted from F. Olsen "The Klin
Book"
2 From D. Rholdes "Kilns"
The mortar should be applied as thinly as possible. In case large gaps need to be filled by mortar it is better to add a lot of coarse grog.
Outer walls
The outer walls are laid with common red bricks and a mortar made of a normal clayey soil can be used for the outside. Where the walls will be exposed to rain, the joints should be pointed with a sand/lime mortar in the proportion of five parts sand to two parts lime.
1.6.1 High temperature testing
1.6.2 Refractory materials and
bodies
1.6.3 Refractory items
Bagwalls, flue linings or saggars that give in during firing may
ruin both the kiln and the ware. To avoid these problems tests can be done to
ensure that the materials will withstand the severe conditions to which they
will be exposed during many cycles of firings. Therefore before trusting a
refractory raw material or a refractory product, say a firebrick, some simple
tests should be carried out. Simple tests of clay supplies can also tell us
whether we get the clay we expected and which may have been paid for
dearly.
1.6.1 High
temperature testing
Ceramic institute
The first thing we want to know is: can the clay withstand high temperatures? For this, a kiln which can withstand temperatures of 1300-1400 °C would be ideal for testing. Few potters will have access to such a kiln, but a sample of the clay could be sent through local authorities to the national geological department or ceramic institute which will normally be interested in gaining information about suitable clay sources.
Production kiln
Quicker results could be obtained by firing the test piece in the flue, in front of the firebox, or on top of the bagwall of a potter's kiln. The temperature may not be 1300� 1400 °C but it is most likely the highest temperature the material will have to withstand in practice.
Test kiln
In case no high temperature kiln is available, a small test kiln could be constructed. In extreme cases, where there are no proper refractories available for the construction of a test kiln, (this was once experienced by the author in Africa) the test kiln, built of the untried refractories and fired to as high a temperature as possible, becomes the test itself. A small test kiln is also useful for firing glaze and body tests and the one shown in fig. 146 is not expensive to construct. By changing the firebox arrangement it can be fired with firewood, oil or coal.

Figure
1.6.2 Refractory materials and
bodies
In most cases it will already have been established whether or not the type of clay in question is suitable for high temperatures and the individual potter or local pottery development centre will only need to check the quality of clay supply and refractory body mixtures. The following tests should be carried out with new batches of clay.
Sampling
The clay to be tested should be collected from at least four different places at the clay deposit or from where the clay has been dumped. The four samples of about equal size are mixed well on a swept concrete floor. The sampled clay is then divided into four equal portions. Two portions opposite each other are set aside and the other two are mixed thoroughly. This process of dividing and mixing should be repeated at least four times. This method is called quartering (fig. 147) and ensures that the final sample is representative of the bulk of the clay.

Fig.1-47: The method of quartering:
1.The sample is mixed well. 2.It is then divided into four portions. 3.Two
portions are removed. 4.The remaining two portions are mixed well and another
cycle of quartering can start.
Figure
Moisture content
A sample of about 100 g is weighed on a scale. The weight Wm is recorded and the sample is heated to 110 - 200 °C for an hour so that all water evaporates. It is then put on the scale again immediately and the dry weight Wd recorded.
Moisture content in per cent = (Wm - Wd)/Wd x 100
When the clay is purchased by weight the moisture content shows how much water has been paid for. When weighing the clay according to recipes, excessive amounts of water in the clay should be compensated for.
Shrinking test
The clay is mixed with water to normal plasticity and 5 - 10 test bars measuring 1x2x 12 cm are formed. A wooden mould makes this job more easy. Two parallel lines exactly 100 mm apart are marked across all the test bars. While drying, the test bars should be turned over now and then in order to avoid warping. When the test bars feel dry the distance between the two cross-lines are measured in mm on all bars and the amount of drying shrinkage is found:
Drying shrinkage in per cent
(100 - Dry length)/100 x 100
As the distance was 100 mm the shrinkage in mm is equal to shrinkage in per cent. After firing the test bar to the highest temperature possible additional shrinkage is measured in mm and recorded as:
Firing shrinkage in per cent = (Dry length - Fired length)/Dry length x 100
Total shrinkage in per cent = 100 - Fired length in mm.
The drying shrinkage indicates to some degree the plasticity of the clay. A large drying shrinkage means that the plastic clay could absorb much water, which in turn indicates fine clay particles. The figure for drying shrinkage should be compared with figures of former supplies to see if the present batch is of the same quality.
The firing shrinkage indicates how fusible the clay is. A high shrinkage normally means a lower melting point. The total shrinkage of refractory bodies tells us how much bigger we should make our moulds. In case we want our slab to measure 30x30 cm and the total shrinkage of the clay/grog mixture is 8% then our mould frame should measure:
30 + 30+8/100 cm = 32.4 cm on each side.
Softening point
The test bars are placed in the kiln as shown in fig. 1-49. The test bars should be supported so that the free span equals the distance between the cross-lines of the test bar. If possible cones should be placed next to the test bars to show the temperature. After firing the amount of bending is compared with the cones and results from former tests. When testing a new clay the test bar should be placed so that it can be viewed through a spyhole and the approximate temperature at which bending starts is noted.
Figure
Pore water
After measuring drying shrinkage some of the test bars can be used for measuring the amount of pore water. Pore water is the water that is left in the clay after the water of plasticity has evaporated. The pore water will only leave the clay above 100 °C during the smoking period of biscuit firing.
First the weight, Wd, of the dry test bar is found and recorded and the test bar is heated to 110-200 °C for one hour. Immediately after that the test bar is weighed again, weight Wp is recorded and the percentage of pore water can be computed:
Pore water in per cent = (Wd - Wp)/Wp x 100
The pore water percentage expresses the fineness of the clay particles or the plasticity of the clay. The test is simple and is good for ensuring that new supplies of clay do not contain too much sand.
The following pore water contents are typical: kaolin 1.5 %, fireclay 3.5 %, ball clay 6.1%, brick clay 2.2%, bentonite 14%
Plasticity
The results of drying shrinkage and pore water content tests discussed above are an accurate indicator of a clay's plasticity. However, the first and most simple test for any potter is to wet a small portion of the clay in the palm of his hand and get the "feel" of it. The clay is rolled into a pencil shape and the more this "pencil" can be bent into a ring without rupturing, the more plastic the clay is.
Particle size
A quick test of new clay supplies can be done by making the clay into a thin slurry and screening it through one or more very fine sieves. A 200 mesh sieve holds back particles bigger than 0.0076 mm. The residue on the screen is dried and put on the scale. If the weight of this residue is called Wr and the dry weight of the total sample Wc,
Size less 200 mesh in per cent = (Wc - Wr)/Wc x 100
This figure can be used to check the amount of sand in the clay.
Some fine sand will pass a 200 mesh sieve, but for comparing the quality of new
batches of clay with former supplies it is accurate enough:
1.6.3 Refractory items
"Spalling count" test
Besides possessing refractoriness our refractory products such as firebricks and saggars should be able to withstand many cycles of heating and cooling without cracking or spalling. The ability to withstand thermal shocks is tested by heating a standard-size (appr. 23 x 11.5 x 6.5 cm) firebrick to around 900 °C. The hot firebrick is then picked out of the kiln and plunged into water of room temperature. This is repeated until half of the brick measured by weight has cracked away due to this shock treatment. If the brick can endure 10 cycles of such heating and cooling it is very satisfactory. The clay body for saggars or slabs is formed into bricks and tested in the same way.
Water absorption
If the clay body of saggars or bricks becomes too dense it will be more prone to cracking due to thermal shocks. The more dense a body is the less water it will absorb. So the density (or porosity) can be measured by soaking a piece of the fired clay body in water for at least 24 hours. It is then taken up and after its surface is wiped dry its weight, Ww, is found. The soaked test piece is then heated at 110-200 °C for one hour and its dry weight, Wd, is recorded. Porosity or more accurately the water absorption can be estimated.
Water absorption in per cent = (Ww -Wd)/Wd + 100
For saggars and slabs a figure of 18-25% is reasonable.
 |
 |