TECHNICAL PAPER # 24
UNDERSTANDING ADOBE
By
Balla Sidibe
Technical Reviewers
Daniel Kuennen
Trinidad Martinez
VITA
1600 Wilson Boulevard, Suite 500
Arlington, Virginia 22209 USA
Tel: 703/276-1800 . Fax: 703/243-1865
Internet: pr-info@vita.org
Understanding Adobe
ISBN: 0-86619-224-7
[C]1985, Volunteers in Technical Assistance
PREFACE
This paper is one of a series published by Volunteers in Technical
Assistance to provide an introduction to specific state-of-the-art
technologies of interest to people in developing countries.
The papers are intended to be used as guidelines to help
people choose technologies that are suitable to their situations.
They are not intended to provide construction or implementation details.
People are urged to contact VITA or a similar organization
for further information and technical assistance if they
find that a particular technology seems to meet their needs.
The papers in the series were written, reviewed, and illustrated
almost entirely by VITA Volunteer technical experts on a purely
voluntary basis. Some 500 volunteers were involved in the production
of the first 100 titles issued, contributing approximately
5,000 hours of their time. VITA staff included Maria Giannuzzi
as editor, Julie Berman handling typesetting and layout, and
Margaret Crouch as project manager.
The author of this paper, Balla Sidibe, was a VITA Technical
Inquiry Coordinator from 1981 to 1983, handling many requests for
information in construction and related areas. He is now a consultant
for C.A.C.I. The reviewers of this paper are VITA Volunteers.
Daniel Kuennen is a community development specialist
with the University of Delaware Cooperative Extension Service.
Trinidad Martinez has experience in adobe construction as well as
construction with stone and concrete, and the design and construction
of greenhouses and solar-wall air heaters. He built his
own 1200-square-foot adobe home.
VITA is a private, nonprofit organization that supports people
working on technical problems in developing countries. VITA offers
information and assistance aimed at helping individuals and
groups to select and implement technologies appropriate to their
situations. VITA maintains an international Inquiry Service, a
specialized documentation center, and a computerized roster of
volunteer technical consultants; manages long-term field projects;
and publishes a variety of technical manuals and papers.
UNDERSTANDING ADOBE
By Balla Sidibe
I. INTRODUCTION
Every low-cost housing project seeks to build the most durable
house at the lowest cost possible. Emphasis is always given to
the maximum use of locally available materials, such as adobe.
Common adobe, as it has been known for centuries, is simply a
soil mixture with a clay content of at least 40 percent. It
becomes a sticky mud when mixed with water. This soil is used to
make building blocks using simple wooden molds. (*)
Traditional adobe can be an acceptable alternative to wood,
masonry, cement, or steel housing. If the adobe blocks are thoroughly
dried before use, the walls should not shrink or crack.
Adobe attracts moisture, which erodes its cohesiveness. An annual
application of a firm coat of mud plaster will prevent block
erosion. One coat is usually sufficient in regions that do not
receive large amounts of rainfall; in rainier, more humid areas,
two coats are needed. Stabilizing adobe will also prevent moisture
degradation.
This paper suggests an approach for improving traditional adobe
as a building material. It focuses on soil selection and the
proper methods for controlling the moisture content of the material.
These two factors influence the performance of the unstabilized
adobe, and determine the success or failure of the stabilization
process. Stabilizers that are known to be efficient
when used with adobe (e.g., straws, cement, asphalt emulsion, and
lime) will be discussed.
-------------------
(*) This paper addresses the use of adobe in block making. Rammed
earth construction is not discussed.
II. PREPARATION OF THE ADOBE MIXTURE
SELECTION OF THE ADOBE SOIL
Identifying the Soil
Soils are generally graded according to the size of the particles.
They include coarse and fine gravel, fine sands, silt, and
clay. A sieve analysis of an equal amount of clay loam and sand
gravel used as building material reveals that the portion of the
soil that is .05 millimeters (mm) in diameter or less constitutes
the silt and clay part. The finest particles are the clay particles
(below .005 mm). Particles with diameters above .05 mm are
classified as sand or gravel, depending on particle size. In
general, the clay content determines the classification of the
soil as clay (over 30 percent clay), clay loam (20 to 30 percent),
loamy sand (below 20 percent), and sandy loam (below 15
percent). Appendix A describes some simple field methods for
identifying the texture of soils. In areas where soil analysis
facilities are available, the adobe builder can get more accurate
information through a laboratory analysis of various soil samples.
For areas where such facilities are not available, a combination
of the various simple tests is recommended.
Determining the Soil Standard
The composition of soils varies from one region of the world to
another. It is difficult to set a uniform soil standard for
making good adobe blocks. The State of California's Uniform
Building Code Specification recommends a standard of 55 to 75
percent sand for 25 to 45 percent clay and silt. The following
table serves as a guide for the selection of the optimum soil
mixture for adobe. The various soil textures in the table are
those available in the State of New Mexico.
Table 1. Optimum Adobe Soil Mixtures
Source: Hohn, C., ABC's of Making Adobe Bricks, Cooperative
Extension
Service (Las Cruces, New Mexico: New Mexico
State University, 1978).
A good mixture of soil used in adobe blocks consists of sand,
clay, and silt. A specific range of either sand, clay, or silt
content depends on the local soil. Too much of a single component
produces poor quality blocks. Although the clay's bonding properties
hold the various granular materials together, the amount of
clay should not exceed one-third of the adobe mix. A clay content
above the one-third limit causes deep cracks in the dry blocks,
and reduces its strength. The coarser sand materials reduce
shrinkage as they are held together by the clay. But too much
sand weakens the bonding effect of the clay, causing the granular
elements to crumble. Silt is usually found in combination with
the sand. It is very vulnerable to erosion and should not constitute
a major proportion in the adobe soil mixture.
The sand, clay, and silt should be mixed in approximately equal
proportions. The proportions can be checked to some degree by
putting a handful of the earth that is planned for use into a jar
of water. The jar should be capped and shaken vigorously. The
sand and silt will settle quickly, while the clay tends to remain
in suspension for a while and settle last. The resulting layers
will provide a preliminary check on the proportions.
The importance of soil testing cannot be overemphasized. A United
Nations publication calls for soil testing prior to block production.
However, the recommended testing standard may be used only
by specialists in a controlled environment. It may be difficult
to apply these tests in the field. Simple field tests are found
in the Peace Corps' Handbook for Building Houses of Earth, published
by the U.S. Department of Housing and Urban Development.
Test blocks can be made with varying combinations of sand, clay,
and silt. After thorough drying (two to four weeks), the test
block should be hard and should resist the scratching action of a
knife and a drop of two feet with no damage. If the block crumbles
or breaks, the sand content is probably too high, and soil
with a high clay content should be added to the mixture. If large
cracks are visible, the clay content is too high, and sand should
be added to the mix. If the organic content is too high, or the
clay content is too low, it may be necessary to add straw for
strength and to quicken its drying.
CONTROLLING THE MOISTURE CONTENT
Another critical factor in adobe block making is an available
water supply. Water is mixed with soil to give it a plastic
consistency. Any type of water can be used. But water with a high
concentration of mineral salts and organic materials should be
avoided. Organic material such as humus reduces the durability of
the block. Some salts have the same harmful effect, especially
when stabilizers are used.
Water is added to the soil mix. The mixture is thoroughly worked
until plastic enough to mold. Too much water will reduce the
soil's stiffness. The mixture must be firm enough to form a block
when the mold is removed. The amount of water determines whether
or not the adobe will be properly stabilized. An unstabilized
adobe soil requires a moisture content ranging from 16 percent to
20 percent of the dry weight of the soil to reach optimum plasticity (*).
A stabilized soil will require a moisture content of
less than 10 percent, especially when a mechanical press is used
instead of the traditional wooden form. One simple way of determining
the moisture content of the soil is to take several samples
of wet soil, weigh them, dry them, and then reweigh them.
The percentage of moisture can be determined by dividing the loss
in weight by the weight of the wet samples.
STABILIZATION OF THE ADOBE SOIL
The proper soil and water mixture is important to the durability
of the adobe block. Moisture absorption must be minimized if
adobe blocks are to be a durable building material. Limiting the
clay content of the adobe mix and using the optimum amount of
water can reduce the moisture absorption. However, even the best
mixture can develop some cracks. Therefore, it is important to
add other materials to the mix to prevent water from infiltrating
the dry block. This process is called stabilization. The addition
of a waterproofing or bonding substance to the adobe increases
its resistance to the weather (rainfall, snowfall, humidity, and,
to a lesser extent, excessive sunlight).
Research has been conducted on the stabilization of soils for
highway and housing construction. To some extent, the use of
stabilizers in road building has been applied to the field of
housing. However, very little research has been done on adobe.
One reason is that the use of modern stabilizers in adobe is
still experimental. Among those being widely used today are
straw, asphalt emulsion, cement, and lime.
--------------------
(*)The property of a material enabling it to be shaped and to hold
its shape.
Straw
Straw is the oldest stabilizer known. It is not a waterproofer
and its bonding properties are limited. It prevents some block
cracking. Straw is presently used in many developing countries,
where the clay content of soils is high. Low-clay content soils
do not require straw as an additive. Clean straw is recommended.
Contaminated straw (i.e., containing manure) can weaken the adobe
block.
Asphalt Emulsion
Asphalt, also known as bitumen, is primarily used for its waterproofing
properties. It is used as an emulsion (in water), which
provides good waterproofing qualities in the adobe block. But
using too much asphalt will lower the compressive strength of the
block. Asphalt emulsion also increases the elasticity and toughness
of the block, making it less likely to break during handling.
The following table can help the adobe builder in the field
when consultant advice is not available.
One author suggests the addition of 5 to 15 percent emulsion to
provide adequate protection to various soils. The asphalt emulsion
is added and thoroughly mixed with the soil before adding
water. Despite the excellent properties of asphalt emulsion as a
stabilizer, its use may not be economically feasible due to its
high cost.
Table 2.
Asphalt Emulsion Proportions for Adobe Soils
Source: United Nations, Manual on Stabilized Soil
Construction
(New York, New York: UN, 1958).
Cement
Cement is used as a stabilizer mainly because of its bonding
properties. As such it provides strength to the block and prevents
softening when the block is exposed to moisture. The soil
composition will determine how much is needed to provide the
optimum stabilization. Soils with high clay and silt content may
require cement stabilizer equal to 20 percent of the dry weight
of the soil. Only 5 to 6 percent may be needed for sandy loams.
Economical use of cement as stabilizer depends on the soil texture.
If soil requires large amounts of cement it can be combined
with less costly lime. Lime can be substituted for half the
amount of cement required.
Lime
Lime is the most popular stabilizer used in developing countries.
It is much less expensive and more available then cement. Lime is
both a waterproofer and a binder. It is greatly enhanced when
used in combination with cement. In addition, lime loosens clay
particles for easy mixing.
Some precautions must be taken when using lime as a stabilizer.
If quicklime (*) is used, it is necessary to slake (combine with
water) it first. Adobe blocks stabilized with lime or cement
require slow curing. Some moisture added during the drying process
keeps the block from drying out too quickly.
A final note: stabilizers must be thoroughly mixed into the soil
to ensure contact with soil particles; otherwise their effects
are greatly reduced. Regardless of the stabilizer selected, it is
always recommended to seek the advice of a specialist when available.
III. PRODUCTION OF THE BLOCKS
EQUIPMENT
The equipment needed for block making includes: wheelbarrows and
ua1x7z.gif (486x486)

shovels to provide a supply of soil; a hopper for measuring soil;
the mixer; a water hose, pails, etc., for handling water and
stabilizer; wheelbarrows for hauling mud to the molding areas;
---------------------
(*)Quicklime is calcium oxide, limestone that is burnt (calcined)
in a kiln at a temperature of 900-1100 [degree]C; it must be handled with
great care because it burns the skin if you touch it.
and wood or metal molds. At the molding area, a brush and pail of
water for cleaning the molds and a rake for smoothing the molding
bed will be needed.
Additional equipment may be needed for more efficient production.
Experience will determine what is needed to improve production.
MIXING THE ADOBE
Select a large level area for mixing, molding, and curing the
adobe. Clear and level an area if necessary. Ideally, block
making should be done as close as possible to the construction
site. Mixing can be done in a mixing and soaking pit, shown in
Figure 2. The pit can be made as large as the adobe maker desires.
ua2x8.gif (486x486)

Its dimensions can vary but a good depth is about one
foot. The deeper the pit below ground level, the harder it is to
mix the mud. More than one pit can be used and can be located at
convenient points.
A wide variety of techniques can be used for mixing, including
the use of shovels and hoes, tractor wheels, the feet of humans,
and the hooves of domestic animals (e.g., goats, oxen, horses).
If after mixing the contents appear lumpy (like flour in gravy)
and resist efforts to make a smooth mix, let the mixture soak
overnight in the pit. Each successive day's batch should also be
soaked overnight.
MOLDING BLOCKS
Various sizes of adobe blocks are made to accommodate the prearranged
dimensions of the walls and the block mold can be built
to the desired dimensions. Regardless of the needed size, the
maximum outside dimension of the block mold should not exceed
81.3 centimeters (32 inches).
The average weight of an adobe block with a volume of .009 cubic
meter (one-third cubic foot) is 16.8 kilograms (37 pounds).
Figure 3 illustrates the various types of molds that can be
ua3x8.gif (486x486)

constructed. Note the end handles in the drawing on the right.
For more efficient production by one worker, a gang form that
will mold eight .009 cubic meter (one-third cubic foot) adobe
blocks that are 25.4 centimeters x 10.2 centimeters x 35.6 centimeters
(10 inches x 4 inches x 14 inches) can be used. A larger
form will require two people to manage it. Two adobe molders can
manage a sixteen-block mold. Whether two people are working or
one, two forms should be made, one for soaking, the other for
molding. For long-term production, line the inside walls of the
form with tin. Handles can be constructed on the mold by extending
the ends of two opposite sides (see Figure 3).
The mold should be thoroughly soaked before putting the adobe
mixture into it. Soaking will keep soil particles from sticking
to the inside of the mold, make the block easier to remove, and
help ensure a smooth finished block.
Two adobe molders are best for a smooth, rhythmic operation. The
molders place the mold at the prepared level site. The adobe mud
is carefully dumped from a wheelbarrow or other container into
the mold compartments. The mud is then filled into the corners
and edges of the mold.
The molders usually use their hands to work the mud gently but
firmly into all parts of the mold.
The excess mud on top is removed by hand or with a straight-edged
piece of wood or other rigid material. Next, the now level surface
is made smooth. (If the block is too wet, water will form on
its surface). Even and level distribution of the mud is needed
for quality blocks. Rough or unlevel top surfaces and nicks in
the corners cause cracks to develop during drying.
The mold is removed by slowly and evenly lifting the mold upwards
from the level ground surface away from the blocks. After the
mold has been removed, the surface is again made smooth.
The process is repeated over again by moving the mold to the next
molding location, which should be as close as possible to the
previously finished blocks. Mud is brought to fill the mold and
the same steps are followed.
The cleaning of molds and tools during block manufacturing,
especially at the end of the work day or before work breaks,
helps to ensure good quality blocks.
In molding the blocks, the following points should be kept in
mind:
1. A team of two molders supplied with properly mixed adobe can
produce 1,000 25.4 centimeters x 10.2 centimeters x 35.6
centimeters (10 inches x 4 inches x 14 inches) blocks per
day. This size block is .009 cubic meter (one-third cubic
foot) and is optimum in terms of wall strength, weight, and
insulation. It weighs 15.9-18.1 kilograms (35-40 pounds).
2. A portable cement mixer can supply four or five molding
teams with mud.
3. Molding teams need to develop an evenly paced work rhythm.
4. Wooden molds should be soaked in water before each day's use.
Moistened molds produce smooth blocks that are less
likely to crack.
5. Adobe mud should be wet enough to be worked into the mold's
corners and angles. Mud that is too wet will run out of the
bottom of the mold.
6. Mixed mud will dry on its surface if left standing. Mud
should not be left in wheelbarrows or mixers for long periods
of time or in direct sunlight. The mixture should be
covered to keep it from drying out before it can be worked.
7. Workmanship always improves with practice.
DRYING AND CURING BLOCKS
The relatively long drying time requires a large site undisturbed
by traffic, etc. While the adobe block mold is moist, it is
placed on a layer of building paper or other flat, smooth substance.
If building paper is not available, blocks can be placed
on a thin layer of sand. The width of the paper or flat surface
should be at least as large as the dimensions of the mold. The
clean level area prevents undesirable elements from becoming
embedded in the wet adobe, as well as excessive breakage or
malformation.
The drying area should be close to the mixing site to provide
easy access to needed material. The first row of blocks should be
placed at the farthest point from the mixing area. Advance determination
of a location for drying will save steps, time, and
energy.
On very hot days in direct sunlight, rapid drying occurs and
blocks may crack. Paper, leaves, straw, and similar coverings
placed on the drying blocks will prevent cracks due to quick
drying.
The blocks should be dried for 14 days. After several days of
drying, the blocks can be carefully placed on end (their edge) to
dry more uniformly.
Warning: rain will quickly destroy unstabilized blocks that are
unprotected during this drying time. Stabilized blocks are not as
easily damaged by normal rains.
A hot, dry period is most favorable for curing. Dry seasons are
ideally suited for production. Under these conditions, only seven
to 10 days are normally needed for drying. Asphalt-stabilized adobe
requires more time to dry than untreated adobe.
The blocks should not be moved more than necessary. Before moving
blocks, determine whether they are ready by testing several.
Break the blocks in half and examine their centers for dryness.
STORAGE OF BLOCKS
The adobe blocks must be stacked on end to minimize erosion. If
the blocks are laid flat, they will break of their own weight.
They should be placed on edge, against a center pillar, and
stacked not more than three or four rows high (see Figure 4).
ua4x11.gif (486x486)
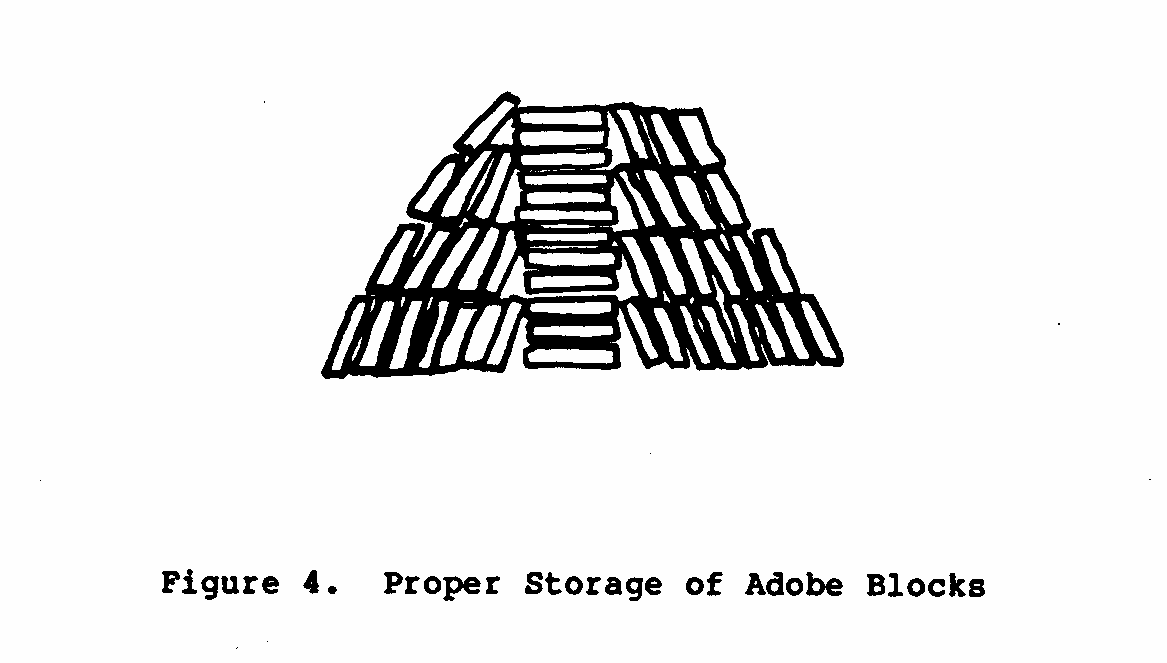
Some bottom blocks can be expected to break, and should be allowed
for. Should the stack be left for any period of time, it
should be protected with a waterproof covering.
IV. CONCLUSION
Making durable adobe blocks efficiently and economically requires
careful Planning and organization. Site selection, in particular,
should be given careful consideration. After the planning phase
is completed, the preliminary work consists of selecting, digging,
grading, and mixing the soil. Some critics of adobe point
to the fact that adobe is labor intensive. This criticism is
correct, especially when basic equipment like a hoe is used for
mixing the soil. There are, however, many appropriate technologies
that can cut labor and improve the quality of the block.
VITA can provide valuable technical bulletins on how to make a
Buck Scraper, Fresno Scraper, and Barrel Fresno Scraper. (*) The
Fresno scraper and barrel Fresno scraper (which can be powered by
oxen or horses) move large quantities of soil from the digging
area to the block-making site. A fourth VITA publication, How to
Get Waterproofing Substances from Plants (formerly Waterproofing
Soil Construction), helps the adobe user identify and tap local
trees and other plant materials for their waterproofing substances.
A more sophisticated but durable block made of earth with cement
or other stabilizer added is described in Making Building Blocks
with the CINVA-Ram Block Press. This VITA publication provides
detailed step-by-step instructions with illustrations on how to
use the portable block press. Included is a list of CINVA-Ram
distributors. See also VITA Technical Paper #2, Understanding
Stabilized Earth Construction.
-------------------
(*)These technical bulletins are also included in the VITA publication,
Village Technology Handbook, April 1978.
BIBLIOGRAPHY/SUGGESTED READING LIST
Articles
Tibbets, Joe. "The Pressed Earth Block Controversy,' Adobe Today,
No. 37, pp. 24-27 (undated).
"Adobe Brick," Mineral Information Service. Vol. 12. No. 7. Sacramento,
California: State of California, Division of
Mines, 1959.
Manuals and Handbooks
Action Peace Corps. Handbook for Building Home's of Earth. Washington,
D.C.: Department of Housing and Urban Development.
(undated)
Adobe Craft. Building Your Adobe Home. Pre-publication draft.
Castro Valley, California: Adobe Craft, 1976.
Fitzmaurice, Robert. Manual On Stabilized Soil Construction. New
York, New York: United Nations, 1958.
Groben, Ellis W. Adobe Architecture: Its Design and Construction.
Seattle, Washington: The Shorey Book Store, 1975.
International Institute of Housing Technology. The Manufacture of
Asphalt Emulsion Stabilized Soil Bricks. Fresno, California:
California State University, 1972.
National Bureau of Standards. Methods for Characterizing Adobe
Building Materials. Washington, D.C.: National Bureau of
Standards, 1978.
Newbauer, L.W. Adobe Construction Methods. Berkeley, California:
Agricultural Publications, 1964.
Salvadorean Foundation for Development and Low Cost Housing Research
Unit. Stabilized Adobe. Washington, D.C.: Organization
for American States, (undated).
U.S. Department of Agriculture. Building with Adobe and Stabilized
Earth Blocks. Washington, D.C.: United States Department
of Agriculture, 1972.
U.S. Department of Housing and Urban Development. Earth and Homes.
Washington, D.C.: Housing and Urban Development, 1970.
Reports and Papers
Kimmons, G.; Fern, R.L.; and Matleson, R. Asphalt Stabilized
Building Blocks." (unpublished, but available from VITA),
1968.
Lunt, M.G. Stabilized Soil Blocks for Building. Garston, Watford,
England: Building Research Establishment, 1980.
Maginnis, Howard. The Classification of Soil Construction for
Architectural Use. St. Louis, Missouri: Washington University,
1970.
Whittlemore, Herbert L.; Stang, Ambrose; Hubbel, Elbert; and
Dill, R. Building Materials and Structures: Structural, Heat-Transfer,
and Water Permeability Properties of Five Earth-Wall
Constructions. Washington, D.C.: National Bureau of
Standards, 1941.
VITA Publications
Volunteers in Technical Assistance. How to Get Waterproofing
Substances from Plants. Arlington, Virginia: VITA, undated).
(Although this publication is out of print, a photocopy
may be obtained by special request to VITA's Information
Service.)
Volunteers in Technical Assistance. Making Building Blocks with
the CINVA-Ram Block Press. Arlington, Virginia: VITA, 1975.
Volunteers in Technical Assistance. Village Technology Handbook.
Arlington, Virginia: VITA, 1978.
Volunteers in Technical Assistance. Understanding Stabilized Earth
Construction. Arlington, Virginia: VITA, 1984.
APPENDIXES
APPENDIX A
Field Method for Identification of Soil Texture
Soil Visual Detection of Particle Squeezed in Hand and Soil Ribboned
Texture Size and General Appearance Pressure Released Between Thumb and
of the Soil Finger when Moist
When Air When
Dry Moist
Sand Soil has a granular Will not Forms a Cannot be
appearance in which form a Which ribboned.
the individual cast and will
grain sizes can be will fall crumble
detected. It is apart when when
free-flowing when pressure is lightly
in a dry, condition. released. touched.
Sandy Essentially a granular Forms a Forms a Cannot be
Loam with sufficient silt and cast cast ribboned.
clay to make it somewhat which which
coherent. Sand readily will
characteristics falls apart bear
predominate. when careful
lightly handling
touched. without
breaking
Loam A uniform mixture of sand, Forms a Forms a Cannot be
silt and clay. Grading of cast cast ribboned.
sand fraction quite uniform which which
from coarse to fine. It is will can be
mellow, has somewhat gritty, bear handled
feel, yet is fairly, smooth careful freely
and slightly plastic. handling without
without breaking
breaking
Silt Contains a moderate amount of Forms a Forms a Will not
Loam the finer grades of sand and cast cast ribbon
only a small amount of clay which which but has
- over half of the particles can be can be a broken
are silt. When dry it may freely freely appearance,
appear quite cloddy; can handled. handled. feels
readily be broken and Pulverized When wet, smooth, and
pulverized to a powder. it has a soil may be
soft runs slightly
flour-like together plastic.
feel. and
puddles.
APPENDIX A--Continued
Soil Visual Detection of Particle Squeezed in Hand and Soil Ribboned
Texture Size and General Appearance Pressure Released Between Thumb and
of the Soil Finger when Moist
When Air When
Dry Moist
Silt Contains over 80% of silt Forms a Forms a It has a tendency
particles with very little cast cast to ribbon with a
fine sand and clay. When which which broken
dry, it may be cloddy; can be can be appearance, feels
readily pulverizes to handled handled. smooth.
powder with a soft without When
flour-like feel. breaking. wet, it
readily
puddles.
Clay Fine textured soil breaks Forms a Forms a Forms a thin
Loam into hard lumps when dry. cast cast which readily
Contains more clay than which which breaks, barely
silt loam. Resembles clay can be can be sustaining its
in a dry condition. handled handled own weight.
Identification is made without freely
on physical behaviour breaking. breaking.
of moist-soil. It can be
worked
into a
dense
mass.
Clay Fine textured soil breaks Forms a Form a Forms long thin
into very hard lumps when cast cast flexible
dry. Difficult to pulverize which which ribbons. Can be
into a soft flourlike can be can be worked into a
powder when dry. freely handled dense compact
Identification based on handled freely mass.
cohesive properties without without Considerable
of the moist soil. breaking. breaking. plasticity.
Organic Identification based on the high organic content. Muck consists of thoroughly
Soils decomposed organic material with considerable amount of mineral soil finely
divided with some fibrous remains. When considerable fibrous material is
present, it may be classified as peat. The plant remains or sometimes the
woody structure can easily be recognized. Soil colour ranges from brown to
blacks. They occur in lowlands in swamps or swale, They have high shrinkage
upon drying.
APPENDIX B
Recommended Standards and Methods of Testing for Construction Related Applications of Adobe
Standard
1. SOIL:
a) Sufficient clay to bind particles (approx. 15%)
(Not less than 25% or more than 45% silt-clay.
Clay and silt are defined as particles which
will pass through a #200 mesh sieve.) Balance
to be made up of "hard particle" material such
as sand, crushed rocks, decomposed granite etc.
not to exceed more than approximately 1/4 [inches] in
diameter.
b) Minimize effects of soluble salts upon bonding
of asphalt film to soil particles.
Soil mix shall not contain more than 0.2% soluble
salts.
2. MOISTURE RESISTANCE: Soil stabilizer to be used.
a) Absorption: Shall not be greater than 2 1/2% of
dry weight in seven days. Average of five
4 [inches] sections cut from each of 5 bricks.)
b) Moisture Content: not to exceed 4% by weight.
c) Erosion: (average of three bricks)
Average less than 1/16 [inches] with no significant
pitting.
3. SHRINKAGE: (average 5 blocks, top surface approx.
1 sq. ft.)
Not more than three cracks, maximum of 3 [inches] long
and 1/8 [inches] wide.
Method of Testing
Fill tall glass jar or cylinder to about 1/3 capacity
with sample of pre-mixed soil. Add water to about 2/3
capacity of container. Shake thoroughly and let stand
for about 15 minutes. Particles will separate themselves
in the following order: (top to bottom)
Clay
Silt
Fine sand
Medium sand
Coarse sand or small gravel-rock
Mix soil and water samples. Filter through filter paper.
Test filtrate with PH paper. Rating of 7 or less is
satisfactory.
State Specification Mixing Grade Asphalt Emulsion SS-1 or
SSlH to be used, Mix one part asphalt emulsion with approximately
4 parts water. To this stir in soil sample. Mold
and dry block.
Dry sample block to constant weight in oven at 140 [degrees] F,
After cooling to room temperature place on constantly
saturated porous surface enclosed in moist cabinet.
Weight gain is percentage of dry weight.
Using field run samples weigh and follow procedure above.
Dry to constant weight and calculate weight loss.
Direct spray from standard 4 [inches] shower head, 20 lbs.
pressure, horizontally against adobe surface for two
hours. Slight erosion or pitting is not considered
unfavorable.
Visual inspection. Adapt this principle as appropriate
to smaller or larger surfaces being tested, e.g. coursed,
poured or sprayed surfaces.
------------------
(*)Condensed and adapted from:
Uniform Building Code sections on "Unburned Clay Masonry" and ASTM
Manual Designator E-72 - 74a "Standard Methods for Conducting Strength
Testing of Panels for Building Construction"
psi = pounds per square inch
lbs.= pounds
APPENDIX B--Continued
Method of T e s t i n g
Standard
Block Samples Panel Samples
4. STRENGTH: Average of five blocks: Wall panel 4 [feet]
x 8 [feet] (or
appropriate reduced
scale model)
a) Compressive Strength: Average of 300 psi Compressive Load Test:
Capability of with tolerance of
supporting vertical 250 psi for one
loads. block in five.
b) Flexion: Modulus of Rupture: Wall Panel 4 [feet]
Capability of Average of five x 8 [feet] (or
resisting blocks= not less appropriate reduced
lateral forces than 50 psi with scale model)
tolerance of 30 psi Transverse Load Test:
for one block in five.
Impact Load Test:
c) Shear:
Capability of Wall panel 8 [feet]
resisting earth x 8 [feet] (or
movements such appropriate reduced
seismic (earthquake) scale model)
forces.
Racking (shear)
Load Test:
uax19a.gif (437x437)

uax19c.gif (353x353)

uax19b.gif (437x437)

uax19d.gif (437x437)

uax19e.gif (437x437)

uax19f.gif (432x432)

5. TEST SAMPLES: one unit of adobe (block or wet mix) to be tested for
each 1000 units used in construction.
6. MORTAR: To bond and seal joints, 1 shovel cement, 2 shovels adobe
soil, 3 shovels sand, 1 pint asphalt stabilizer, 4+ pints water
APPENDIX C
Mortar for Adobe Brick
Mortar must provide a strong bond between bricks and must resist the
forces of vibration, violent windstorm, contraction due to temperature changes
and earthquake. The mortar must be at least as strong as the bricks it binds.
Complete safety from nature's violence is not possible, but high quality
workmanship and construction practice go far in reducing the effects of these
forces.
Properly designed and constructed footings and foundations, proper use of
pilasters, reinforcing, lintels, and the proper size and shape of quality bricks
along with the necessary quality of workmanship are of utmost importance in
the construction of a sound, safe adobe building.
Lime or clay is used in mortar to obtain plasticity, workability, and
water-holding capacity. On burned brick, tile, and cement block, mortars
containing lime seem to bond better, while mortars containing fireclay tend to
shrink and cause cracking. On asphalt stabilized adobe brick, lime tends to
cause deterioration of the asphalt which results in reduced adhesion to asphaltstabilized
bricks, particularly when subjected to cycles of wet and dry weather.
In very dry climates where moisture resistance is not an important consideration,
lime-cement mortar should be satisfactory. Good mortar requires proper
materials of good quality, properly mixed.
Adobe bricks should be laid with full bed and head joints 1/2 inch thick.
This is necessary to obtain the most strength and moisture resistance possible.
The bed joint should be spread thick and not furrowed. This will assure a full
joint without voids. Joints should be finished with a trowel or pointing tool for
appearance and watertightness. Without good workmanship the full advantages
of stabilized adobe bricks cannot be realized.
Cement Mortar 1 cement, 2 1/2-3 sand (by volume), 1 1/2 gallon
asphalt emulsion per sack of cement
Cement-lime Mortar 1 cement, 1 hydrated lime, 4 sand
Cement-soil Mortar 1 cement, 2 soil (use same soil bricks are made
from), 3 sand, 1 1/2 gallon asphalt emulsion per
sack of cement
Mixing Procedures
1. Mix dry ingredients thoroughly.
2. Add water to stiff consistency.
3. Add emulsion - continue thorough mixing.
4. Use additional water to proper consistency. Mortar should work easily,
slide from trowel.
Adobe Mortar The same mixture as the bricks are molded from
should be used.
Good soil containing about 15% clay and 85% sand stabilized with 5% asphalt
emulsion or its equivalent of RC2 road oil can be used. This mortar is slow-curing
and requires working around the building, laying no more than 2-3 courses and
allowing adequate drying time. Extra sand may be needed if shrinkage in the
mortar occurs. Soil which makes good bricks should make good mortar.
Use of RC2 as a Substitute for Asphalt Emulsion
When using RC2 in mortar, the amount required is much less than the amount
of asphalt emulsion. The proportion should be 1 cement, 2 soil, 3 sand, 2-3
quarts RC2 per sack of cement for cement-soil mortar or 1 cement, 2 1/2-3 sand
and 2 quarts RC2 per sack of cement for cement mortar.
A slurry of soil, RC2 and water may be pre-mixed and added to dry ingredients.
Continue thorough mixing and addition of water to proper consistency. Thorough
mixing is essential to provide a waterproof mortar. RC2 requires even more care
in mixing than does asphalt emulsion.
To make the slurry, mix about 5 shovels full of soil and enough water to form
a sloppy wet mud. Add 2 quarts (4 pounds) RC2. Mix thoroughly. This will make
a stiff sticky mixture. Continue mixing and add water to make 5 gallons total
volume. This is enough stabilizer to mix with 1 sack of cement and can be proportioned
into batches of lesser amounts easily. The slurry breaks the RC2 into
small particles and distributes the relatively small amount of RC2 into the mixture
more evenly. When only part of the slurry is used and the remainder allowed to
stand for any length of time it must be stirred carefully before use.
APPENDIX D
English and Metric Conversion Factors
Multiply By To Obtain
Centimeters ..............................0.3937 ....................Inches
Centimeters ..........................0.01 ......................Meters
Centimeters ..........................10 ........................Millimeters
Cubic Centimeters ........................3.531 x [10.sup.5] ........Cubic feet
Cubic centimeters ....................6.102x [10.sup.2] .........Cubic inches
Cubic centimeters ....................[10.sup.6] ................Cubic meters
Cubic centimeters ....................1.308x [10.sup.6]..........Cubic yards
Cubic centimeters ....................2.642x [10.sup.4]..........Gallons
Cubic centimeters ....................10 [10.sup.3] .............Liters
Cubic centimeters ....................2.113x [10.sup.3] .........Pints (liquid)
Cubic centimeters ....................1.057x [10.sup.3] .........Quarts (liquid)
Cubic Feet ...............................2.832x [10.sup.4] .........Cubic centimeters
Cubic feet ...........................1728 ......................Cubic inches
Cubic feet ...........................0.02832 ...................Cubic meters
Cubic feet ...........................0.03704 ...................Cubicyards
Cubic feet ...........................7.48052 ...................Gallons
Cubic feet ...........................28.32 .....................Liters
Cubic feet ...........................59.84 .....................Pints (liquid)
Cubic feet ...........................29.92 .....................Quarts liquid)
Cubic inches .............................16.39 .....................Cubic centimeters
Cubic inches .........................5.787x [10.sup.4] .........Cubic feet
Cubic inches .........................1.639x [10.sup.5] .........Cubic meters
Cubic inches .........................2.143x [10.sup.5] .........Cubic yards
Cubic inches .........................4.329x [10.sup.3] .........Gallons
Cubic inches .........................1.639x [10.sup.2] .........Liters
Cubic inches .........................0.03463 ...................Pints (liquid)
Cubic inches .........................0.01732 ...................Quarts (liquid)
Cubic Meters .............................[10.sup.6] ................Cubic centimeters
Cubic meters .........................35.31 .....................Cubic feet
Cubic meters .........................61,023 ....................Cubic inches
Cubic meters .........................1.038 .....................Cubic yards
Cubic meters .........................264.2 .....................Gallons
Cubic meters .........................[10.sup.3] ................Liters
Cubic meters .........................2113 ......................Pints (liquid)
Cubic meters .........................1057 ......................Quarts (liquid)
Cubic Yards ..............................7.646x [10.sup.5] .........Cubic centimeter
Cubic yards ..........................27 ........................Cubic feet
Cubic yards ..........................46,656 ....................Cubic inches
Cubic yards ..........................0.7646.....................Cubic meters
Cubic yards ..........................202.0 .....................Gallons
Cubic yards ..........................764.6 .....................Liters
Cubic yards ..........................1616 ......................Pints (liquid)
Cubic yards ..........................807.9 .....................Quarts (liquid)
Feet .....................................30.48 .....................Centimeters
Feet .................................12 ........................Inches
Feet .................................0.3048 ....................Meters
Feet .................................1/3 .......................Yards
Gallons ..................................3785 ......................Cubic centimeters
Gallons ..............................0.1337 ....................Cubic feet
Gallons ..............................231 .......................Cubic inches
Gallons ..............................3.785x [10.sup.3] .........Cubic meters
Gallons ..............................4.95lx [10.sup.3] .........Cubic yards
Gallons ..............................3.785 .....................Liters
Gallons ..............................8 .........................Pints (liquid)
Gallons ..............................4 .........................Quarts (liquid)
Gallons, Imperial ........................1.20095 ...................U.S. Gallons
Gallons, U.S .........................0.83267 ...................Imperial Gallons
Gallons Water ............................8.3453 ....................Pounds of water
Grams ....................................0.03527 ...................Ounces
Grams ................................2.205x [10.sup.3] .........Pounds
Grams/Cu. Cm. ............................62.43 .....................Pounds/cubic foot
Grams/Cu. cm .........................0.03613 ...................Pounds/cubic inch
Inches ...................................2.540 .....................Centimeters
Liters ...................................[10.sup.3] ................Cubic centimeters
Liters ...............................0.03531 ...................Cubic feet
Liters ...............................61.02 .....................Cubic inches
Liters ...............................[10.sup.3] ................Cubic meters
Liters ...............................1.308x [10.sup.3] .........Cubic yards
Liters ...............................0.2642 ....................Gallons
Liters ...............................2.113 .....................Pints (liquid)
Liters ...............................1.057 .....................Quarts (liquid)
Meters ...................................100 .......................Centimeters
Meters ...............................3.281 .....................Feet
Meters ...............................39.37 .....................Inches
Meters ...............................[10.sup.3] ................Kilometers
Meters ...............................[10.sup.3] ................Millimeters
Meters ...............................1.094 .....................Yards
Pounds ...................................16 ........................Ounces
Pounds ...............................0.0005 ....................Tons (short)
Pounds ...............................453.5924 ..................Grams
Pounds of Water ..........................0.01602 ...................Cubic feet
Pounds of water ......................27.68 .....................Cubic inches
Pounds of water ......................0.1198 ....................Gallons
APPENDIX E
Finishes For Asphalt-Stabilized Adobe Brick Walls and Specifications
Wall Finishes
Exterior or interior walls shall be left unfinished, or smoothed and washed, or given
a transparent protective seal coat, or painted, as designated for each job.
1. Smoothing and Washing -- The wall surface shall be cleaned by wetting and rubbing smooth
with wet burlap, then washing.
2. Paint Coat, Prime Coat, Transparent Sealer --
a. Paint. The following paints are satisfactory when applied on
emulsified asphalt treated soil brick dry surfaces to serve as
finish paint coat, exterior or interior. No prime coat is required.
Caladium Paint, made by Bishop-Conklin, Los Angeles, California,
distributed by "Treasure Tones," dealers in various cities.
Gelvatex Exterior or interior Paint, made by Gelvatex Coatings
Corporation, sales offices at Oakland and Los Angeles, California.
b. Asphalt Base Aluminum Prime. After the walls are smoothed and
cleaned (1) and are thoroughly dry, a good grade of asphalt base
aluminum paint, formulated with drying oils, shall be used as prime.
When the coating is dry, one or more coats of a good grade of exterior
or interior paint may be applied. (Note: Aluminum paint is not
recommended to be applied during wet seasons, or on walls when damp.
When wall is damp, use instead cement wash, paragraph c. below.)
c. Cement Wash. The clean wall surface shall be wetted, then primed
with a cement wash consisting of one sack of medusa or equal White
Cement mixed with about six gallons of water to a paint consistency,
applied by vigorous brushing. After initial set, the prime coat shall
be fogged with water several times daily for five or six days, until
the cement is fully set and hardened.
A second application of cement wash, tinted with pigment if desired, may be applied as final
coat; or after setting, the cement-primed surface may be painted with a good grade of exterior
or interior paint. (Cement wash coats are best applied when damp; cloudy weather aids
moist curing.)
1Chevron Research Company. The Manufacture And Use Of Asphalt Emulsion
Stabilized Adobe Bricks. April 16. 1963 (Mimeographed)
d. Transparent Protective Sealer. A nonglossy protective finish,
not altering natural color of the bricks, may be obtained by applying
on the clean wall surface Caldotone Rubberized Transparent Sealer, made
and sold by Caldow Paint Company, Oakland, California. The sealer is
made for exterior or interior use.
e. Linseed Oil, For interior Finish Only. For harder, tougher interior
surfaces a prime coat or a transparent protective seal coat may be
provided by painting with raw linseed oil (imparting to the brick
surface a richer, darker color). When used as prime coat, allow to
cure thoroughly, at least two weeks, then paint with 50% raw linseed
oil, 50% "50-50 Du Pont Paint."
3. Plaster. Expanded metal lath or 1-inch 18-gage galvanized wire shall
be fastened to the walls with furring nails driven into the bricks. Cement
stucco or hardwall plaster is then applied in scratch, brown, and finish
coats according to standard practice.
========================================
========================================
UNDERSTANDING ADOBE
By
Balla Sidibe
Technical Reviewers
Daniel Kuennen
Trinidad Martinez
VITA
1600 Wilson Boulevard, Suite 500
Arlington, Virginia 22209 USA
Tel: 703/276-1800 . Fax: 703/243-1865
Internet: pr-info@vita.org
Understanding Adobe
ISBN: 0-86619-224-7
[C]1985, Volunteers in Technical Assistance
PREFACE
This paper is one of a series published by Volunteers in Technical
Assistance to provide an introduction to specific state-of-the-art
technologies of interest to people in developing countries.
The papers are intended to be used as guidelines to help
people choose technologies that are suitable to their situations.
They are not intended to provide construction or implementation details.
People are urged to contact VITA or a similar organization
for further information and technical assistance if they
find that a particular technology seems to meet their needs.
The papers in the series were written, reviewed, and illustrated
almost entirely by VITA Volunteer technical experts on a purely
voluntary basis. Some 500 volunteers were involved in the production
of the first 100 titles issued, contributing approximately
5,000 hours of their time. VITA staff included Maria Giannuzzi
as editor, Julie Berman handling typesetting and layout, and
Margaret Crouch as project manager.
The author of this paper, Balla Sidibe, was a VITA Technical
Inquiry Coordinator from 1981 to 1983, handling many requests for
information in construction and related areas. He is now a consultant
for C.A.C.I. The reviewers of this paper are VITA Volunteers.
Daniel Kuennen is a community development specialist
with the University of Delaware Cooperative Extension Service.
Trinidad Martinez has experience in adobe construction as well as
construction with stone and concrete, and the design and construction
of greenhouses and solar-wall air heaters. He built his
own 1200-square-foot adobe home.
VITA is a private, nonprofit organization that supports people
working on technical problems in developing countries. VITA offers
information and assistance aimed at helping individuals and
groups to select and implement technologies appropriate to their
situations. VITA maintains an international Inquiry Service, a
specialized documentation center, and a computerized roster of
volunteer technical consultants; manages long-term field projects;
and publishes a variety of technical manuals and papers.
UNDERSTANDING ADOBE
By Balla Sidibe
I. INTRODUCTION
Every low-cost housing project seeks to build the most durable
house at the lowest cost possible. Emphasis is always given to
the maximum use of locally available materials, such as adobe.
Common adobe, as it has been known for centuries, is simply a
soil mixture with a clay content of at least 40 percent. It
becomes a sticky mud when mixed with water. This soil is used to
make building blocks using simple wooden molds. (*)
Traditional adobe can be an acceptable alternative to wood,
masonry, cement, or steel housing. If the adobe blocks are thoroughly
dried before use, the walls should not shrink or crack.
Adobe attracts moisture, which erodes its cohesiveness. An annual
application of a firm coat of mud plaster will prevent block
erosion. One coat is usually sufficient in regions that do not
receive large amounts of rainfall; in rainier, more humid areas,
two coats are needed. Stabilizing adobe will also prevent moisture
degradation.
This paper suggests an approach for improving traditional adobe
as a building material. It focuses on soil selection and the
proper methods for controlling the moisture content of the material.
These two factors influence the performance of the unstabilized
adobe, and determine the success or failure of the stabilization
process. Stabilizers that are known to be efficient
when used with adobe (e.g., straws, cement, asphalt emulsion, and
lime) will be discussed.
-------------------
(*) This paper addresses the use of adobe in block making. Rammed
earth construction is not discussed.
II. PREPARATION OF THE ADOBE MIXTURE
SELECTION OF THE ADOBE SOIL
Identifying the Soil
Soils are generally graded according to the size of the particles.
They include coarse and fine gravel, fine sands, silt, and
clay. A sieve analysis of an equal amount of clay loam and sand
gravel used as building material reveals that the portion of the
soil that is .05 millimeters (mm) in diameter or less constitutes
the silt and clay part. The finest particles are the clay particles
(below .005 mm). Particles with diameters above .05 mm are
classified as sand or gravel, depending on particle size. In
general, the clay content determines the classification of the
soil as clay (over 30 percent clay), clay loam (20 to 30 percent),
loamy sand (below 20 percent), and sandy loam (below 15
percent). Appendix A describes some simple field methods for
identifying the texture of soils. In areas where soil analysis
facilities are available, the adobe builder can get more accurate
information through a laboratory analysis of various soil samples.
For areas where such facilities are not available, a combination
of the various simple tests is recommended.
Determining the Soil Standard
The composition of soils varies from one region of the world to
another. It is difficult to set a uniform soil standard for
making good adobe blocks. The State of California's Uniform
Building Code Specification recommends a standard of 55 to 75
percent sand for 25 to 45 percent clay and silt. The following
table serves as a guide for the selection of the optimum soil
mixture for adobe. The various soil textures in the table are
those available in the State of New Mexico.
Service (Las Cruces, New Mexico: New Mexico
State University, 1978).
A good mixture of soil used in adobe blocks consists of sand,
clay, and silt. A specific range of either sand, clay, or silt
content depends on the local soil. Too much of a single component
produces poor quality blocks. Although the clay's bonding properties
hold the various granular materials together, the amount of
clay should not exceed one-third of the adobe mix. A clay content
above the one-third limit causes deep cracks in the dry blocks,
and reduces its strength. The coarser sand materials reduce
shrinkage as they are held together by the clay. But too much
sand weakens the bonding effect of the clay, causing the granular
elements to crumble. Silt is usually found in combination with
the sand. It is very vulnerable to erosion and should not constitute
a major proportion in the adobe soil mixture.
The sand, clay, and silt should be mixed in approximately equal
proportions. The proportions can be checked to some degree by
putting a handful of the earth that is planned for use into a jar
of water. The jar should be capped and shaken vigorously. The
sand and silt will settle quickly, while the clay tends to remain
in suspension for a while and settle last. The resulting layers
will provide a preliminary check on the proportions.
The importance of soil testing cannot be overemphasized. A United
Nations publication calls for soil testing prior to block production.
However, the recommended testing standard may be used only
by specialists in a controlled environment. It may be difficult
to apply these tests in the field. Simple field tests are found
in the Peace Corps' Handbook for Building Houses of Earth, published
by the U.S. Department of Housing and Urban Development.
Test blocks can be made with varying combinations of sand, clay,
and silt. After thorough drying (two to four weeks), the test
block should be hard and should resist the scratching action of a
knife and a drop of two feet with no damage. If the block crumbles
or breaks, the sand content is probably too high, and soil
with a high clay content should be added to the mixture. If large
cracks are visible, the clay content is too high, and sand should
be added to the mix. If the organic content is too high, or the
clay content is too low, it may be necessary to add straw for
strength and to quicken its drying.
CONTROLLING THE MOISTURE CONTENT
Another critical factor in adobe block making is an available
water supply. Water is mixed with soil to give it a plastic
consistency. Any type of water can be used. But water with a high
concentration of mineral salts and organic materials should be
avoided. Organic material such as humus reduces the durability of
the block. Some salts have the same harmful effect, especially
when stabilizers are used.
Water is added to the soil mix. The mixture is thoroughly worked
until plastic enough to mold. Too much water will reduce the
soil's stiffness. The mixture must be firm enough to form a block
when the mold is removed. The amount of water determines whether
or not the adobe will be properly stabilized. An unstabilized
adobe soil requires a moisture content ranging from 16 percent to
20 percent of the dry weight of the soil to reach optimum plasticity (*).
A stabilized soil will require a moisture content of
less than 10 percent, especially when a mechanical press is used
instead of the traditional wooden form. One simple way of determining
the moisture content of the soil is to take several samples
of wet soil, weigh them, dry them, and then reweigh them.
The percentage of moisture can be determined by dividing the loss
in weight by the weight of the wet samples.
STABILIZATION OF THE ADOBE SOIL
The proper soil and water mixture is important to the durability
of the adobe block. Moisture absorption must be minimized if
adobe blocks are to be a durable building material. Limiting the
clay content of the adobe mix and using the optimum amount of
water can reduce the moisture absorption. However, even the best
mixture can develop some cracks. Therefore, it is important to
add other materials to the mix to prevent water from infiltrating
the dry block. This process is called stabilization. The addition
of a waterproofing or bonding substance to the adobe increases
its resistance to the weather (rainfall, snowfall, humidity, and,
to a lesser extent, excessive sunlight).
Research has been conducted on the stabilization of soils for
highway and housing construction. To some extent, the use of
stabilizers in road building has been applied to the field of
housing. However, very little research has been done on adobe.
One reason is that the use of modern stabilizers in adobe is
still experimental. Among those being widely used today are
straw, asphalt emulsion, cement, and lime.
--------------------
(*)The property of a material enabling it to be shaped and to hold
its shape.
Straw
Straw is the oldest stabilizer known. It is not a waterproofer
and its bonding properties are limited. It prevents some block
cracking. Straw is presently used in many developing countries,
where the clay content of soils is high. Low-clay content soils
do not require straw as an additive. Clean straw is recommended.
Contaminated straw (i.e., containing manure) can weaken the adobe
block.
Asphalt Emulsion
Asphalt, also known as bitumen, is primarily used for its waterproofing
properties. It is used as an emulsion (in water), which
provides good waterproofing qualities in the adobe block. But
using too much asphalt will lower the compressive strength of the
block. Asphalt emulsion also increases the elasticity and toughness
of the block, making it less likely to break during handling.
The following table can help the adobe builder in the field
when consultant advice is not available.
One author suggests the addition of 5 to 15 percent emulsion to
provide adequate protection to various soils. The asphalt emulsion
is added and thoroughly mixed with the soil before adding
water. Despite the excellent properties of asphalt emulsion as a
stabilizer, its use may not be economically feasible due to its
high cost.
(New York, New York: UN, 1958).
Cement
Cement is used as a stabilizer mainly because of its bonding
properties. As such it provides strength to the block and prevents
softening when the block is exposed to moisture. The soil
composition will determine how much is needed to provide the
optimum stabilization. Soils with high clay and silt content may
require cement stabilizer equal to 20 percent of the dry weight
of the soil. Only 5 to 6 percent may be needed for sandy loams.
Economical use of cement as stabilizer depends on the soil texture.
If soil requires large amounts of cement it can be combined
with less costly lime. Lime can be substituted for half the
amount of cement required.
Lime
Lime is the most popular stabilizer used in developing countries.
It is much less expensive and more available then cement. Lime is
both a waterproofer and a binder. It is greatly enhanced when
used in combination with cement. In addition, lime loosens clay
particles for easy mixing.
Some precautions must be taken when using lime as a stabilizer.
If quicklime (*) is used, it is necessary to slake (combine with
water) it first. Adobe blocks stabilized with lime or cement
require slow curing. Some moisture added during the drying process
keeps the block from drying out too quickly.
A final note: stabilizers must be thoroughly mixed into the soil
to ensure contact with soil particles; otherwise their effects
are greatly reduced. Regardless of the stabilizer selected, it is
always recommended to seek the advice of a specialist when available.
III. PRODUCTION OF THE BLOCKS
EQUIPMENT
The equipment needed for block making includes: wheelbarrows and
ua1x7z.gif (486x486)
shovels to provide a supply of soil; a hopper for measuring soil;
the mixer; a water hose, pails, etc., for handling water and
stabilizer; wheelbarrows for hauling mud to the molding areas;
---------------------
(*)Quicklime is calcium oxide, limestone that is burnt (calcined)
in a kiln at a temperature of 900-1100 [degree]C; it must be handled with
great care because it burns the skin if you touch it.
and wood or metal molds. At the molding area, a brush and pail of
water for cleaning the molds and a rake for smoothing the molding
bed will be needed.
Additional equipment may be needed for more efficient production.
Experience will determine what is needed to improve production.
MIXING THE ADOBE
Select a large level area for mixing, molding, and curing the
adobe. Clear and level an area if necessary. Ideally, block
making should be done as close as possible to the construction
site. Mixing can be done in a mixing and soaking pit, shown in
Figure 2. The pit can be made as large as the adobe maker desires.
ua2x8.gif (486x486)
Its dimensions can vary but a good depth is about one
foot. The deeper the pit below ground level, the harder it is to
mix the mud. More than one pit can be used and can be located at
convenient points.
A wide variety of techniques can be used for mixing, including
the use of shovels and hoes, tractor wheels, the feet of humans,
and the hooves of domestic animals (e.g., goats, oxen, horses).
If after mixing the contents appear lumpy (like flour in gravy)
and resist efforts to make a smooth mix, let the mixture soak
overnight in the pit. Each successive day's batch should also be
soaked overnight.
MOLDING BLOCKS
Various sizes of adobe blocks are made to accommodate the prearranged
dimensions of the walls and the block mold can be built
to the desired dimensions. Regardless of the needed size, the
maximum outside dimension of the block mold should not exceed
81.3 centimeters (32 inches).
The average weight of an adobe block with a volume of .009 cubic
meter (one-third cubic foot) is 16.8 kilograms (37 pounds).
Figure 3 illustrates the various types of molds that can be
ua3x8.gif (486x486)
constructed. Note the end handles in the drawing on the right.
For more efficient production by one worker, a gang form that
will mold eight .009 cubic meter (one-third cubic foot) adobe
blocks that are 25.4 centimeters x 10.2 centimeters x 35.6 centimeters
(10 inches x 4 inches x 14 inches) can be used. A larger
form will require two people to manage it. Two adobe molders can
manage a sixteen-block mold. Whether two people are working or
one, two forms should be made, one for soaking, the other for
molding. For long-term production, line the inside walls of the
form with tin. Handles can be constructed on the mold by extending
the ends of two opposite sides (see Figure 3).
The mold should be thoroughly soaked before putting the adobe
mixture into it. Soaking will keep soil particles from sticking
to the inside of the mold, make the block easier to remove, and
help ensure a smooth finished block.
Two adobe molders are best for a smooth, rhythmic operation. The
molders place the mold at the prepared level site. The adobe mud
is carefully dumped from a wheelbarrow or other container into
the mold compartments. The mud is then filled into the corners
and edges of the mold.
The molders usually use their hands to work the mud gently but
firmly into all parts of the mold.
The excess mud on top is removed by hand or with a straight-edged
piece of wood or other rigid material. Next, the now level surface
is made smooth. (If the block is too wet, water will form on
its surface). Even and level distribution of the mud is needed
for quality blocks. Rough or unlevel top surfaces and nicks in
the corners cause cracks to develop during drying.
The mold is removed by slowly and evenly lifting the mold upwards
from the level ground surface away from the blocks. After the
mold has been removed, the surface is again made smooth.
The process is repeated over again by moving the mold to the next
molding location, which should be as close as possible to the
previously finished blocks. Mud is brought to fill the mold and
the same steps are followed.
The cleaning of molds and tools during block manufacturing,
especially at the end of the work day or before work breaks,
helps to ensure good quality blocks.
In molding the blocks, the following points should be kept in
mind:
1. A team of two molders supplied with properly mixed adobe can
produce 1,000 25.4 centimeters x 10.2 centimeters x 35.6
centimeters (10 inches x 4 inches x 14 inches) blocks per
day. This size block is .009 cubic meter (one-third cubic
foot) and is optimum in terms of wall strength, weight, and
insulation. It weighs 15.9-18.1 kilograms (35-40 pounds).
2. A portable cement mixer can supply four or five molding
teams with mud.
3. Molding teams need to develop an evenly paced work rhythm.
4. Wooden molds should be soaked in water before each day's use.
Moistened molds produce smooth blocks that are less
likely to crack.
5. Adobe mud should be wet enough to be worked into the mold's
corners and angles. Mud that is too wet will run out of the
bottom of the mold.
6. Mixed mud will dry on its surface if left standing. Mud
should not be left in wheelbarrows or mixers for long periods
of time or in direct sunlight. The mixture should be
covered to keep it from drying out before it can be worked.
7. Workmanship always improves with practice.
DRYING AND CURING BLOCKS
The relatively long drying time requires a large site undisturbed
by traffic, etc. While the adobe block mold is moist, it is
placed on a layer of building paper or other flat, smooth substance.
If building paper is not available, blocks can be placed
on a thin layer of sand. The width of the paper or flat surface
should be at least as large as the dimensions of the mold. The
clean level area prevents undesirable elements from becoming
embedded in the wet adobe, as well as excessive breakage or
malformation.
The drying area should be close to the mixing site to provide
easy access to needed material. The first row of blocks should be
placed at the farthest point from the mixing area. Advance determination
of a location for drying will save steps, time, and
energy.
On very hot days in direct sunlight, rapid drying occurs and
blocks may crack. Paper, leaves, straw, and similar coverings
placed on the drying blocks will prevent cracks due to quick
drying.
The blocks should be dried for 14 days. After several days of
drying, the blocks can be carefully placed on end (their edge) to
dry more uniformly.
Warning: rain will quickly destroy unstabilized blocks that are
unprotected during this drying time. Stabilized blocks are not as
easily damaged by normal rains.
A hot, dry period is most favorable for curing. Dry seasons are
ideally suited for production. Under these conditions, only seven
to 10 days are normally needed for drying. Asphalt-stabilized adobe
requires more time to dry than untreated adobe.
The blocks should not be moved more than necessary. Before moving
blocks, determine whether they are ready by testing several.
Break the blocks in half and examine their centers for dryness.
STORAGE OF BLOCKS
The adobe blocks must be stacked on end to minimize erosion. If
the blocks are laid flat, they will break of their own weight.
They should be placed on edge, against a center pillar, and
stacked not more than three or four rows high (see Figure 4).
ua4x11.gif (486x486)
Some bottom blocks can be expected to break, and should be allowed
for. Should the stack be left for any period of time, it
should be protected with a waterproof covering.
IV. CONCLUSION
Making durable adobe blocks efficiently and economically requires
careful Planning and organization. Site selection, in particular,
should be given careful consideration. After the planning phase
is completed, the preliminary work consists of selecting, digging,
grading, and mixing the soil. Some critics of adobe point
to the fact that adobe is labor intensive. This criticism is
correct, especially when basic equipment like a hoe is used for
mixing the soil. There are, however, many appropriate technologies
that can cut labor and improve the quality of the block.
VITA can provide valuable technical bulletins on how to make a
Buck Scraper, Fresno Scraper, and Barrel Fresno Scraper. (*) The
Fresno scraper and barrel Fresno scraper (which can be powered by
oxen or horses) move large quantities of soil from the digging
area to the block-making site. A fourth VITA publication, How to
Get Waterproofing Substances from Plants (formerly Waterproofing
Soil Construction), helps the adobe user identify and tap local
trees and other plant materials for their waterproofing substances.
A more sophisticated but durable block made of earth with cement
or other stabilizer added is described in Making Building Blocks
with the CINVA-Ram Block Press. This VITA publication provides
detailed step-by-step instructions with illustrations on how to
use the portable block press. Included is a list of CINVA-Ram
distributors. See also VITA Technical Paper #2, Understanding
Stabilized Earth Construction.
-------------------
(*)These technical bulletins are also included in the VITA publication,
Village Technology Handbook, April 1978.
BIBLIOGRAPHY/SUGGESTED READING LIST
Articles
Tibbets, Joe. "The Pressed Earth Block Controversy,' Adobe Today,
No. 37, pp. 24-27 (undated).
"Adobe Brick," Mineral Information Service. Vol. 12. No. 7. Sacramento,
California: State of California, Division of
Mines, 1959.
Manuals and Handbooks
Action Peace Corps. Handbook for Building Home's of Earth. Washington,
D.C.: Department of Housing and Urban Development.
(undated)
Adobe Craft. Building Your Adobe Home. Pre-publication draft.
Castro Valley, California: Adobe Craft, 1976.
Fitzmaurice, Robert. Manual On Stabilized Soil Construction. New
York, New York: United Nations, 1958.
Groben, Ellis W. Adobe Architecture: Its Design and Construction.
Seattle, Washington: The Shorey Book Store, 1975.
International Institute of Housing Technology. The Manufacture of
Asphalt Emulsion Stabilized Soil Bricks. Fresno, California:
California State University, 1972.
National Bureau of Standards. Methods for Characterizing Adobe
Building Materials. Washington, D.C.: National Bureau of
Standards, 1978.
Newbauer, L.W. Adobe Construction Methods. Berkeley, California:
Agricultural Publications, 1964.
Salvadorean Foundation for Development and Low Cost Housing Research
Unit. Stabilized Adobe. Washington, D.C.: Organization
for American States, (undated).
U.S. Department of Agriculture. Building with Adobe and Stabilized
Earth Blocks. Washington, D.C.: United States Department
of Agriculture, 1972.
U.S. Department of Housing and Urban Development. Earth and Homes.
Washington, D.C.: Housing and Urban Development, 1970.
Reports and Papers
Kimmons, G.; Fern, R.L.; and Matleson, R. Asphalt Stabilized
Building Blocks." (unpublished, but available from VITA),
1968.
Lunt, M.G. Stabilized Soil Blocks for Building. Garston, Watford,
England: Building Research Establishment, 1980.
Maginnis, Howard. The Classification of Soil Construction for
Architectural Use. St. Louis, Missouri: Washington University,
1970.
Whittlemore, Herbert L.; Stang, Ambrose; Hubbel, Elbert; and
Dill, R. Building Materials and Structures: Structural, Heat-Transfer,
and Water Permeability Properties of Five Earth-Wall
Constructions. Washington, D.C.: National Bureau of
Standards, 1941.
VITA Publications
Volunteers in Technical Assistance. How to Get Waterproofing
Substances from Plants. Arlington, Virginia: VITA, undated).
(Although this publication is out of print, a photocopy
may be obtained by special request to VITA's Information
Service.)
Volunteers in Technical Assistance. Making Building Blocks with
the CINVA-Ram Block Press. Arlington, Virginia: VITA, 1975.
Volunteers in Technical Assistance. Village Technology Handbook.
Arlington, Virginia: VITA, 1978.
Volunteers in Technical Assistance. Understanding Stabilized Earth
Construction. Arlington, Virginia: VITA, 1984.
APPENDIXES
APPENDIX A
Field Method for Identification of Soil Texture
Soil Visual Detection of Particle Squeezed in Hand and Soil Ribboned
Texture Size and General Appearance Pressure Released Between Thumb and
of the Soil Finger when Moist
When Air When
Dry Moist
Sand Soil has a granular Will not Forms a Cannot be
appearance in which form a Which ribboned.
the individual cast and will
grain sizes can be will fall crumble
detected. It is apart when when
free-flowing when pressure is lightly
in a dry, condition. released. touched.
Sandy Essentially a granular Forms a Forms a Cannot be
Loam with sufficient silt and cast cast ribboned.
clay to make it somewhat which which
coherent. Sand readily will
characteristics falls apart bear
predominate. when careful
lightly handling
touched. without
breaking
Loam A uniform mixture of sand, Forms a Forms a Cannot be
silt and clay. Grading of cast cast ribboned.
sand fraction quite uniform which which
from coarse to fine. It is will can be
mellow, has somewhat gritty, bear handled
feel, yet is fairly, smooth careful freely
and slightly plastic. handling without
without breaking
breaking
Silt Contains a moderate amount of Forms a Forms a Will not
Loam the finer grades of sand and cast cast ribbon
only a small amount of clay which which but has
- over half of the particles can be can be a broken
are silt. When dry it may freely freely appearance,
appear quite cloddy; can handled. handled. feels
readily be broken and Pulverized When wet, smooth, and
pulverized to a powder. it has a soil may be
soft runs slightly
flour-like together plastic.
feel. and
puddles.
APPENDIX A--Continued
Soil Visual Detection of Particle Squeezed in Hand and Soil Ribboned
Texture Size and General Appearance Pressure Released Between Thumb and
of the Soil Finger when Moist
When Air When
Dry Moist
Silt Contains over 80% of silt Forms a Forms a It has a tendency
particles with very little cast cast to ribbon with a
fine sand and clay. When which which broken
dry, it may be cloddy; can be can be appearance, feels
readily pulverizes to handled handled. smooth.
powder with a soft without When
flour-like feel. breaking. wet, it
readily
puddles.
Clay Fine textured soil breaks Forms a Forms a Forms a thin
Loam into hard lumps when dry. cast cast which readily
Contains more clay than which which breaks, barely
silt loam. Resembles clay can be can be sustaining its
in a dry condition. handled handled own weight.
Identification is made without freely
on physical behaviour breaking. breaking.
of moist-soil. It can be
worked
into a
dense
mass.
Clay Fine textured soil breaks Forms a Form a Forms long thin
into very hard lumps when cast cast flexible
dry. Difficult to pulverize which which ribbons. Can be
into a soft flourlike can be can be worked into a
powder when dry. freely handled dense compact
Identification based on handled freely mass.
cohesive properties without without Considerable
of the moist soil. breaking. breaking. plasticity.
Organic Identification based on the high organic content. Muck consists of thoroughly
Soils decomposed organic material with considerable amount of mineral soil finely
divided with some fibrous remains. When considerable fibrous material is
present, it may be classified as peat. The plant remains or sometimes the
woody structure can easily be recognized. Soil colour ranges from brown to
blacks. They occur in lowlands in swamps or swale, They have high shrinkage
upon drying.
APPENDIX B
Recommended Standards and Methods of Testing for Construction Related Applications of Adobe
Standard
1. SOIL:
a) Sufficient clay to bind particles (approx. 15%)
(Not less than 25% or more than 45% silt-clay.
Clay and silt are defined as particles which
will pass through a #200 mesh sieve.) Balance
to be made up of "hard particle" material such
as sand, crushed rocks, decomposed granite etc.
not to exceed more than approximately 1/4 [inches] in
diameter.
b) Minimize effects of soluble salts upon bonding
of asphalt film to soil particles.
Soil mix shall not contain more than 0.2% soluble
salts.
2. MOISTURE RESISTANCE: Soil stabilizer to be used.
a) Absorption: Shall not be greater than 2 1/2% of
dry weight in seven days. Average of five
4 [inches] sections cut from each of 5 bricks.)
b) Moisture Content: not to exceed 4% by weight.
c) Erosion: (average of three bricks)
Average less than 1/16 [inches] with no significant
pitting.
3. SHRINKAGE: (average 5 blocks, top surface approx.
1 sq. ft.)
Not more than three cracks, maximum of 3 [inches] long
and 1/8 [inches] wide.
Method of Testing
Fill tall glass jar or cylinder to about 1/3 capacity
with sample of pre-mixed soil. Add water to about 2/3
capacity of container. Shake thoroughly and let stand
for about 15 minutes. Particles will separate themselves
in the following order: (top to bottom)
Clay
Silt
Fine sand
Medium sand
Coarse sand or small gravel-rock
Mix soil and water samples. Filter through filter paper.
Test filtrate with PH paper. Rating of 7 or less is
satisfactory.
State Specification Mixing Grade Asphalt Emulsion SS-1 or
SSlH to be used, Mix one part asphalt emulsion with approximately
4 parts water. To this stir in soil sample. Mold
and dry block.
Dry sample block to constant weight in oven at 140 [degrees] F,
After cooling to room temperature place on constantly
saturated porous surface enclosed in moist cabinet.
Weight gain is percentage of dry weight.
Using field run samples weigh and follow procedure above.
Dry to constant weight and calculate weight loss.
Direct spray from standard 4 [inches] shower head, 20 lbs.
pressure, horizontally against adobe surface for two
hours. Slight erosion or pitting is not considered
unfavorable.
Visual inspection. Adapt this principle as appropriate
to smaller or larger surfaces being tested, e.g. coursed,
poured or sprayed surfaces.
------------------
(*)Condensed and adapted from:
Uniform Building Code sections on "Unburned Clay Masonry" and ASTM
Manual Designator E-72 - 74a "Standard Methods for Conducting Strength
Testing of Panels for Building Construction"
psi = pounds per square inch
lbs.= pounds
APPENDIX B--Continued
Method of T e s t i n g
Standard
Block Samples Panel Samples
4. STRENGTH: Average of five blocks: Wall panel 4 [feet]
x 8 [feet] (or
appropriate reduced
scale model)
a) Compressive Strength: Average of 300 psi Compressive Load Test:
Capability of with tolerance of
supporting vertical 250 psi for one
loads. block in five.
b) Flexion: Modulus of Rupture: Wall Panel 4 [feet]
Capability of Average of five x 8 [feet] (or
resisting blocks= not less appropriate reduced
lateral forces than 50 psi with scale model)
tolerance of 30 psi Transverse Load Test:
for one block in five.
Impact Load Test:
c) Shear:
Capability of Wall panel 8 [feet]
resisting earth x 8 [feet] (or
movements such appropriate reduced
seismic (earthquake) scale model)
forces.
Racking (shear)
Load Test:
uax19a.gif (437x437)
uax19c.gif (353x353)
uax19b.gif (437x437)
uax19d.gif (437x437)
uax19e.gif (437x437)
uax19f.gif (432x432)
5. TEST SAMPLES: one unit of adobe (block or wet mix) to be tested for
each 1000 units used in construction.
6. MORTAR: To bond and seal joints, 1 shovel cement, 2 shovels adobe
soil, 3 shovels sand, 1 pint asphalt stabilizer, 4+ pints water
APPENDIX C
Mortar for Adobe Brick
Mortar must provide a strong bond between bricks and must resist the
forces of vibration, violent windstorm, contraction due to temperature changes
and earthquake. The mortar must be at least as strong as the bricks it binds.
Complete safety from nature's violence is not possible, but high quality
workmanship and construction practice go far in reducing the effects of these
forces.
Properly designed and constructed footings and foundations, proper use of
pilasters, reinforcing, lintels, and the proper size and shape of quality bricks
along with the necessary quality of workmanship are of utmost importance in
the construction of a sound, safe adobe building.
Lime or clay is used in mortar to obtain plasticity, workability, and
water-holding capacity. On burned brick, tile, and cement block, mortars
containing lime seem to bond better, while mortars containing fireclay tend to
shrink and cause cracking. On asphalt stabilized adobe brick, lime tends to
cause deterioration of the asphalt which results in reduced adhesion to asphaltstabilized
bricks, particularly when subjected to cycles of wet and dry weather.
In very dry climates where moisture resistance is not an important consideration,
lime-cement mortar should be satisfactory. Good mortar requires proper
materials of good quality, properly mixed.
Adobe bricks should be laid with full bed and head joints 1/2 inch thick.
This is necessary to obtain the most strength and moisture resistance possible.
The bed joint should be spread thick and not furrowed. This will assure a full
joint without voids. Joints should be finished with a trowel or pointing tool for
appearance and watertightness. Without good workmanship the full advantages
of stabilized adobe bricks cannot be realized.
Cement Mortar 1 cement, 2 1/2-3 sand (by volume), 1 1/2 gallon
asphalt emulsion per sack of cement
Cement-lime Mortar 1 cement, 1 hydrated lime, 4 sand
Cement-soil Mortar 1 cement, 2 soil (use same soil bricks are made
from), 3 sand, 1 1/2 gallon asphalt emulsion per
sack of cement
Mixing Procedures
1. Mix dry ingredients thoroughly.
2. Add water to stiff consistency.
3. Add emulsion - continue thorough mixing.
4. Use additional water to proper consistency. Mortar should work easily,
slide from trowel.
Adobe Mortar The same mixture as the bricks are molded from
should be used.
Good soil containing about 15% clay and 85% sand stabilized with 5% asphalt
emulsion or its equivalent of RC2 road oil can be used. This mortar is slow-curing
and requires working around the building, laying no more than 2-3 courses and
allowing adequate drying time. Extra sand may be needed if shrinkage in the
mortar occurs. Soil which makes good bricks should make good mortar.
Use of RC2 as a Substitute for Asphalt Emulsion
When using RC2 in mortar, the amount required is much less than the amount
of asphalt emulsion. The proportion should be 1 cement, 2 soil, 3 sand, 2-3
quarts RC2 per sack of cement for cement-soil mortar or 1 cement, 2 1/2-3 sand
and 2 quarts RC2 per sack of cement for cement mortar.
A slurry of soil, RC2 and water may be pre-mixed and added to dry ingredients.
Continue thorough mixing and addition of water to proper consistency. Thorough
mixing is essential to provide a waterproof mortar. RC2 requires even more care
in mixing than does asphalt emulsion.
To make the slurry, mix about 5 shovels full of soil and enough water to form
a sloppy wet mud. Add 2 quarts (4 pounds) RC2. Mix thoroughly. This will make
a stiff sticky mixture. Continue mixing and add water to make 5 gallons total
volume. This is enough stabilizer to mix with 1 sack of cement and can be proportioned
into batches of lesser amounts easily. The slurry breaks the RC2 into
small particles and distributes the relatively small amount of RC2 into the mixture
more evenly. When only part of the slurry is used and the remainder allowed to
stand for any length of time it must be stirred carefully before use.
APPENDIX D
English and Metric Conversion Factors
Multiply By To Obtain
Centimeters ..............................0.3937 ....................Inches
Centimeters ..........................0.01 ......................Meters
Centimeters ..........................10 ........................Millimeters
Cubic Centimeters ........................3.531 x [10.sup.5] ........Cubic feet
Cubic centimeters ....................6.102x [10.sup.2] .........Cubic inches
Cubic centimeters ....................[10.sup.6] ................Cubic meters
Cubic centimeters ....................1.308x [10.sup.6]..........Cubic yards
Cubic centimeters ....................2.642x [10.sup.4]..........Gallons
Cubic centimeters ....................10 [10.sup.3] .............Liters
Cubic centimeters ....................2.113x [10.sup.3] .........Pints (liquid)
Cubic centimeters ....................1.057x [10.sup.3] .........Quarts (liquid)
Cubic Feet ...............................2.832x [10.sup.4] .........Cubic centimeters
Cubic feet ...........................1728 ......................Cubic inches
Cubic feet ...........................0.02832 ...................Cubic meters
Cubic feet ...........................0.03704 ...................Cubicyards
Cubic feet ...........................7.48052 ...................Gallons
Cubic feet ...........................28.32 .....................Liters
Cubic feet ...........................59.84 .....................Pints (liquid)
Cubic feet ...........................29.92 .....................Quarts liquid)
Cubic inches .............................16.39 .....................Cubic centimeters
Cubic inches .........................5.787x [10.sup.4] .........Cubic feet
Cubic inches .........................1.639x [10.sup.5] .........Cubic meters
Cubic inches .........................2.143x [10.sup.5] .........Cubic yards
Cubic inches .........................4.329x [10.sup.3] .........Gallons
Cubic inches .........................1.639x [10.sup.2] .........Liters
Cubic inches .........................0.03463 ...................Pints (liquid)
Cubic inches .........................0.01732 ...................Quarts (liquid)
Cubic Meters .............................[10.sup.6] ................Cubic centimeters
Cubic meters .........................35.31 .....................Cubic feet
Cubic meters .........................61,023 ....................Cubic inches
Cubic meters .........................1.038 .....................Cubic yards
Cubic meters .........................264.2 .....................Gallons
Cubic meters .........................[10.sup.3] ................Liters
Cubic meters .........................2113 ......................Pints (liquid)
Cubic meters .........................1057 ......................Quarts (liquid)
Cubic Yards ..............................7.646x [10.sup.5] .........Cubic centimeter
Cubic yards ..........................27 ........................Cubic feet
Cubic yards ..........................46,656 ....................Cubic inches
Cubic yards ..........................0.7646.....................Cubic meters
Cubic yards ..........................202.0 .....................Gallons
Cubic yards ..........................764.6 .....................Liters
Cubic yards ..........................1616 ......................Pints (liquid)
Cubic yards ..........................807.9 .....................Quarts (liquid)
Feet .....................................30.48 .....................Centimeters
Feet .................................12 ........................Inches
Feet .................................0.3048 ....................Meters
Feet .................................1/3 .......................Yards
Gallons ..................................3785 ......................Cubic centimeters
Gallons ..............................0.1337 ....................Cubic feet
Gallons ..............................231 .......................Cubic inches
Gallons ..............................3.785x [10.sup.3] .........Cubic meters
Gallons ..............................4.95lx [10.sup.3] .........Cubic yards
Gallons ..............................3.785 .....................Liters
Gallons ..............................8 .........................Pints (liquid)
Gallons ..............................4 .........................Quarts (liquid)
Gallons, Imperial ........................1.20095 ...................U.S. Gallons
Gallons, U.S .........................0.83267 ...................Imperial Gallons
Gallons Water ............................8.3453 ....................Pounds of water
Grams ....................................0.03527 ...................Ounces
Grams ................................2.205x [10.sup.3] .........Pounds
Grams/Cu. Cm. ............................62.43 .....................Pounds/cubic foot
Grams/Cu. cm .........................0.03613 ...................Pounds/cubic inch
Inches ...................................2.540 .....................Centimeters
Liters ...................................[10.sup.3] ................Cubic centimeters
Liters ...............................0.03531 ...................Cubic feet
Liters ...............................61.02 .....................Cubic inches
Liters ...............................[10.sup.3] ................Cubic meters
Liters ...............................1.308x [10.sup.3] .........Cubic yards
Liters ...............................0.2642 ....................Gallons
Liters ...............................2.113 .....................Pints (liquid)
Liters ...............................1.057 .....................Quarts (liquid)
Meters ...................................100 .......................Centimeters
Meters ...............................3.281 .....................Feet
Meters ...............................39.37 .....................Inches
Meters ...............................[10.sup.3] ................Kilometers
Meters ...............................[10.sup.3] ................Millimeters
Meters ...............................1.094 .....................Yards
Pounds ...................................16 ........................Ounces
Pounds ...............................0.0005 ....................Tons (short)
Pounds ...............................453.5924 ..................Grams
Pounds of Water ..........................0.01602 ...................Cubic feet
Pounds of water ......................27.68 .....................Cubic inches
Pounds of water ......................0.1198 ....................Gallons
APPENDIX E
Finishes For Asphalt-Stabilized Adobe Brick Walls and Specifications
Wall Finishes
Exterior or interior walls shall be left unfinished, or smoothed and washed, or given
a transparent protective seal coat, or painted, as designated for each job.
1. Smoothing and Washing -- The wall surface shall be cleaned by wetting and rubbing smooth
with wet burlap, then washing.
2. Paint Coat, Prime Coat, Transparent Sealer --
a. Paint. The following paints are satisfactory when applied on
emulsified asphalt treated soil brick dry surfaces to serve as
finish paint coat, exterior or interior. No prime coat is required.
Caladium Paint, made by Bishop-Conklin, Los Angeles, California,
distributed by "Treasure Tones," dealers in various cities.
Gelvatex Exterior or interior Paint, made by Gelvatex Coatings
Corporation, sales offices at Oakland and Los Angeles, California.
b. Asphalt Base Aluminum Prime. After the walls are smoothed and
cleaned (1) and are thoroughly dry, a good grade of asphalt base
aluminum paint, formulated with drying oils, shall be used as prime.
When the coating is dry, one or more coats of a good grade of exterior
or interior paint may be applied. (Note: Aluminum paint is not
recommended to be applied during wet seasons, or on walls when damp.
When wall is damp, use instead cement wash, paragraph c. below.)
c. Cement Wash. The clean wall surface shall be wetted, then primed
with a cement wash consisting of one sack of medusa or equal White
Cement mixed with about six gallons of water to a paint consistency,
applied by vigorous brushing. After initial set, the prime coat shall
be fogged with water several times daily for five or six days, until
the cement is fully set and hardened.
A second application of cement wash, tinted with pigment if desired, may be applied as final
coat; or after setting, the cement-primed surface may be painted with a good grade of exterior
or interior paint. (Cement wash coats are best applied when damp; cloudy weather aids
moist curing.)
1Chevron Research Company. The Manufacture And Use Of Asphalt Emulsion
Stabilized Adobe Bricks. April 16. 1963 (Mimeographed)
d. Transparent Protective Sealer. A nonglossy protective finish,
not altering natural color of the bricks, may be obtained by applying
on the clean wall surface Caldotone Rubberized Transparent Sealer, made
and sold by Caldow Paint Company, Oakland, California. The sealer is
made for exterior or interior use.
e. Linseed Oil, For interior Finish Only. For harder, tougher interior
surfaces a prime coat or a transparent protective seal coat may be
provided by painting with raw linseed oil (imparting to the brick
surface a richer, darker color). When used as prime coat, allow to
cure thoroughly, at least two weeks, then paint with 50% raw linseed
oil, 50% "50-50 Du Pont Paint."
3. Plaster. Expanded metal lath or 1-inch 18-gage galvanized wire shall
be fastened to the walls with furring nails driven into the bricks. Cement
stucco or hardwall plaster is then applied in scratch, brown, and finish
coats according to standard practice.
========================================
========================================