TECHNICAL PAPER # 13
UNDERSTANDING CLAY RECOGNITION
AND PROCESSING
By
Miska Petersham
Technical Reviewers
Daniel Rhodes
Gerald Rowan
VITA
1600 Wilson Boulevard, Suite 500
Arlington, Virginia 22209 USA
Tel: 703/276-1800 . Fax: 703/243-1865
Internet: pr-info@vita.org
Understanding Briquetting
ISBN: 0-86619-233-6
[C]1984, Volunteers in Technical Assistance
PREFACE
This paper is one of a series published by Volunteers in Technical
Assistance to provide an introduction to specific state-of-the-art
technologies of interest to people in developing countries.
The papers are intended to be used as guidelines to help
people choose technologies that are suitable to their situations.
They are not intended to provide construction or implementation
details. People are urged to contact VITA or a similar organization
for further information and technical assistance if they
find that a particular technology seems to meet their needs.
The papers in the series were written, reviewed, and illustrated
almost entirely by VITA Volunteer technical experts on a purely
voluntary basis. Some 500 volunteers were involved in the production
of the first 100 titles issued, contributing approximately
5,000 hours of their time. VITA staff included Leslie Gottschalk
and Maria Giannuzzi as editors, Julie Berman handling typesetting
and layout, and Margaret Crouch as project manager.
Miska Petersham, the author of this VITA Technical Paper and a
second one, "Understanding The Small-Scale Clay Products Enterprise,"
has worked in the field of ceramics for many years. He
is also a designer in glass and wood and a wood carver, and has
considerable experience in these fields in developing countries.
Reviewers Daniel Rhodes and Gerald Rowan are also experts in clay
and ceramics. Daniel Rhodes is a professor emeritus at Alfred
University, New York, in ceramics. He is the author of four books
on ceramics, and has experience with pottery design, glazes,
kilns, molds, clay refining, etc. Gerald Rowan is the chairman
of the art department at Northampton Community College, Pennsylvania.
He has a wide knowledge of ceramics, clay, brick making,
kiln building, glazes, owner made equipment, etc.
VITA is a private, nonprofit organization that supports people
working on technical problems in developing countries. VITA offers
information and assistance aimed at helping individuals and
groups to select and implement technologies appropriate to their
situations. VITA maintains an international Inquiry Service, a
specialized documentation center, and a computerized roster of
volunteer technical consultants; manages long-term field projects;
and publishes a variety of technical manuals and papers.
UNDERSTANDING CLAY RECOGNITION AND PROCESSING
By VITA Volunteer Miska Petersham
I. ABOUT CLAY IN GENERAL
Clay occurs naturally almost everywhere in the world and is
formed by the action of weathering on several kinds of rocks.
This process takes many thousands of years, but it happens wherever
the rocks are exposed to the natural forces of wind, water,
frost, etc. The rocks change very slowly in both physical and
chemical ways. Physically, they break down into smaller and
smaller bits; chemically, elements are added and taken away.
After a long, long time, some of the rock changes to clay. The
longer the geological period of time, the more clay is formed.
There are several different kinds of clay minerals and most clay
deposits contain more than one kind. "Clay" is the general term
that is used for all the clay minerals. Some of these clay minerals
or clays are of greater use to the potter than others. It
takes difficult laboratory tests to determine just which clay
minerals are present in a particular clay. As practical potters,
however, we are more concerned with how the clay works in use,
rather than exactly what is in it.
All of these clay minerals are a variation of the one called Kaolin.
Kaolin is the most pure and is a hydrous silicate of alumina.
This means that it contains aluminium oxide, silicon oxide,
and water linked chemically. The other clay minerals often contain
more water and also have some impurities, such as potassium,
sodium, etc.
Clays are made up of many small, flat particles. The size of
these particles affects the way the clay behaves. If the clay has
been carried long distances by water, the particles are smaller
and smoother so that the resulting clay is usually more plastic.
In a very simplified way, Figures 1 through 7 show what happens
ucr1x20.gif (600x600)

when wet clay is dried. The clay particles and water molecules
are actually too small to be seen, except in a special microscope.
-----------------------
Note: Terms in bold face are defined in the glossary in the back
of this paper.
When clay is fired at 800 degrees Centigrade or more, it will no
longer slake (absorb water) but remains hard and permanent because
of the glass that is formed.
The most common clay minerals are Kaolin, Illite, Montmorillonite,
and Halloysite (or disordered Kaolin).
Clays from the temperate zones are weathered slowly from feld-spathic
rock, which is common in these areas. Because these clays
have been slowly weathered, they tend to consist of the more
stable clay minerals (Kaolin) and to be uniform in content. Thus,
temperate clays are most often Kaolin alone or with small additions
of Illite and/or Montmorillonite. Owing to the longer geological
time period, temperate clays are often transported long
distances by water, thereby collecting impurities and being
ground finer. Temperate clays, therefore, represent a rather
orderly progression from pure Kaolin, weathered on site (primary)
to common surface clays carried long distances by water (secondary).
Table 1 presents some well-known kinds of temperate clay.
Table 1. Some Established Categories of Temperate Clays
Firing Degrees
Transfer Material Color Plasticity Term Centigrade
None to Short Kaolin White Low High 1300 - 1400
Short to Long Ball Clay Buff-White High Medium 1250 - 1300
High
Medium to Fire Clay Buff-Gray Med Medium 1250 - 1300
Short High
Long Earthenware Buff-Red High High 1000 - 1100
Tropical clays are of volcanic origin and are quite different.
They are weathered relatively quickly because of the high heat,
humidity, and acidic-conditions. Because of the shorter geological
period and less movement physically, they are often a mixture
of several clay minerals. These usually are the less stable ones.
The clays are younger and contain more Illite, Montmorillinite,
and Holloysite in relation to Kaolin. Tropical clay deposits vary
greatly in constituents and physical characteristics over
short distances. They do not show the orderly progression of temperate
clays because the mixtures are more varied, and travel-mixing
has seldom taken place. Almost all contain iron as a basic
constituent, since the parent rock is largely basaltic, with a
high iron content. They also often contain a high proportion of
parent rock.
Tropical clays have maturing temperatures of from under 1000 degrees
Centigrade to over 1400 degrees Centigrade; that for most
falls between 1100 degrees Centigrade and 1200 degrees Centigrade.
Plasticity is often medium to high, owing to the presence
of Montmorillonite. Shrinkage is high and the color is usually
dark buff to red. It is impractical to relate them to temperate
clay categories or to seek a pattern by which to set up a local
category system.
II. USING TROPICAL CLAYS
Due to the presence of clay minerals other than Kaolin, there is
excess chemical water in the clay. This water is given off at
different temperatures depending upon the minerals present; some
can be given up as late as 1000 degrees Centigrade. The water is
often released rather suddenly causing potential problems. For
best results:
* Dry pots slowly and evenly.
* Fire bisque slowly up to 1000 degrees Centigrade. Stack pots
rim up. Do not stack pots inside or on top of each other.
* Shrinkage is high and, therefore, any temperature gradient
causes warpage. High iron content causes excess shrinkage
where reduction occurs or where flames touch. High iron content
can also cause bloating.
To prevent excess shrinking or warping:
* Shape must be structurally sound.
* Maintain a clean, even firing cycle (oxidation only).
* Protect pots from flame.
With a slow, clean firing, most tropical clays fire to a reasonable
hardness and can be glazed successfully. It is very difficult
to reduce absorption below 5 to 10 percent without causing
slumping.
Thermal shock resistance of tropical clays is good to excellent.
With sand or grog added, most tropical clays can be brush- or
pit-fired (approximately 800 degrees Centigrade) without excessive
loss. The resulting pottery is rather soft and, therefore,
works well as cook pots or on an open fire. Brush-fired clay does
not travel well, due to its fragility, but works for stove linings,
water filters, cook pots, small decorative items, bricks,
etc. If the firing temperature is too low (under 700 degrees Centigrade),
the fired pot will eventually crumble if exposed to water.
When fired at over 1000 degrees Centigrade, most of the clays become
much more durable. A 1000 degrees Centigrade fire is a
bright red orange color. To reach 1000 degrees Centigrade or
over, it is necessary to construct a kiln to contain the heat.
Excessive shrinkage can be reduced by adding as much silica sand
or grog as can be added and still use the clay. Maturing temperature,
plasticity, and absorption can be changed by blending with
other clays. For example, to lower absorption, add a clay with a
lower maturing point, talc, feldspar, or ground glass. To increase
plasticity, age as long as possible (minimum one week),
blend with more plastic clay, or add a small amount of bentonite.
Bentonite is mostly Montmoillonite and is highly plastic. Do not
use over 5 percent. To decrease plasticity, blend with a short
clay or add sand or grog; this also helps to prevent cracking.
Never use beach sand. It is calcium carbonate and turns to lime
in the heat. This will destroy the pot. Instead, use silica sand,
river sand or any inland deposit not associated with the ocean,
shells, or coral.
Grog is ground up, fired clay, usually broken pots from the fire.
Never use glazed pieces. To make grog, crush broken pieces of pot
in a yacona pounder or with a hammer or a stone. Sift the crushed
pieces through a fine screen. Remove any piece left in the
screen, crush again, and rescreen. Grog that passes through the
screen can have fine dust removed, if necessary. Too much dust
sometimes causes cracks in the finished pot. If it causes no
trouble, leave it in and do not worry. To remove the dust, winnow
as you would remove chaff from rice. In a windy open area, pour
grog from one container to another, as shown in Figure 8, allowing
ucr8x6.gif (486x486)

wind to blow dust away. Any larger particles stay. Repeat
this two or three times.
III. LOCATING AND EVALUATING CLAY
In the tropics and on islands with a volcanic history, clay
deposits are younger, smaller, and often part of the original
rock. They also occur in river deltas and low areas. There are
many clay deposits on hillsides that are the result of the
weathering of a rock mass; thus you will often find clay from the
bottom to middle of low hills, as shown in Figure 9.
ucr9x6.gif (243x486)

Low lying areas, especially if water does not drain easily, probably
have clay under 1-4 feet of peat or muck. Sometimes a field
will have several feet of clay 1-2 feet below the top soil. River
and stream banks often show clay deposits under 1-2 feet of soil.
Sometimes a deposit of sand occurs close to the water, so try
digging about 20 feet from the water. Roads and irrigation
ditches often cut through clay deposits, giving easy access to
the material. Clay in easily recognizable when wet because it is
slick and shiny and has water puddles on it. When it dries, clay
cracks and has a hard smooth surface, as shown in Figure 10.
ucr10x6.gif (243x486)

Banks erode in rivulets, not smoothly, and fine clay is carried
down to the bottom where it cracks and curls when dry, as shown
in Figure 11.
ucr11x7.gif (300x600)

Two simple field tests will help to establish whether a deposit
is actually clay. The only true test is in the fire, but a lot of
non-clay material can be discarded by performing these tests:
First, moisten a lump of test material and knead it until it is
free of large lumps and the consistency of putty or bread dough.
Squeeze an egg-sized piece in one hand, as shown in Figure 12. If
ucr12x7.gif (270x540)
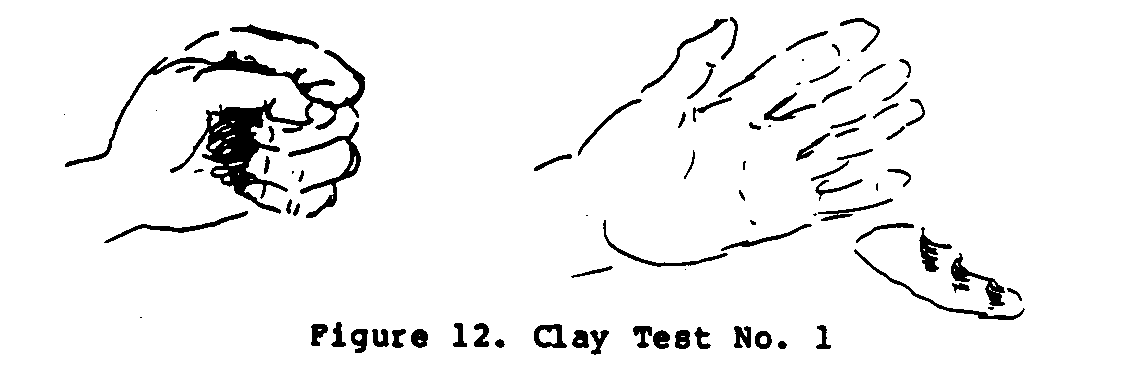
the lump holds together, does not crumble, and retains the clear
impression of your hand, as shown in Figure 12, it may be clay.
Second, take another small piece of the kneaded material and roll
out a pencil-sized coil. Send this around one finger. If it bends
without cracking or only cracks slightly, as shown in Figure 13,
ucr13x7.gif (270x540)

it may be clay.
IV. PROCESSING CLAY
The materials you will need to process clay include a shovel, a
piece of window screen mounted on a frame, two or three pails or
other large containers, several pieces of cloth (cotton sheeting
or muslin) and plastic bags.
Build a 1 foot x 1 foot frame out of 2 inch x 2 inch lumber or 1
inch x 2 inch lumber, as shown in Figure 14.
ucr14x8.gif (243x486)

Firmly tack the window screen on one side of the frame so there
are no gaps, as shown in Figure 15.
ucr15x8.gif (486x600)

You are now ready to make clay in quantity. Remember that the
longer it can sit in the plastic state, the better it will be
when you use it. Follow these instructions:
1. Break up lumps to golf ball size or smaller and spread out
to dry. If collecting large quantities, store in bulk and
spread to dry as needed.
2. When clay is completely dry, put it into water to slake.
Use a 44-gallon drum or large pail half filled with water.
Clay should not be above water.
3. Let stand without stirring until the clay softens. This can
vary from a few hours to a few days, depending on the clay.
4. Stir vigorously with a paddle or by hand, adding water as
necessary, until the clay is the consistency of thin cream.
The clay is now-slip.
5. Dip out slip and screen through a window screen or a 30-mesh
sieve. This depends on clay and tooth desired.
6. Some clays will settle readily at this consistency, if
allowed to stand for several hours. This leaves clear water
on top which may then be siphoned or poured off to make
drying easier.
MIXING CLAYS
Clays can be mixed before processing or after they are made into
slip. Use the following procedure to mix before processing: If
the clay contains a high proportion of rock fragments or other
large non-clay particles, and you wish to blend it with other
clays, it helps to know the amount of material that will be removed
by the screening. Suppose you want to blend two clays, A
and B. Assume Clay A has 20 percent residue and Clay B has 5 percent
residue. You can blend the two clays before processing
(which is much easier) by adding 20 percent extra of Clay A and 5
percent extra of Clay B to whatever blend you are making. After
making slip and screening, the proper proportions of the blend
will result.
To determine the amount of non-clay residue, follow these steps:
1. Weigh out 100 grams of dried clay or measure out by volume,
10 small measures (such as spoonfuls).
2. Add weighed or measured amount of dry clay to water in a
container. Water should cover clay fully. Allow to slake
from 1 to 24 hours, depending on how quickly the clay breaks
down in the water. When slaked, stir until no lumps remain.
Add water, if needed, until consistency of cream is reached.
3. Pour through a screen into a second container. Dry residue
(what is left in screen). Extra water may be poured over
residue in screen to wash away any clay remaining.
4. Weigh or measure residue, as shown in Figure 16.
ucr16x10.gif (540x540)

To mix clays after they are made into slip, you must know the dry
weight of the materials in a known amount of slip. The dry weight
of ingredients can be calculated using the following formula:
W = P - 20(g)
-----------
g-1
where:
W = the dry weight needed
P = the weight in ounces of one pint of slip
g = the specific gravity of the solid
20 = the weight in ounces of one pint of water.
The specific gravity of pure water is about 1.
The specific gravity of clay is about 2.6.
The specific gravity of potash spar is about 2.56.
The specific gravity of flint (silica) is about 2.65.
If two or more local clays are to be mixed as slips, determine
the correct proportion by the above formula. It is not necessary
to return the slips to the mixer, just stir them to assure a mixed
batch.
When adding dry ingedients such as feldspart determine dry weight
of clay in the slip. Start with a small amount of water. Add a
known amount of the slip. Then, slowly add other dry ingredients
as needed to complete the correct proportion. Add water, as needed,
to retain slip consintency. When mixed, dip out and allow to
settle. It should not be necessary to screen at this point.
Which ever method is used, you should now have a slip that contains
all of the desired ingredients, including grog, if called
for.
DRYING CLAY SLIP
There are several popular methods of drying clay slip: (1)
plaster bats; (2) clay bats; (3) drying clay with bricks; (4)
drying clay in a cloth bag; (5) drying clay with cloth and sand;
and (6) drying clay in a frame.
Plaster Bats
Make large plaster bats over a lump of plastic clay approximately
12 to 18 inches by 24 to 30 inches by 4 to 6 inches. Use strips
of burlap dipped in plaster to strengthen and make wall approximately
1 inch thick. See Figure 17. Fill with clay slip.
ucr17x11.gif (200x600)

Several bats will be needed as they must be dried after each use.
It takes two days or more to dry the clay. Bats take considerably
longer to dry unless a kiln is running.
Clay Bats
Clay bats can be made and bisque-fired at a low temperature, if a
good porous body is available. They should be smaller than the
plaster ones and fired no higher than 900 degrees Centigrade.
They work quite well and have the advantage of not contaminating
the clay with non-clay materials. See Figure 18. Large bisque-fired
ucr18x11.gif (285x285)

clay bowls can also be used, provided they are at least an
inch thick.
Drying Clay with Bricks
Using low-fired commercial brick or homemade ones, build a floor
raised on bricks, set crosswise to give air circulation underneath.
Set other bricks at the edges to contain the clay and pour
slip inside. Cover with other bricks so drying is even. See Figure 19.
ucr19x12.gif (200x600)

Drying Clay in a Cloth Bag
As shown in Figure 20, make a bag big enough to hold a basketball
ucr20x12.gif (300x600)

out of thin canvas or sheeting; fill with slip and tie up the
open end with a rope. Hang where water can drip out. This method
is quite effective but often uneven, leaving dry edges and
liquid centers. Combined with bats, it works well, since much of
the water can be removed before putting in the bats.
Drying Clay with Cloth and Sand
As shown in Figure 21, scoop a shallow hole in dry sand and lay
ucr21x12.gif (162x486)

the cloth in it. Fill the hollow with slip. In a dry area and on
a dry day this works quite well. It takes from one to three days
to dry to a plastic consistency.
Drying Clay in a Frame
As shown in Figure 22, make a 2 foot square out of 2 inch by 2
ucr22x13.gif (200x600)
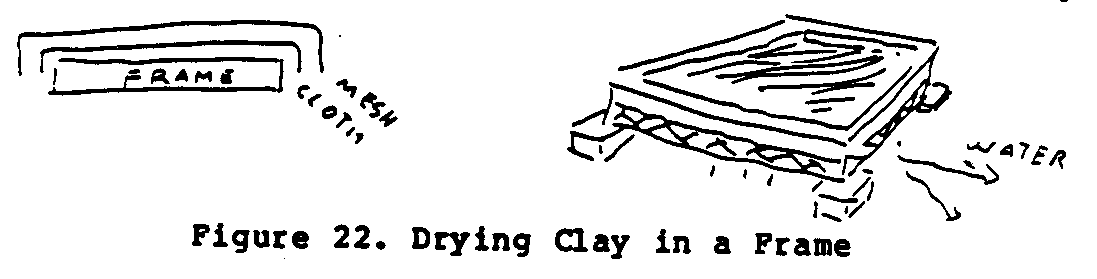
inch wood. Cover one side with cloth and then wire mesh, such as
chicken wire, to keep the cloth from sagging. Make a rack or
arrange bricks to hold up the edges of the frame so cloth does
not touch. Water drips out and if watched for uneven drying, this
works quite well. Store plastic clay in airtight plastic bags or
plastic garbage cans. The longer, the better, since clay improves
with
CLAY MIXERS
If a mechanical mixer is available, set it up in a separate drum
and add water to cover blade. Start mixer in water and add slip
clay slowly with additional water as needed to make a thin,
creamy consistency. Mix until lumps are gone. Once mixer is
started, do not stop and restart, as the lumpy slip can cause the
motor to burn out. Strength of the motor will determine the
amount of clay you are able to mix at one time. One-half horsepower
will mix about one-third (1/3) of a drum, if used with
caution so as not to overload. A typical clay mixer is shown in
Figure 23.
ucr23x13.gif (486x486)

Warning: Do not stop and restart mixer in slip; start only in
water. Therefore, mixing, once started, should be completed before
shutting off mixer.
If a mixer is to be built, use a shaft length and clamp to fit
container to be used. The motor should be 1/2 to 1 horsepower.
Use a 3-inch propellor made out of 1/4 by 1-1/2-inch stainless
steel welded to the shaft. Balance is most important to reduce
vibration. Set the top blade so the clay is lifted and the
bottom blade so the clay is forced down. The propellor may have
two, three, or four blades.
GLOSSARY
Absorption Sucking in of fluid (water retention) due to
porosity.
Adsorption Attraction of liquid molecules to the surface
of a solid; electrical bonding.
Alumina Oxide of Aluminum [A1.sub.2][O.sub.3].
Basalt (Basaltic) Dark igneous rock of volcanic origin and contains
iron.
Bats Large, shallow, porous containers.
Bisque (biscuit) Clay that has been fired once or the first
firing itself.
Chemical Combination of elements into new substances
or the reverse; molecules from atoms or atoms
from molecules.
Clay Alteration product of igneous rock, hydrous
silicate of alumina [A1.sub.2][O.sub.3]Si[O.sub.2]2[H.sub.2]O.
Feldspar Mineral composed of alumina, silica and either
potassium, sodium or calcium, for example:
[K.sub.2]O/[A1.sub.2][O.sub.3]/6Si[O.sub.2] is called Potash Feldspar.
Feldspathic Rock Rock composed primarily of feldspar.
Flux Any substance that lowers the melting point
of the mix.
Glaze A controlled glass bonded to the surface of a
ceramic piece.
Grog Crushed, fired clay.
Ground Glass Powdered glass, such as bottles crushed to a
powder.
Halloysite Disordered Kaolin particles often tubular in
form.
Illite Clay mineral.
Kaolin Clay mineral [A1.sub.2][O.sub.3]/2Si[O.sub.2]/2[H.sub.2]O.
Kiln Refractory containers for heating ceramic
ware.
Maturing Temperature The temperature at which the clay obtains
optimum hardness and durability without melting.
Mineral Inorganic substance.
Molecule The smallest grouping of atoms to which a
substance can be reduced without losing its
chemical identity.
Montmorillonite Clay mineral capable of both absorption and
adsorption of water.
Oxidation Conditions of burning (kiln firing) with an
excess of oxygen.
Parent Rock Original rock from which a clay is weathered.
Plaster (plaster Calcined and ground gypsum (calcium sulphate).
of Paris)
Plasticity Ability to bend without cracking.
Porous Able to absorb liquid.
Primary Clay Clay weathered in place and not transported
by water.
Reduction Conditions of burning (kiln firing) with a
lack of oxygen atmosphere of free carbon or
CO or [CO.sub.2].
Secondary Clay Clay transported in water.
Short The opposite of plastic; cracks on bending.
Silica Oxide of silicon Si[O.sub.2]; also known as quartz
or flint.
Silica Sand Particles of quartz or Si[O.sub.2].
Slake The absorption of water by clay to make a
slip.
Slip Watery clay thin enough to pour.
Slump Sagging or deformed from its own weight.
Talc Mineral containing silica; used as a body
flux.
Temperate Zone Middle latitudes of the northern and southern
hemispheres.
Thermal Shock Reaction to suddenly applied heat such as
open flame or sudden chill.
Tooth The amount and character of grit in the clay.
Weathering Action on a substance by natural forces, such
as rain, wind, freezing, and sun.
SUGGESTED READING LIST
Buchanan, W. Hand Moulded Burnt Clay-Bricks: Labour Intensive
Production. Malawi Ministry of Trade, Industry, and Tourism
(United Nations Industrial Development Organisation, Project
DP/MLW/78/003), undated.
Cardew, M. Pioneer Pottery. New York: St. Martin's Press, 1976.
Green, D. Pottery Glazes. New York: Watson Guptill Publishing,
1973.
Leach, B. A Potter's Book. Hollywood, Florida: Transatlantic
Arts, Inc., 1967.
Parry, J.P. Brickmaking in Developing Countries. Prepared for
Overseas Division, Building Research Establishment, UK.
Garston, Watford, United Kingdom: Building Research Establishment,
1979.
University of California. Division of Agricultural Sciences.
California Agricultural Experiment Station Extension Service.
Adobe Construction Method. Manual 19 (Revised). 1964.
========================================
========================================