Back to Home
Page of CD3WD Project or Back to list of CD3WD Publications
 |  |  | Feather Key Joints - Course: Techniques of fitting and assembling component parts to produce simple units. Trainees' handbook of lessons (Institut f³r Berufliche Entwicklung, 19 p.) | |  | (introduction...) | | | Introduction | | | Hints on Labour Safety | | | 1. Purpose of Feather Key Joints | | | 2. Kinds of Feather Keys and Profile Shafts | | | 3. Kinds of Feather Key Joints | | | 4. Stress on the Feather Key Joints | | | 5. Tools, Devices and Auxiliary Means |  | | 6. Technological Processes for Manufacturing Feather Key Joints and Profile Shaft Joints | | | 7. Detachment of Feather Key Joints |
|
6. Technological Processes for Manufacturing Feather Key Joints and Profile Shaft Joints
There are only slight differences between the sequences of
operations for manufacturing the different kinds of feather key joints.
6.1. Fitting Key Joints
Preparation of the keyway
For the manufacture of feather key joints it is necessary that
keyways are cut into the parts to be connected for receiving the keys. This
premachining is done by milling, broaching or shaping.

Figure 17 Individual parts
with premachined keyways
|
Do not scrape or file shaft keyways by hand - they will be
inaccurate and the correct position of the fitting key will not be guaranteed.
|
Checking of the individual parts
The external condition and dimensional accuracy of the hub and
the shaft must be checked. In doing, so find out if
- the shaft has a clean surface (no defects);
- the hub bore hole has no steps or marks;
- length, width, depth and alignment of shaft keyway and keyway
in hub are true to size (according to working drawing by vernier caliper, depth
gauge and others);
- the fit size of the shaft is exactly maintained (according to
working drawing by external limit gauge);
- the fit size of the hub is exactly maintained (according to
working drawing by plug limit gauge).
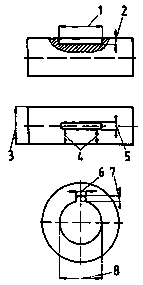
Figure 18 Checking of the
individual parts
1 length of the keyway of the shaft, 2 depth of
the keyway of the shaft, 3 fit size of the shaft, 4 alignment of shaft keyway, 5
width of the keyway of the shaft, 6 width of the keyway of the hub, 7 depth of
the keyway of the hub, 8 fit size of the hub
Deburring of the individual parts
Fitting key and keyways in shaft and hub are to be checked for
buns. If burrs are found, they are removed by file or triangular scraper.
Fitting in of the fitting key into the keyway of the hub
The hub is clamped in a vice between protective jaws.
The fitting key is shoved through the keyway of the hub by
slight pressure of the hand. If the fitting key gets stuck, the lateral surfaces
of the keyway of the hub are carefully refiled - pay attention that the surfaces
are worked evenly in order to guarantee that the fitting key is situated right
in the middle.
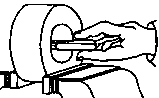
Figure 19 Fitting in of the
key in the keyway of the hub
Fitting in of the fitting key in the keyway of the shaft
By a press or screwing device, the fitting key is forced into
the keyway of the shaft evenly and without canting.

Figure 20 Fitting in of the
key in the keyway of the shaft
|
Do not force in the fitting key by a hammer - it will be canted
and damaged at the top and side surfaces. |
The key must perfectly fit to the internal side surfaces of the
keyway of the shaft, otherwise it may be torn out of the keyway when the rotary
power is applied.
If absolute accuracy is required, the fitting key must be fitted
in by scraping: By this technique, the side surfaces of the fitting key are
worked in such a way that it is placed in the keyway in a slight press fit
Checking of the fit of the fitting key
The fit of the fitting key has to be checked. In doing so, make
sure that
- the fitting key is parallel to the axis of the
shaft;
- the height of the fitting key is invariable over the total
length.
For testing this, profile gauges, go gauges or dial gauges can
be used.
|
When a dial gauge is used, the shaft must be placed safely on
Vee supports. For the dial gauge, a stand that can be locked in position is
required. |
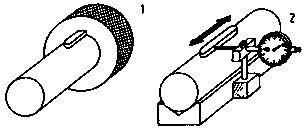
Figure 21 Checking of the fit
of the fitting key for central and parallel position
1 profile gauge ring, 2 dial
gauge
If the fitting key does not fit properly, find out if there had
already been shortcomings with the machining of the keyway. In this case, the
shaft has to be replaced or the fitting key has to be reworked till the correct
fit is achieved.
Assembly of the individual parts
The shaft journal with the key and the hub bore hole are
slightly greased. With clearance fit between shaft and hub, the hub is put on
the shaft straight and shoved over the fitting key by hand power.
With press fit (interference fit) between shaft and hub, the hub
must be forced over the shaft in hot condition and with the help of a press.
The shaft may be previously cooled, if possible.
|
When heated, the hub expands slightly thus causing a widening of
the bore hole, too.
When cooled, the shaft shrinks slightly and thus the
diameter of the shaft becomes smaller. |
When putting the parts together, make sure that the hub is not
applied in a canted way and that the keyway of the shaft and the keyway of the
hub are aligned.

Figure 22 Assembly of
the individual parts
Checking of the joint
After assembly, make sure that
- between the back of the fitting key and the keyway
of the hub there is a clearance of approximately 0.2 mm;
- the fitting key does not clatter;
- the hub is seated in its correct place on the shaft;
- true-running of the hub on the shaft is ensured.
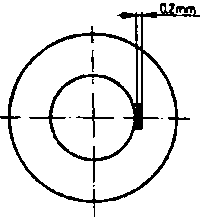
Figure 23 Checking of the
joint
With clearance and transition fits between shaft and hub, the
hub must be locked on the shaft to prevent an axial displacement of the hub.
For this purpose, shaft snap rings or retainer rings (circlips)
are fixed on the right and left side of the hub. The therefore required radial
grooves in the shaft must be free and placed exactly on the left of the hub.

Figure 24 Axial locking by
shaft snap ring
1 hub, 2 shaft, 3 grooves for shaft snap rings, 4
shaft snap ring
What are the criteria for checking the individual parts, if a
fitting key joint shall be
made?
__________________________________________________________________________
__________________________________________________________________________
__________________________________________________________________________
How tight must be the fit of the fitting key in the keyway of
the
shaft?
__________________________________________________________________________
__________________________________________________________________________
__________________________________________________________________________
How can a hub be placed on the shaft, if there is press fit
(interference fit) between the two
parts?
__________________________________________________________________________
__________________________________________________________________________
__________________________________________________________________________
What are the criteria for checking after a fitting key joint has
been
made?
__________________________________________________________________________
__________________________________________________________________________
__________________________________________________________________________
How can the axial displacement of the hub on the shaft
prevented?
__________________________________________________________________________
__________________________________________________________________________
__________________________________________________________________________
6.2. Sliding Key Joints
The sequence of operations is similar to that for manufacturing
fitting key joints:
- Preparation of the keyway.
- Checking of the
individual parts.
- Deburring of the individual parts.
- Fitting in the
sliding key into the keyway of the hub.
- Fitting in of the sliding key in
the keyway of the shaft.
- Checking of the fit of the sliding key.
-
Assembly of the individual parts.
- Checking of the joints.
Differences in comparison with the fitting key joints are to be
found with the fitting in of the key in the key-way of the shaft as well as with
the assembly of the individual parts.
Fitting in of the sliding key in the keyway of the shaft
The sliding key is pressed into keyway of the shaft by hand - it
must slip in easily. If this is not possible, the side surfaces of the key must
be reworked.
According to the dimensions of the bore holes for the holding
screws, the shaft is marked at the side. The sliding key is removed, so that the
holes can be tapped for the holding screws.
Then, the sliding key is put into the cleaned keyway of the
shaft and locked by matching holding screws.
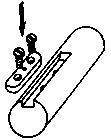
Figure 25 Fitting in and
securing of the sliding key
Assembly of the individual parts
Between shaft and hub there must be an easily adjustable
clearance fit. Otherwise, the hub must be reamed by a spiral-fluted reamer.
After this has been checked, shaft and hub are sligthly greased
and assembled by hand - large parts with the help of hoisting machines.
What enables the firm fit of the sliding key in the keyway of
the
shaft?
__________________________________________________________________________
__________________________________________________________________________
__________________________________________________________________________
What kind of fit is required between shaft and hub with a
sliding key
joint?
__________________________________________________________________________
__________________________________________________________________________
__________________________________________________________________________
6.3. Profile Shaft Joint
The following steps have to be completed:
- Preparation of the keyways.
- Checking of the
individual parts
- Deburring of the individual parts.
- Assembly of the
individual parts.
- Checking of the joint.
Corresponding to the characteristic design of the various
profile shafts, the individual steps are carried out as described for the
fitting key and sliding key joints. Special attention has to be paid that
- the external profile of the shaft and the internal
profile of the hub match accurately;
- the parts have no scratches or other
defects;
- any burrs are removed from the external edges;
- no chips or
other contamination are to be found in the keyways;
- the machine parts are
assembled carefully and without
canting.

